Cycle Analysis:
HWC: 🔼 Bullish
MWC: 🔽 Bearish
LWC: 🔽 Bearish
The mismatch between higher and lower cycles shows we're in a transitional phase — a potential pivot zone where the market is deciding whether to reverse or continue its correction.
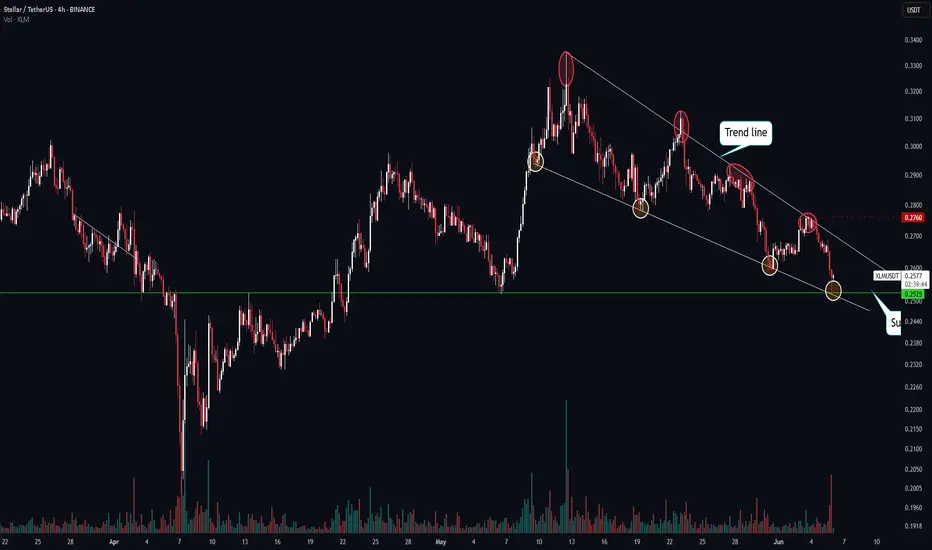
Market Structure & Pattern:
XLM is forming a clear compression pattern (either a triangle or falling wedge) with the following traits:
Upper trendline has been tested multiple times
Buyers show more pressure than sellers
Breakout to the upside looks more probable, aligning with the HWC direction
Entry Strategy:
If you're looking to enter, wait for a confirmed breakout above the pattern, ideally with:
A full-bodied 4H candle closing above the upper trendline
Volume spike supporting the breakout
Retest and successful bounce on the 15-min timeframe
📍 Stop-loss: Below the last local low
🎯 Target 1: Top of the MWC structure
🎯 Target 2: Full cycle alignment with HWC, if momentum continues
⚠️ Final Note:
Since MWC and LWC are still bearish, any long entry should be managed with tight risk control. A failed breakout could lead to a sweep of the lower range, though less likely based on current price action.
📌 Got a coin you'd like analyzed? Drop it in the comments.
⚠️ Without proper risk management, you're just a ticking time bomb.
HWC: 🔼 Bullish
MWC: 🔽 Bearish
LWC: 🔽 Bearish
The mismatch between higher and lower cycles shows we're in a transitional phase — a potential pivot zone where the market is deciding whether to reverse or continue its correction.
Market Structure & Pattern:
XLM is forming a clear compression pattern (either a triangle or falling wedge) with the following traits:
Upper trendline has been tested multiple times
Buyers show more pressure than sellers
Breakout to the upside looks more probable, aligning with the HWC direction
Entry Strategy:
If you're looking to enter, wait for a confirmed breakout above the pattern, ideally with:
A full-bodied 4H candle closing above the upper trendline
Volume spike supporting the breakout
Retest and successful bounce on the 15-min timeframe
📍 Stop-loss: Below the last local low
🎯 Target 1: Top of the MWC structure
🎯 Target 2: Full cycle alignment with HWC, if momentum continues
⚠️ Final Note:
Since MWC and LWC are still bearish, any long entry should be managed with tight risk control. A failed breakout could lead to a sweep of the lower range, though less likely based on current price action.
📌 Got a coin you'd like analyzed? Drop it in the comments.
⚠️ Without proper risk management, you're just a ticking time bomb.
Отказ от ответственности
Все виды контента, которые вы можете увидеть на TradingView, не являются финансовыми, инвестиционными, торговыми или любыми другими рекомендациями. Мы не предоставляем советы по покупке и продаже активов. Подробнее — в Условиях использования TradingView.
Отказ от ответственности
Все виды контента, которые вы можете увидеть на TradingView, не являются финансовыми, инвестиционными, торговыми или любыми другими рекомендациями. Мы не предоставляем советы по покупке и продаже активов. Подробнее — в Условиях использования TradingView.