PROTECTED SOURCE SCRIPT
RUBY SYSTEM
📋 Step 1: Setup & Installation
Add to TradingView:
Copy the entire Pine Script code from the artifact above
Open TradingView → Go to Pine Editor (bottom of screen)
Paste the code and click "Add to Chart"
Boom! Your chart now has institutional-level analysis
Customize Your Settings:
Click the ⚙️ gear icon on the indicator to adjust:
EMA Length: Keep at 9 (optimal for price action)
Stop Loss Method: Choose "Structure" (uses swing highs/lows)
Risk:Reward: TP1 at 1.5R, TP2 at 3R (customize as needed)
Volume Filter: Keep ON (avoids low-conviction moves)
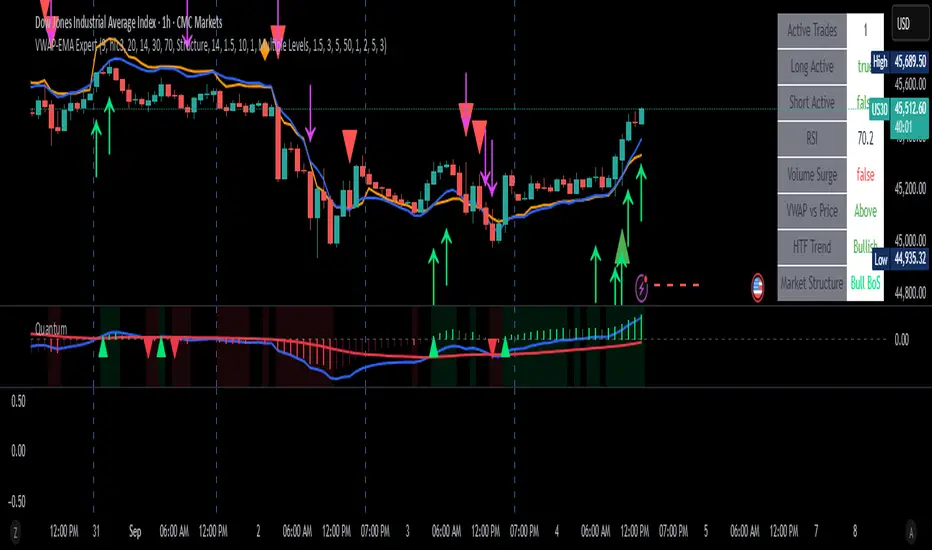
🎯 Step 2: Reading the Visual Signals
What You'll See on Your Chart:
📊 Core Lines:
🟠 Orange Line: VWAP (institutional fair value)
🔵 Blue Line: EMA 9 (trend filter)
📦 Order Flow Boxes:
🟢 Green Boxes: Bullish Order Blocks (banks bought here)
🔴 Red Boxes: Bearish Order Blocks (institutions sold here)
📱 Green/Red FVG Boxes: Fair Value Gaps (price imbalances)
🎯 Entry Signals:
🟢 Green Triangle UP: Long entry signal
🔴 Red Triangle DOWN: Short entry signal
💎 Orange Diamonds: Liquidity sweeps (stop hunts)
⬆️ Lime Arrows: Bullish Break of Structure
⬇️ Purple Arrows: Bearish Break of Structure
📏 Trade Management Lines:
🔴 Red Dashed Line: Stop Loss level
🟢 Green Dashed Line: Take Profit level
🚀 Step 3: How to Trade
🔍 BEFORE Entering Any Trade:
Check the Dashboard (top-right corner):
HTF Trend: Only trade WITH the trend
Volume Surge: Want this to be TRUE
Market Structure: Look for BoS signals
📈 LONG ENTRY Checklist:
✅ Green triangle appears (entry signal)
✅ Price above VWAP (orange line)
✅ Price above EMA (blue line)
✅ HTF Trend shows "Bullish"
✅ Volume Surge = True
✅ Recent Break of Structure UP (↑)
📉 SHORT ENTRY Checklist:
✅ Red triangle appears (entry signal)
✅ Price below VWAP (orange line)
✅ Price below EMA (blue line)
✅ HTF Trend shows "Bearish"
✅ Volume Surge = True
✅ Recent Break of Structure DOWN (↓)
💰 Step 4: Trade Management
🛑 Stop Loss (Red Dashed Line):
Automatically calculated at recent swing high/low
NEVER move your stop against you
Only move to break-even after hitting first target
🎯 Take Profit (Green Dashed Line):
TP1: 1.5 Risk:Reward (take 50% profits)
TP2: 3.0 Risk:Reward (take remaining 50%)
Or hold until price closes opposite side of EMA
🚪 Exit Rules:
LONG: Exit when price closes BELOW EMA (blue line)
SHORT: Exit when price closes ABOVE EMA (blue line)
Or hit your stop loss
🏆 Step 5: Advanced Strategies
🎪 The "Liquidity Sweep" Setup:
Wait for orange diamond (liquidity sweep)
Look for immediate reversal back into structure
Enter when green/red triangle confirms
These are PREMIUM setups - highest win rate
📦 The "Order Block Retest":
Wait for price to hit a green/red box (order block)
Look for rejection from that zone
Enter when triangle signal appears
Institutions often defend these levels
🔄 The "VWAP Retest":
Price breaks VWAP with volume
Comes back to retest VWAP (orange line)
Gets support/resistance at VWAP
Enter on triangle signal confirmation
🚨 Step 6: Risk Management Rules
⚠️ NEVER Trade When:
Volume Surge = False (low conviction)
HTF Trend contradicts your direction
No Break of Structure signal
Market Structure shows "Ranging"
💡 Position Sizing:
Risk 1-2% per trade maximum
Use the stop loss line to calculate position size
Never risk more than you can afford to lose
📊 Best Timeframes:
5M-15M: Scalping (quick in/out)
1H-4H: Swing trading (hold longer)
Daily: Position trading
🎯 Quick Start Checklist:
✅ Add indicator to chart
✅ Wait for green/red triangle signal
✅ Check dashboard shows favorable conditions
✅ Confirm HTF trend alignment
✅ Enter trade at signal
✅ Set stop at red dashed line
✅ Take profits at green dashed line
✅ Exit if price closes opposite side of EMA
🚀 Pro Tips:
Be patient - wait for ALL confirmations
Quality over quantity - fewer high-probability trades win
Practice on paper before going live
Backtest on historical data to build confidence
Set up alerts so you don't miss signals
Add to TradingView:
Copy the entire Pine Script code from the artifact above
Open TradingView → Go to Pine Editor (bottom of screen)
Paste the code and click "Add to Chart"
Boom! Your chart now has institutional-level analysis
Customize Your Settings:
Click the ⚙️ gear icon on the indicator to adjust:
EMA Length: Keep at 9 (optimal for price action)
Stop Loss Method: Choose "Structure" (uses swing highs/lows)
Risk:Reward: TP1 at 1.5R, TP2 at 3R (customize as needed)
Volume Filter: Keep ON (avoids low-conviction moves)
🎯 Step 2: Reading the Visual Signals
What You'll See on Your Chart:
📊 Core Lines:
🟠 Orange Line: VWAP (institutional fair value)
🔵 Blue Line: EMA 9 (trend filter)
📦 Order Flow Boxes:
🟢 Green Boxes: Bullish Order Blocks (banks bought here)
🔴 Red Boxes: Bearish Order Blocks (institutions sold here)
📱 Green/Red FVG Boxes: Fair Value Gaps (price imbalances)
🎯 Entry Signals:
🟢 Green Triangle UP: Long entry signal
🔴 Red Triangle DOWN: Short entry signal
💎 Orange Diamonds: Liquidity sweeps (stop hunts)
⬆️ Lime Arrows: Bullish Break of Structure
⬇️ Purple Arrows: Bearish Break of Structure
📏 Trade Management Lines:
🔴 Red Dashed Line: Stop Loss level
🟢 Green Dashed Line: Take Profit level
🚀 Step 3: How to Trade
🔍 BEFORE Entering Any Trade:
Check the Dashboard (top-right corner):
HTF Trend: Only trade WITH the trend
Volume Surge: Want this to be TRUE
Market Structure: Look for BoS signals
📈 LONG ENTRY Checklist:
✅ Green triangle appears (entry signal)
✅ Price above VWAP (orange line)
✅ Price above EMA (blue line)
✅ HTF Trend shows "Bullish"
✅ Volume Surge = True
✅ Recent Break of Structure UP (↑)
📉 SHORT ENTRY Checklist:
✅ Red triangle appears (entry signal)
✅ Price below VWAP (orange line)
✅ Price below EMA (blue line)
✅ HTF Trend shows "Bearish"
✅ Volume Surge = True
✅ Recent Break of Structure DOWN (↓)
💰 Step 4: Trade Management
🛑 Stop Loss (Red Dashed Line):
Automatically calculated at recent swing high/low
NEVER move your stop against you
Only move to break-even after hitting first target
🎯 Take Profit (Green Dashed Line):
TP1: 1.5 Risk:Reward (take 50% profits)
TP2: 3.0 Risk:Reward (take remaining 50%)
Or hold until price closes opposite side of EMA
🚪 Exit Rules:
LONG: Exit when price closes BELOW EMA (blue line)
SHORT: Exit when price closes ABOVE EMA (blue line)
Or hit your stop loss
🏆 Step 5: Advanced Strategies
🎪 The "Liquidity Sweep" Setup:
Wait for orange diamond (liquidity sweep)
Look for immediate reversal back into structure
Enter when green/red triangle confirms
These are PREMIUM setups - highest win rate
📦 The "Order Block Retest":
Wait for price to hit a green/red box (order block)
Look for rejection from that zone
Enter when triangle signal appears
Institutions often defend these levels
🔄 The "VWAP Retest":
Price breaks VWAP with volume
Comes back to retest VWAP (orange line)
Gets support/resistance at VWAP
Enter on triangle signal confirmation
🚨 Step 6: Risk Management Rules
⚠️ NEVER Trade When:
Volume Surge = False (low conviction)
HTF Trend contradicts your direction
No Break of Structure signal
Market Structure shows "Ranging"
💡 Position Sizing:
Risk 1-2% per trade maximum
Use the stop loss line to calculate position size
Never risk more than you can afford to lose
📊 Best Timeframes:
5M-15M: Scalping (quick in/out)
1H-4H: Swing trading (hold longer)
Daily: Position trading
🎯 Quick Start Checklist:
✅ Add indicator to chart
✅ Wait for green/red triangle signal
✅ Check dashboard shows favorable conditions
✅ Confirm HTF trend alignment
✅ Enter trade at signal
✅ Set stop at red dashed line
✅ Take profits at green dashed line
✅ Exit if price closes opposite side of EMA
🚀 Pro Tips:
Be patient - wait for ALL confirmations
Quality over quantity - fewer high-probability trades win
Practice on paper before going live
Backtest on historical data to build confidence
Set up alerts so you don't miss signals
Скрипт с защищённым кодом
Этот скрипт опубликован с закрытым исходным кодом. Однако вы можете использовать его свободно и без каких-либо ограничений — читайте подробнее здесь.
Отказ от ответственности
Все виды контента, которые вы можете увидеть на TradingView, не являются финансовыми, инвестиционными, торговыми или любыми другими рекомендациями. Мы не предоставляем советы по покупке и продаже активов. Подробнее — в Условиях использования TradingView.