Debt-Cycle vs Bitcoin-CycleDebt-Cycle vs Bitcoin-Cycle Indicator
The Debt-Cycle vs Bitcoin-Cycle indicator is a macro-economic analysis tool that compares traditional financial market cycles (debt/credit cycles) against Bitcoin market cycles. It uses Z-score normalization to track the relative positioning of global financial conditions versus cryptocurrency market sentiment, helping identify potential turning points and divergences between traditional finance and digital assets.
Key Features
Dual-Cycle Analysis: Simultaneously tracks traditional financial cycles and Bitcoin-specific cycles
Z-Score Normalization: Standardizes diverse data sources for meaningful comparison
Multi-Asset Coverage: Analyzes currencies, commodities, bonds, monetary aggregates, and on-chain metrics
Divergence Detection: Identifies when Bitcoin cycles move independently from traditional finance
21-Day Timeframe: Optimized for Long-term cycle analysis
What It Measures
Finance-Cycle (White Line)
Tracks traditional financial market health through:
Currencies: USD strength (DXY), global currency weights (USDWCU, EURWCU)
Commodities: Oil, gold, natural gas, agricultural products, and Bitcoin price
Corporate Bonds: Investment-grade spreads, high-yield spreads, credit conditions
Monetary Aggregates: M2 money supply, foreign exchange reserves (weighted by currency)
Treasury Bonds: Yield curve (2Y/10Y, 3M/10Y), term premiums, long-term rates
Bitcoin-Cycle (Orange Line)
Tracks Bitcoin market positioning through:
On-Chain Metrics:
MVRV Ratio (Market Value to Realized Value)
NUPL (Net Unrealized Profit/Loss)
Profit/Loss Address Distribution
Technical Indicators:
Bitcoin price Z-score
Moving average deviation
Relative Strength:
ETH/BTC ratio (altcoin strength indicator)
Visual Elements
White Line: Finance-Cycle indicator (positive = expansionary conditions, negative = contractionary)
Orange Line: Bitcoin-Cycle indicator (positive = bullish positioning, negative = bearish)
Zero Line: Neutral reference point
Interpretation
Cycle Alignment
Both positive: Risk-on environment, favorable for crypto
Both negative: Risk-off environment, caution warranted
Divergence: Potential opportunities or warning signals
Divergence Signals
Finance positive, Bitcoin negative: Bitcoin may be undervalued relative to macro conditions
Finance negative, Bitcoin positive: Bitcoin may be overextended or decoupling from traditional finance
Important Limitations
This indicator uses some technical and macro data but still has significant gaps:
⚠️ Limited monetary data - missing:
Funding rates (repo, overnight markets)
Comprehensive bond spread analysis
Collateral velocity and quality metrics
Central bank balance sheet details
⚠️ Basic economic coverage - missing:
GDP growth rates
Inflation expectations
Employment data
Manufacturing indices
Consumer confidence
⚠️ Simplified on-chain analysis - missing:
Exchange flow data
Whale wallet movements
Mining difficulty adjustments
Hash rate trends
Network fee dynamics
⚠️ No sentiment data - missing:
Fear & Greed Index
Options positioning
Futures open interest
Social media sentiment
The indicator provides a high-level cycle comparison but should be combined with comprehensive fundamental analysis, detailed on-chain research, and proper risk management.
Settings
Offset: Adjust the horizontal positioning of the indicators (default: 0)
Timeframe: Fixed at 21 days for optimal cycle detection
Use Cases
Macro-crypto correlation analysis: Understand when Bitcoin moves with or against traditional markets
Cycle timing: Identify potential tops and bottoms in both cycles
Risk assessment: Gauge overall market conditions across asset classes
Divergence trading: Spot opportunities when cycles diverge significantly
Portfolio allocation: Balance traditional and crypto assets based on cycle positioning
Technical Notes
Uses Z-score normalization with varying lookback periods (40-60 bars)
Applies HMA (Hull Moving Average) smoothing to reduce noise
Asymmetric multipliers for upside/downside movements in certain metrics
Requires access to FRED economic data, Glassnode, CoinMetrics, and IntoTheBlock feeds
21-day timeframe optimized for cycle analysis
Strategy Applications
This indicator is particularly useful for:
Cross-asset allocation - Decide between traditional finance and crypto exposure
Cycle positioning - Identify where we are in credit/debt cycles vs. Bitcoin cycles
Regime changes - Detect shifts in market leadership and correlation patterns
Risk management - Reduce exposure when both cycles turn negative
Disclaimer: This indicator is a cycle analysis tool and should not be used as the sole basis for investment decisions. It has limited coverage of monetary conditions, economic fundamentals, and on-chain metrics. The indicator provides directional insight but cannot predict exact timing or magnitude of market moves. Always conduct thorough research, consider multiple data sources, and maintain proper risk management in all investment decisions.
M-oscillator

Smart RSI Composite [DotGain]Summary
Do you want to know the "True Direction" of the market without getting distracted by noise on a single timeframe?
The Smart RSI Composite simplifies market analysis by aggregating momentum data from 10 different timeframes (5m to 12M) into a single, easy-to-read Histogram.
Instead of looking at 10 separate charts or dots, this indicator calculates the Average RSI of the entire market structure. It answers one simple question: "Is the market predominantly Bullish or Bearish right now?"
⚙️ Core Components and Logic
This indicator works like a consensus mechanism for momentum:
Data Aggregation: It pulls RSI values from 10 customizable slots (Default: 5m, 15m, 1h, 4h, 1D, 1W, 1M, 3M, 6M, 12M). All slots are enabled by default.
Smart Averaging: It calculates the arithmetic mean of all active timeframes. If the 5m chart is bearish but the Monthly chart is bullish, this indicator balances them out to show you the net result.
Histogram Visualization: The result is plotted as a histogram centered around the 50-line (Neutral).
🚦 How to Read the Histogram
The histogram bars indicate the aggregate strength of the trend based on the Average RSI:
🟩 DARK GREEN (Strong Bullish)
Condition: Average RSI > 60.
Meaning: The market is in a strong uptrend across most timeframes. Momentum is firmly on the buyers' side.
🟢 LIGHT GREEN (Weak Bullish)
Condition: Average RSI between 50 and 60.
Meaning: Slight bullish bias. The bulls are in control, but momentum is not yet extreme.
🔴 LIGHT RED (Weak Bearish)
Condition: Average RSI between 40 and 50.
Meaning: Slight bearish bias. The bears are taking control.
🟥 DARK RED (Strong Bearish)
Condition: Average RSI < 40.
Meaning: The market is in a strong downtrend across most timeframes. Momentum is firmly on the sellers' side.
Visual Elements
Center Line (50): This acts as the Zero-Line. Above 50 is bullish, below 50 is bearish.
Zone Lines (30/70): Dashed lines indicate the traditional Overbought/Oversold levels applied to the aggregate average.
Key Benefit
The Smart RSI Composite acts as a powerful Macro Trend Filter .
Pro Tip: Never go long if the Histogram is Dark Red, and avoid shorting when it is Dark Green. Use this tool to align your trades with the overall market momentum.
Have fun :)
Disclaimer
This "Smart RSI Composite" indicator is provided for informational and educational purposes only. It does not, and should not be construed as, financial, investment, or trading advice.
The signals generated by this tool (both "Buy" and "Sell" indications) are the result of a specific set of algorithmic conditions. They are not a direct recommendation to buy or sell any asset. All trading and investing in financial markets involves substantial risk of loss. You can lose all of your invested capital.
Past performance is not indicative of future results. The signals generated may produce false or losing trades. The creator (© DotGain) assumes no liability for any financial losses or damages you may incur as a result of using this indicator.
You are solely responsible for your own trading and investment decisions. Always conduct your own research (DYOR) and consider your personal risk tolerance before making any trades.

Smart RSI MTF Matrix [DotGain]Summary
Are you tired of trading trend signals, only to miss the bigger picture because you are focused on a single timeframe?
The Smart RSI MTF Matrix is the ultimate "Cockpit View" for momentum traders. Unlike chart overlays that can sometimes clutter your price action, this indicator organizes RSI conditions across 10 different timeframes simultaneously into a clean, separate Heatmap pane.
It monitors everything from the 5-minute chart all the way up to the 12-Month view , giving you a complete X-ray vision of the market's momentum structure instantly.
⚙️ Core Components and Logic
The Smart RSI MTF Matrix relies on a sophisticated hierarchy to deliver clear, actionable context:
Multi-Timeframe Engine: The script runs 10 independent RSI calculations in the background, organized in rows from bottom (Short Term) to top (Long Term).
Classic RSI Thresholds:
Overbought (> 70): Indicates price may be extended to the upside.
Oversold (< 30): Indicates price may be extended to the downside.
Smart Visibility System (The "Secret Sauce"): Not all signals are equal. A 5-minute signal is "noise" compared to a Yearly signal. This indicator automatically applies Transparency to differentiate importance. The visibility increases by 10% for each higher timeframe slot (Row).
🚦 How to Read the Matrix
The indicator plots dots in 10 stacked rows. The position and opacity tell you the direction and significance:
🟥 RED DOTS (Overbought Condition)
Trigger: RSI is above 70 on that specific timeframe.
Meaning: Potential bearish reversal or pullback.
🟩 GREEN DOTS (Oversold Condition)
Trigger: RSI is below 30 on that specific timeframe.
Meaning: Potential bullish reversal or bounce.
⚪ GRAY DOTS (Neutral)
Trigger: RSI is between 30 and 70.
Meaning: No extreme momentum present.
👻 TRANSPARENCY (Signal Strength)
The visibility of the dot tells you exactly which Timeframe (Row) is triggered. The higher the row, the more solid the color:
Faint (10-30% Visibility): Rows 1-3 (5m, 15m, 1h). Used for scalping entries.
Medium (40-60% Visibility): Rows 4-6 (4h, 1D, 1W). Used for swing trading context.
Solid (70-100% Visibility): Rows 7-10 (1M, 3M, 6M, 12M). Used for identifying major macro cycles.
Visual Elements
Structure: Row 1 (Bottom) represents the 5-minute timeframe. Row 10 (Top) represents the 12-Month timeframe.
Vertical Alignment: If you see a vertical column of Red or Green dots, it indicates Multi-Timeframe Confluence —a highly probable reversal point.
Key Benefit
The goal of the Smart RSI MTF Matrix is to keep your main chart clean while providing maximum information. You can instantly see if a short-term pullback (Faint Green Dot) is happening within a long-term uptrend (Solid Gray/Red Dot), allowing for precision entries.
Have fun :)
Disclaimer
This "Smart RSI MTF Matrix" indicator is provided for informational and educational purposes only. It does not, and should not be construed as, financial, investment, or trading advice.
The signals generated by this tool (both "Buy" and "Sell" indications) are the result of a specific set of algorithmic conditions. They are not a direct recommendation to buy or sell any asset. All trading and investing in financial markets involves substantial risk of loss. You can lose all of your invested capital.
Past performance is not indicative of future results. The signals generated may produce false or losing trades. The creator (© DotGain) assumes no liability for any financial losses or damages you may incur as a result of using this indicator.
You are solely responsible for your own trading and investment decisions. Always conduct your own research (DYOR) and consider your personal risk tolerance before making any trades.

[CT] Kurutoga MTF HistogramWhat is Kurutoga MTF Histogram?
The Kurutoga MTF Histogram is a multi-time-frame momentum and mean-deviation tool.
It measures how far the current close is trading away from a rolling midpoint of price and then displays that deviation as a color-coded histogram.
Instead of looking only at one lookback, this version plots three Kurutoga “leads” at the same time:
Kurutoga Lead (x1) – base length
Kurutoga Lead 2x – slower, 2 × base length
Kurutoga Lead 4x – slowest, 4 × base length
Each lead is calculated both on the chart’s timeframe (LTF) and on a Higher Time Frame (HTF) of your choice, so you can see short-term deviation inside a higher-time-frame structure.
4-color Kurutoga scheme
Each Kurutoga lead uses a 4-color MACD-style scheme:
For a given lead:
Up Light – divergence ≥ 0 and rising compared to the previous bar
Up Dark – divergence ≥ 0 and falling (positive but losing momentum)
Down Light – divergence < 0 and falling (bearish momentum increasing)
Down Dark – divergence < 0 and rising (negative but contracting)
By default the same four teal / red hues are shared across x1, x2, and x4. The only difference between the leads is transparency:
x1 = strongest (least transparent)
x2 = medium opacity
x4 = faintest
This lets you see all three layers at once without the chart becoming a solid block of color.
The HTF areas use the same palette but with an extra transparency offset applied, so they appear as soft background bands rather than competing with the histograms.
Inputs and how to use them
1. Base Length
Defines the lookback for the main Kurutoga Lead.
The script automatically creates:
len1 = baseLength
len2 = baseLength × 2
len3 = baseLength × 4
Smaller base lengths → faster, more reactive histograms.
Larger base lengths → smoother, trend-focused behavior.
2. Higher Time Frame
This is the HTF used for the area plots and HTF midpoints.
Examples:
5-minute chart with HTF = 30 or 60 minutes
15-minute chart with HTF = 4H or 1D
The idea is to trade on the lower timeframe while seeing how far price is stretched relative to a higher-time-frame range midpoint.
3. Show / Hide toggles
Under “Show / Hide” you can independently turn on/off:
Kurutoga Lead (x1)
Kurutoga Lead 2x
Kurutoga Lead 4x
HTF Lead, HTF Lead 2x, HTF Lead 4x
This lets you:
Run only a single Kurutoga if you want a clean panel, or
Stack multiple leads for a “multi-speed” view of extension and mean reversion.
4. Color Scheme (4-color Kurutoga)
Up Light / Up Dark / Down Light / Down Dark – base hues used for every lead.
Lead opacity (x1, 2x, 4x) – sets how strong or faint each lead appears.
x1 is usually your primary “trading speed.”
x2 and x4 can be faded so they act as context.
Extra transparency for HTF areas – additional opacity applied on top of each lead’s opacity when drawing HTF areas. This keeps the HTF layer subtle.
You can fine-tune the exact teal/red values here to match your personal palette.
Practical reading & trade ideas
Trend alignment
When all three Kurutoga leads (x1, 2x, 4x) are above zero, price is trading above its rolling mid-range on multiple speeds → bullish environment.
When all three are below zero, you have a multi-speed bearish environment.
Mixed readings (e.g., x1 above zero, x4 below zero) can signal transition or mean-reversion areas.
Momentum vs exhaustion
Up Light / Down Light (light colors) show momentum expanding in that direction.
Up Dark / Down Dark (dark colors) show momentum contracting – price still on that side of zero, but the push is weakening.
After a run of Up Light bars, a shift to Up Dark may hint at a stall or pullback.
After a run of Down Light bars, a shift to Down Dark may hint at short covering / bounce potential.
Multi-time-frame confluence
Use the HTF areas as a backdrop:
If LTF Kurutoga leads are above zero while the HTF area is also positive (and ideally expanding), that’s strong bullish alignment.
If LTF leads are trying to flip up while HTF divergence is still deeply negative, you may be looking at a counter-trend bounce rather than a true trend change.
Example setups
Trend-following entries:
Look for x2 & x4 leads on the same side of zero as the HTF area, then use x1 color shifts (from Down Dark → Up Light or vice versa) to fine-tune entries in the direction of that higher-time-frame bias.
Mean-reversion fades:
Watch for extreme Kurutoga values where x1/x2 are strongly extended beyond zero while color flips from Light to Dark (momentum stalling) against an opposing HTF backdrop .
Notes
The indicator is non-directional by itself – it measures distance from a rolling midpoint rather than trend structure or order flow. It works best when combined with your existing price action/trend tools (moving averages, HLBO, structure zones, etc.).
Because HTF values are brought down via request.security, choose HTF settings that make sense for your product and session (for example, don’t use very high HTFs on thin intraday markets).
Use the Kurutoga MTF Histogram as a visual scanner for extension, momentum regime, and multi-speed alignment, then layer your own entry/exit rules on top.

Predictive Analysis Engine — Adaptive MACD Forecasting with R² SProfessional and Rule-Compliant Description (Ready for Publishing)
This description explains every component of the script in detail, highlights its originality, and provides traders with clear usage instructions — exactly what TradingView expects.
Predictive Analysis Engine (PAE)
This script is a predictive analysis model that combines trend filtering, linear forecasting, stability analysis (R²), and outlier filtering using ATR to produce an advanced, leading-style version of MACD rather than a traditional lagging one.
The indicator does not rely on random elements; it is built on four core components that work together:
1. Stability Measurement Using R²
The coefficient of determination (R²) is calculated based on the correlation between price and time, then normalized to a 0–1 scale.
A higher R² indicates more stable price movement, allowing the script to increase forecast accuracy.
Here, R² acts as a primary component of the Confidence Filter.
2. Forecasted Price Using Linear Regression
Instead of relying solely on the current price, the script uses:
Linear Regression
Weighted blending between the forecasted price and actual price
This enables the script to build a Leading MACD based on an “advanced” price that anticipates probable movement.
3. Advanced MACD With Adaptive Smoothing
MACD is applied to the blended (real + forecasted) price using:
Fast EMA
Slow EMA
MACD base
Optional TEMA for reducing signal lag
Adjustable histogram smoothing
This process makes MACD more responsive with significantly less lag, reacting faster to predicted movements.
4. Predictive MACD (Projected MACD)
Linear Regression is applied again — but this time to:
MACD
Signal
Histogram
to generate projected versions of each line (proj_macd, proj_signal), while proj_hist is used to produce early signals before the actual crossover occurs.
5. Volatility Filtering Using ATR & Volatility Ratio
ATR is used to evaluate:
Strength of movement
Overextension levels
Signal quality
ATR is combined with R² to compute:
Confidence = R² × Volatility Ratio
This suppresses weak signals and boosts high-quality, reliable ones.
6. Predictive Signals + Safety Filters
A signal is triggered when:
proj_hist crosses the 0 level
Confidence exceeds the required threshold
The real histogram is not excessively stretched (extra safety)
The script includes:
BUY / SELL
BUY_STRONG / SELL_STRONG
based on the smoothed histogram trend.
7. Coloring, Background & Visual Enhancements
The script colors:
The histogram
Chart background
Signal lines
to clearly highlight momentum direction and confidence conditions.
8. Built-In Alerts
The script provides ready-to-use alerts:
BUY Alert
SELL Alert
Both based on the predictive MACD model.
How to Use the Script
Add it to any timeframe and any market.
BUY/SELL signals are generated from the projected histogram crossover.
Higher Confidence = stronger signal.
Background colors help visualize trend transitions instantly.
Recommended to combine with support/resistance or price action.
Indicator Objective
This script is designed to deliver early insight into momentum shifts using a blend of:
Linear forecasting
Trend stability via R²
Signal quality filtering via ATR
A fast and adaptive advanced MACD

Smart RSI MTF [DotGain]Summary
Are you tired of constantly switching between timeframes to check the RSI, only to miss the bigger picture?
The Smart RSI MTF (Multi-Timeframe) is designed to solve this exact problem. It is a streamlined chart overlay that monitors RSI conditions across up to 10 different timeframes simultaneously —from the 1-minute chart all the way up to the Monthly view.
This indicator removes the need for multiple open tabs and declutters your analysis by plotting signals directly on your main chart using a smart "visual hierarchy" system based on transparency.
⚙️ Core Components and Logic
The Smart RSI MTF relies on a sophisticated 3-layer logic to deliver clear, actionable context:
Multi-Timeframe Engine: The script runs 10 independent RSI calculations in the background. It checks standard intervals (5m, 15m, 1h, 4h, Daily, Weekly, Monthly) to ensure you never miss a momentum extreme on any scale.
Classic RSI Thresholds:
Overbought (> 70): Indicates price may be extended to the upside.
Oversold (< 30): Indicates price may be extended to the downside.
Smart Visibility System (The "Secret Sauce"): Not all signals are equal. A 5-minute Overbought signal is "noise" compared to a Weekly Overbought signal. This indicator automatically applies Transparency to differentiate importance:
Minutes = High Transparency (Faint).
Hours = Medium Transparency.
Days/Weeks/Months = No Transparency (Solid/Bold).
🚦 How to Read the Indicator
The indicator plots shapes (Labels by default) directly above or below the candles. The appearance tells you the direction and the timeframe significance:
🟥 RED SIGNALS (Overbought Condition)
Trigger: RSI is above 70 on a specific timeframe.
Location: Placed above the candle bar.
Meaning: Potential bearish reversal or pullback.
🟩 GREEN SIGNALS (Oversold Condition)
Trigger: RSI is below 30 on a specific timeframe.
Location: Placed below the candle bar.
Meaning: Potential bullish reversal or bounce.
👻 TRANSPARENCY (Signal Strength)
Faint/Ghostly: The signal comes from a lower timeframe (e.g., 5m, 15m). Use for scalping or entry timing.
Solid/Bright: The signal comes from a major timeframe (e.g., Daily, Weekly). Use for swing trading and identifying major market turns.
Visual Elements
Symbol Shapes: Fully customizable (Label, Diamond, Circle, Triangle, etc.) via settings.
Stacking: If multiple timeframes trigger at once, symbols will overlay, creating a visually denser and darker color, indicating Confluence .
Key Benefit
The goal of the Smart RSI MTF is to help traders instantly spot Confluence . When you see a faint short-term signal align with a solid long-term signal, you have identified a high-probability reversal zone without leaving your chart.
Have fun :)
Disclaimer
This "Smart RSI MTF" indicator is provided for informational and educational purposes only. It does not, and should not be construed as, financial, investment, or trading advice.
The signals generated by this tool (both "Buy" and "Sell" indications) are the result of a specific set of algorithmic conditions. They are not a direct recommendation to buy or sell any asset. All trading and investing in financial markets involves substantial risk of loss. You can lose all of your invested capital.
Past performance is not indicative of future results. The signals generated may produce false or losing trades. The creator (© DotGain) assumes no liability for any financial losses or damages you may incur as a result of using this indicator.
You are solely responsible for your own trading and investment decisions. Always conduct your own research (DYOR) and consider your personal risk tolerance before making any trades.
QCO - "Science" Based OSC This indicator, called QCO - Quantum Confluence OSC, combines three different types of information into one oscillator: trend, momentum, and volume-based order flow. It is designed to show when these three elements line up in the same direction.
Here is how it actually works, step by step, in simple terms.
////triangle disabled///
First, it calculates three separate components:
1. Trend component
It uses an 8-period and a 21-period exponential moving average. When the fast EMA is above the slow one, the trend is considered up, and vice versa. It then measures how far apart the two EMAs are compared to the current volatility (ATR). This distance is turned into a number between -1 and +1.
2. RSI component
It takes the standard 14-period RSI, subtracts 50, and divides by 30 so the result also moves roughly between -1 and +1. This keeps RSI on the same scale as the other two parts instead of letting it dominate just because it can reach 0-100.
3. Cumulative Volume Delta (CVD) component
On every green candle it adds the volume, on every red candle it subtracts the volume, and keeps a running total. This running total is then normalized (turned into a z-score) over the last 100 bars on the current timeframe. If the MTF option is enabled, it also pulls normalized CVD from the 5-minute and 15-minute charts and mixes them in with lower weights (60% current, 30% 5-min, 10% 15-min). The final CVD value is again clamped between -1 and +1.
These three numbers are multiplied by fixed weights (normally 35% trend, 35% RSI, 30% CVD) and added together to create one combined raw score. A short 3-period EMA smooths this raw score slightly so the line is readable.
The weights can shift a little if the regime filter is turned on: in very volatile periods it gives more weight to trend and less to CVD; in very quiet periods it gives a bit more weight to RSI.
A separate check called “resonance” looks at whether at least two of the three components have the same sign. If all three agree strongly, resonance is marked as high and the background gets a gold tint.
Divergence protection (optional) looks back 10 bars: if price makes a higher high but the 1-minute CVD is weaker than its previous peak, sell signals are blocked. The same idea works in reverse for bullish divergence on lows.
Signals appear only when:
- The smoothed score is beyond the user-set threshold (default 1.0, adjustable)
- The basic trend (8/21 EMA) agrees with the direction
- RSI is not already overbought for buys or oversold for sells
- Divergence protection (if enabled) does not block the signal
Strong signals (gold triangles) require high resonance. Regular signals (green/red triangles) fire even with lower agreement.
The oscillator itself plots between roughly -1.5 and +1.5, with zero as the center line. A small table in the corner shows the current state of trend, RSI level, CVD direction, total score, active signal, and resonance level.
That is the complete mechanism. It does not repaint, uses only past and current data, and works on any timeframe or asset that has volume.
What actually makes this oscillator different from the thousands of others on TradingView comes down to a few practical choices that most scripts ignore:
- It forces real confluence. Most oscillators only look at one thing (price or momentum). This one requires trend, momentum, and order-flow-based volume to point the same way before it gives a strong signal. Weak or conflicting readings produce no gold signal or no signal at all.
- It uses properly normalized inputs. Trend strength, RSI, and CVD are all forced onto the same -1 to +1 scale using statistically sound methods (ATR for trend, fixed division for RSI, z-score for CVD). This means none of the three can bully the final score just because it naturally swings wider.
- It brings in higher-timeframe order flow without repainting. Pulling normalized 5-minute and 15-minute CVD into a 1-minute chart is rare in public scripts and usually done wrong. Here it is coded cleanly with request.security and blended with sensible weights.
- It adapts the weighting to the market regime. In choppy, low-volatility ranges it leans more on RSI; in fast trending or high-volatility moves it leans more on trend and less on short-term CVD noise. Very few free indicators do this automatically.
- It has working hidden divergence protection on the CVD, not just regular price/RSI divergence. Since CVD reflects actual buying and selling pressure, this filter catches a lot of traps that normal divergence detectors miss.
- Resonance filter is simple but powerful: it literally counts how many of the three components agree. This single extra condition turns a decent oscillator into one that only screams when the probability is genuinely higher.
- The final line is lightly smoothed (3-period EMA on the combined score), so it moves fast enough for scalping but does not jump on every tick like most raw oscillators.
Because of these points, the signal-to-noise ratio is noticeably higher than a plain RSI, Stochastic, MACD, or even most “smart money” scripts that just plot cumulative delta without normalization or confluence checks. The gold triangles especially do not appear often, but when they do, multiple independent market forces are aligned at the same time.
\\\\\\\\\\\\\\\\\\\\\\\\\\\\\\\\\\\\\\\\\\\\\\\\\\\\\\\\\\\\\\\\\\\\\\\\\\\\\\\\\\\\\\\\\\\\\\
### Colors and what they mean
The indicator uses color in three places: the line, the background, and the signal triangles. Each one tells you something specific.
**The main line (Quantum Score)**
- Bright cyan (#00BCD4): this is the actual oscillator line you watch.
- Above zero = overall bullish pressure.
- Below zero = overall bearish pressure.
- The farther from zero, the stronger the combined pressure.
Typical range is roughly -1.5 to +1.5. Crosses of zero are not automatic signals (it needs more conditions), but they show when the balance flips.
**Background color**
- Light gold with transparency: High Resonance. All three components (trend, RSI, CVD) are clearly agreeing. This is the highest-conviction state.
- Very light green: trend is up but resonance is only medium or low.
- Very light red: trend is down but resonance is only medium or low.
- Grayish when flat: no clear trend or everything is mixed.
**Signal triangles**
- Large gold triangle up (bottom of pane): STRONG BUY → high resonance + all filters passed.
- Large gold triangle down (top of pane): STRONG SELL → same but bearish.
- Normal-sized green triangle up: regular buy (conditions met but components do not fully agree).
- Normal-sized red triangle down: regular sell (same, weaker agreement).
**The small table (top-right corner)**
- Trend: UP (green) or DN (red)
- RSI: number + color (red if >70, blue if <30)
- CVD: BUY (green) / SELL (red) / NEUT (gray)
- Score: current value of the cyan line
- Signal: BUY / SELL / WAIT
- Resonance: HIGH (gold) or LOW (gray)
### How to read it in practice
1. Wait for the cyan line to be clearly above or below zero. Close to zero usually means indecision.
2. Look at the background first:
- Gold background → pay maximum attention, probability is highest.
- Green or red background → direction is still valid, but not as powerful.
3. When a triangle appears:
- Gold large triangles: enter aggressively if your higher-timeframe bias agrees. These are the cleanest moves.
- Normal green/red triangles: still usable, especially if price is at support/resistance or you already have a position and want to add.
4. No triangle at all, even if the line is far from zero? One of the filters is blocking (usually RSI already overbought/oversold or hidden CVD divergence). It is deliberately staying quiet.
5. Quick checklist before taking a gold signal:
- Cyan line on the correct side of zero
- Background gold
- Gold triangle just printed
- Table shows “BUY” or “SELL” and “HIGH” resonance
That combination happens only a few times per day on most pairs, sometimes less.
In short: ignore everything until you see gold background + line up/down. That is when trend, momentum, and actual order flow are all pushing the same way at the same time. Everything else is secondary information or lower-probability setups.
BUY condition (table turns to BUY + line usually turns yellow)
All five must be true on the same bar:
finalScore > baseSensitivity
(default threshold = 1.0, you can lower it to 0.6–0.8 if you want more signals)
emaFast (8) > emaSlow (21) → trendUp = true
rsi ≤ 70 → not overbought
If “Divergence Protection” is enabled → no bearish hidden CVD divergence in last 10 bars
(price ≥ highest high of last 10 bars AND cvd1m_norm < highest cvd1m_norm of last 10 bars − 0.3)
Internally the rawScore is positive and rising (because finalScore is a 3-period EMA of it)
When all of the above are true → the table shows “BUY” in green and the oscillator line usually (but not always) turns yellow because resonance is high.
SELL condition (table turns to SELL + line usually turns yellow)
All five must be true:
finalScore < −baseSensitivity
emaFast (8) < emaSlow (21) → trendDown = true
rsi ≥ 30 → not oversold
If “Divergence Protection” is enabled → no bullish hidden CVD divergence in last 10 bars
(price ≤ lowest low of last 10 bars AND cvd1m_norm > lowest cvd1m_norm of last 10 bars + 0.3)
rawScore negative and falling
When all are true → table shows “SELL”.
///////////////////////////////////////////////////////////////////
The QCS oscillator is not copied from any single academic paper, but almost every technical choice inside it comes from established, tested concepts that appear repeatedly in serious quantitative and institutional trading literature. Here are the real scientific or evidence-based roots for each major part:
1. **EMA 8 and EMA 21 for trend**
Widely used in institutional trend-following systems (examples: Aberration, many CTA trend models). The 8/21 combination is close to the classic 10/20 or 12/26 that appear in papers on adaptive moving averages and has been back-tested extensively in futures and forex since the 1990s.
2. **Trend strength normalized by ATR**
Directly from Kaufman (1995, 1998), Schwager, and later from papers on “volatility-adjusted momentum” (e.g., “Normalized Momentum” studies). Dividing price separation by ATR turns the raw difference into a dimensionless, comparable score across assets and timeframes – a standard technique in academic risk-parity and volatility-scaled strategies.
3. **RSI re-centered and re-scaled to -1 / +1**
Comes from statistical normalization practices in quantitative finance. Raw RSI is bounded 0-100, so it distorts weighted combinations. Re-scaling it to the same units as the other components is exactly what portfolio-construction and factor-investing literature does when combining signals of different native scales (see Grinold & Kahn, “Active Portfolio Management”).
4. **Cumulative Volume Delta (CVD) with z-score normalization**
Order-flow and volume-delta research exploded after 2010 with papers from the CME Group, Easley et al. (VPIN, 2012), and many microstructure studies. Normalizing cumulative delta by its own rolling standard deviation is the standard way high-frequency and market-making firms turn raw delta into a usable stationary signal (see Hasbrouck, “Empirical Market Microstructure” and many follow-up papers).
5. **Multi-timeframe order flow blending**
Institutional delta scalping desks and prop firms routinely look at delta on 1 m, 5 m, and 15 m simultaneously. Blending higher-timeframe delta with lower weights is a direct copy of how professional cumulative-delta tools (Bookmap, Jigsaw, Sierra Chart clusters) filter noise.
6. **Regime-dependent weighting (high vol → trust trend more, low vol → trust oscillators more)**
Straight from regime-switching literature (Ang & Bekaert, Hamilton time-series regime models) and practical papers like “Trend Following in Different Volatility Regimes” (Clare, Seaton, etc.). The exact thresholds (1.3× and 0.7× average ATR) are simplified but follow the same logic used in many volatility-regime filters.
7. **Hidden divergence on volume delta instead of just price**
Comes from modern order-flow literature. Classic price/RSI divergence is well known, but hidden divergence between price and cumulative delta is a much stronger filter according to microstructure research and papers on “aggressive order flow” (e.g., studies using TAQ data and signed volume).
8. **Requiring pairwise agreement (the resonance score)**
This is a very simple form of factor concordance or ensemble agreement, a technique used in almost all professional quantitative models to reduce false positives. Academic factor-timing papers (Asness, Frazzini, etc.) and ensemble machine-learning literature show that requiring multiple independent signals to agree dramatically improves Sharpe ratio.
So while no single university paper is titled “Quantum Confluence OSC,” every single mechanism inside the indicator is copied from concepts that have been published, back-tested, and used for decades in real institutional or high-level quantitative trading. That is why it feels cleaner and more robust than 99% of retail indicators — it is built from the same building blocks that actual trading firms use, just simplified into one Pine Script.

Qosh GRC 3Qosh GRC 3
Comprehensive indicator for crypto market analysis with advanced correlation capabilities and wave strength assessment.
Core Components
Mid Index (Green line)
Dynamic middle line based on EMA with hesitation filter. Determines current market zone (Bull/Bear).
Settings:
• Length: 230 (default)
• Hesitation: 0.0001
Mid Index 2 (Black line)
Channel middle line based on highest/lowest values. Visibility depends on slope (>0.15% change over 4 bars).
Settings:
• Length: 20 (default)
SMA
Two moving averages for trend analysis:
• SMA A (red): 50 periods
• SMA B (blue): 200 periods
Main Bars with Open Interest
Bar color depends on Open Interest level:
• Blue = bullish bar
• Red = bearish bar
• Opacity inversely proportional to OI (higher interest → more saturated color)
opacity = reverseAndRound(((oi_smoothed * 100 / 1)) / 2)
bar_color = color.new(close >= open ? color.blue : color.red, opacity)
Oscillators (Lord Caramelo)
BTC Oscillator
Semi-transparent green oscillator based on BTCUSDT. Shows Bitcoin's base movement for comparison.
Main Oscillator (4 candles)
Price movement decomposition into 4 components:
• Verde (green) — bullish strength
• Branca (white) — neutral zone
• Vermelha (red) — bearish strength
• Azul (blue) — baseline
Wave Strength (Candle Strength)
Displayed on top of main oscillator:
• Aqua = bullish wave
• Maroon = bearish wave
Candle height = wave intensity (based on TCUD calculations).
Critical Levels
• 0.2 (green) — oversold zone
• 0.8 (purple) — extreme overbought
Critical Zone Indication
Background colors when oscillator breaches critical levels and price diverges from Mid Index >2%:
• Blue background = bullish extremity
• Red background = bearish extremity
Correlation
Correlation A (primary)
Correlation of current asset with selected ticker (default BTCUSDT). Displays scaled candles of correlating asset.
Correlation B and C (additional)
Correlation calculation between two arbitrary ticker pairs.
Information Table
Top right corner displays:
• Movement strength of Mid Index and Mid Index 2
• Correlation values A/B/C
• Current market state (Bull/Bear)
━━━━━━━━━━━━━━━━━━━━━━

VMS Multi Index Options Buying IndicatorDetailed User Guide
This system is a multi-faceted toolkit designed for traders who use options. It synthesizes information from the underlying asset, specific call and put options, and market structure to generate a consolidated view.
Core Philosophy:
The tool is built on the principle of "Multi-Timeframe, Multi-Indicator Confirmation." It avoids relying on a single signal. Instead, it seeks confluence between momentum, trend, market structure, and volume data across different components (underlying, call, and put) before suggesting a trade.
1. The Legal Agreement & Setup
Getting Started: The first thing you will see is a mandatory disclaimer. You must type "agree" into the input field to activate the indicator and acknowledge the associated risks.
Defining Your Instruments: The core of the setup is specifying the two options you want to analyze.
Call Option Symbol: Input the specific symbol for the call option you are tracking.
Put Option Symbol: Input the specific symbol for the put option you are tracking (typically, these would be similar strike prices and expiry).
2. Understanding the Primary Signal
The main trading signal is derived from a multi-index analysis applied separately to your chosen call and put options.
The Histogram (Momentum Gauge):
You will see two histograms (bar charts) on the main panel.
The top section (above the zero line) represents the Call Option's momentum.
The bottom section (below the zero line) represents the Put Option's momentum.
Interpretation:
Green Bars (Call) / Red Bars (Put): Indicate a "BUY" signal for that respective option.
Yellow Bars (Call) / Orange Bars (Put): Indicate a "WEAK" or cautionary signal.
Gray Bars: Indicate "NO TRADE" conditions.
The height and position of the bars show the strength and direction of the momentum oscillator.
The Signal Dashboard (Your Command Center):
A table provides a numerical breakdown of the signal strength. This is where you get the "why" behind the colors.
Overall Signal: The final verdict ("BUY CALL", "WEAK PUT", "NO TRADE").
Strength (/7): A score out of 7 for each option. A score of 4 or higher is considered a strong signal. A score of 3 is weak. This score is an aggregate of several factors:
Momentum Oscillator Value & Direction
Momentum above a defined threshold
Short-term vs. Long-term trend alignment
"Squeeze" state (a volatility contraction indicator)
A bonus for fresh momentum crossovers.
Key Takeaway: Look for the option with the higher strength score, and only consider trades when the score is 3 or above, with a preference for scores of 4+.
3. Integrating Market Context
The indicator overlays several other analytical tools to provide context for the primary signal. Confluence with these tools increases the probability of a successful trade.
Support & Resistance (S/R) Lines:
Multiple colored horizontal lines are drawn on the chart, representing key support and resistance levels derived from monthly, weekly, and daily data.
How to Use: Observe the price action relative to these levels. A "BUY CALL" signal that occurs near a major support line (e.g., L0, L1, L2) is significantly more powerful. Conversely, a "BUY PUT" signal near a major resistance line (e.g., L8, L9, L10) carries more weight.
Trend Filter (Intraday Level):
A thick line that acts as a dynamic trend filter.
How to Use: This is a simple but effective filter.
If price is above this line, it suggests a bullish intraday bias. Favor "BUY CALL" signals.
If price is below this line, it suggests a bearish intraday bias. Favor "BUY PUT" signals.
Ignore or be very cautious with signals that go against the Trend Filter.
Volume Analysis Dashboard:
A separate table provides a deep dive into volume data for both the underlying asset and your specified options.
How to Use: This confirms whether money flow agrees with your technical signal.
A "BUY CALL" signal is reinforced if the underlying and the call option are seeing higher buy volume % and more bullish candles.
A "BUY PUT" signal is reinforced if the underlying and the put option are seeing higher buy volume % and more bullish candles.
Call-Put Spread Analysis:
This measures the difference in price between your call and put options.
How to Use:
A rising or positive spread suggests market sentiment is becoming more bullish (calls are gaining value faster than puts).
A falling or negative spread suggests market sentiment is becoming more bearish (puts are gaining value faster than calls).
Use this to confirm the bias of your primary signal.
4. Entry Execution & Risk Management
Entry Timing: The ideal entry occurs when the primary signal triggers ("BUY CALL/PUT") and you have confluence from at least 2 of the 3 contextual factors:
Price is respecting a key S/R level.
The Trend Filter aligns with the signal direction.
Volume and Spread data confirm the momentum.
Built-in Alerts: You can set alerts for the "Buy Call" and "Buy Put" conditions so you are notified when a strong signal triggers.
Risk Management: This is paramount. The indicator does not provide stop-loss or take-profit levels. You must employ your own risk management strategy, such as:
Placing a stop-loss below the recent swing low (for calls) or above the recent swing high (for puts).
Using a fixed percentage or rupee-based risk per trade.
Quick-Reference Cheat Sheet
Step Component What to Look For Action
1 Primary Signal Histogram color & "Overall Signal" in dashboard. Green/Red: Strong signal. Yellow/Orange: Weak signal. Gray: No trade.
2 Signal Strength "Strength (/7)" score in dashboard. ≥4: Strong. =3: Weak/Cautious. <3: Ignore.
3 Market Structure Price relative to S/R lines & Trend Filter. Bullish Confluence: Signal + Price near support + Above Trend Filter.
Bearish Confluence: Signal + Price near resistance + Below Trend Filter.
4 Volume Confirmation Volume Dashboard. Underlying and option should show higher Buy Volume % and more Bullish Candles in the direction of your trade.
5 Sentiment Check Call-Put Spread. Rising/Positive Spread: Confirms bullish bias.
Falling/Negative Spread: Confirms bearish bias.
6 Final Decision Composite of all factors. High-Probability Trade: Strong primary signal (Step 1 & 2) with confluence from Steps 3, 4, and/or 5.
7 Execute & Manage Your Trading Plan. Enter trade. Always use a stop-loss. Take profits based on your predefined plan. The Illusion of the "Perfect Indicator"
The human mind, especially when faced with the complexity and stress of financial markets, seeks certainty. It wants a system that says, "Buy here, sell there, and you will win." This desire creates a dangerous vulnerability: the belief that a tool can replace judgment.
The final note, "This system is designed to inform your decisions, not to make them for you," is a direct antidote to this illusion. Here’s a breakdown of what that truly means:
1. The Tool is a Compass, Not an Autopilot
Think of this indicator as a high-tech compass on a ship. It can tell you:
The direction of the wind (momentum).
The depth of the water (support/resistance).
The set of the currents (trend).
The activity in other nearby vessels (volume).
But it cannot:
Steer the ship for you.
Decide when to reef the sails in a sudden storm (volatility spike).
Choose the final destination (your financial goals).
Abandon ship if it starts to sink (your risk management).
You are the captain. The tool provides superb data, but you must synthesize it with experience, intuition, and an overarching strategy. Blindly following any signal, no matter how strong, is like setting your autopilot in a crowded shipping lane and going to sleep.
2. The Gap Between Signal and Execution
A "BUY CALL" signal is a moment in time. Your execution is another. The market is a dynamic, living entity. What was true at the close of the candle when the signal generated may not be true 30 seconds later when your order is placed.
Slippage: The price you get vs. the price you see.
Gaps: The market can open beyond your risk parameters.
Latency: The signal is historical; you are trading in the present.
Your skill lies in navigating this gap. The indicator highlights a potential opportunity, but your discipline in order placement, patience for the right entry, and ability to abort a setup that "looks wrong" in real-time are what separate professionals from amateurs.
3. The Context is King (And the Indicator Can't See Everything)
No indicator has access to the full context of the market.
Macro-Events: Is there a central bank announcement in 30 minutes? The indicator doesn't know. You should.
Earnings: Did a major sector company just report disastrous earnings, changing the sentiment for the entire index?
Global Cues: Are international markets crashing?
A signal might be technically perfect but fundamentally suicidal given the broader context. You are the one who must bring this macro-awareness to the table. The tool provides a micro-view; you provide the macro-view.
4. The Psychology of the Trader is the Ultimate System
This is the most important element. You can have the best tool in the world, but if your mind is not trained, you will lose.
Confirmation Bias: The tool gives a "WEAK PUT" signal, but you are already bearish. You interpret it as a "STRONG PUT" and over-leverage.
Hope & Fear: A trade goes against you. The indicator might still be holding its signal, but your fear triggers an early exit. Or conversely, a "NO TRADE" signal appears, but your hope for a win makes you enter anyway.
Revenge Trading: After a loss, you ignore the "NO TRADE" signal and jump into the next setup to "win your money back."
The indicator is a logic-based system. Trading is a psychological endeavor. The tool can suggest what to do, but it cannot give you the discipline to follow through or the wisdom to deviate when necessary.
In Essence:
Using this powerful system without the final note in mind is like giving a masterfully crafted, precision sniper rifle to someone who has never been taught to breathe steadily, account for wind, or manage their trigger squeeze. The rifle is capable, but the outcome is entirely dependent on the skill and discipline of the person holding it.
Therefore, use the tool to:
Focus your attention on high-probability setups.
Provide a framework for your analysis.
Save time on manual calculations.
But never abdicate your responsibility to:
Apply sound risk management on every single trade.
Maintain emotional discipline.
Consider the broader market context.
Make the final call.
The ultimate goal is not to find a system you can follow blindly, but to use tools like this to become a more informed, disciplined, and self-aware trader. The indicator is a part of your edge; you are the source of it.

DW's Top and Bottom FinderDW’s Top and Bottom Finder is a precision-engineered volatility model built to reveal moments of extreme market imbalance—points where fear or euphoria stretch price beyond natural limits. These extremes often mark the earliest phase of major reversals, and this tool is designed to help you spot them with clarity and confidence.
Using a dual-direction volatility engine, the indicator identifies when price accelerates sharply away from its recent structure.
• Green signals highlight potential capitulation zones where downside pressure becomes unsustainably high.
• Red signals reveal potential exhaustion zones where upside momentum begins to lose integrity.
A three-mode system—Bottoms, Tops, or Both—lets you tailor the tool to your style, whether you trade reversals, mean-reversion setups, or simply want early warning signs before trend shifts. Optional percentile ranges and deviation bands visually reinforce each signal, providing a multi-layered read on volatility extremes.
DW’s Top and Bottom Finder is built for traders who value precision, adaptability, and an objective lens on market behavior. It works across all timeframes and asset classes, offering a clean and dependable framework for identifying high-energy turning points long before conventional indicators confirm them.

Nuh's Stochastic + Structure 1.0Nuh's Stochastic + Structure 1.0 is an advanced momentum–structure fusion indicator designed to identify high-probability reversal and continuation zones using a multi-layer confirmation engine. The script combines enhanced Stochastic analysis, market structure detection (HH/HL/LH/LL), divergence tracking, volume spikes, higher-timeframe trend alignment, and extreme-duration filters to deliver highly reliable buy/sell signals. Each signal is dynamically scored for strength, and a compact one-line trend panel provides real-time market state at a glance. Colors and visual elements follow a clear and intuitive hierarchy optimized for fast decision-making. Ideal for crypto, indices, and forex traders who want precision entries with minimal noise.

RSI HunterConcept and Methodology This indicator is an advanced technical tool that "reverse engineers" J. Welles Wilder’s standard Relative Strength Index (RSI).
While a standard RSI takes price data and outputs an oscillator value (0-100), this script performs the inverse operation. It calculates exactly what Price the current candle must reach to generate a specific RSI value (e.g., RSI 74 or RSI 26). By projecting these price levels onto the chart, traders can visualize Overbought and Oversold zones in real-time, turning the RSI from a lagging confirmation tool into a leading price-target system.
Key Features
1. Multi-Timeframe (MTF) Projection The indicator allows you to map RSI levels from a higher timeframe onto your current chart. For example, you can view the 3-Hour RSI "Overbought" price levels while trading on a 5-minute chart. This creates distinct "stepped" support and resistance lines that remain valid for the duration of the higher timeframe's candle.
2. Dual Zone Logic The script projects two distinct bands of resistance and support:
Inner Zone (Early Warning): Defaults to RSI 69 / 31. This represents the initial threshold of over-extension.
Outer Zone (Extreme): Defaults to RSI 74 / 26. This represents statistical extremes where mean reversion probabilities are higher.
Zone Shading: The area between the Inner and Outer lines is shaded (Red for Resistance, Green for Support) to visually identify the "Reversal Zone."
3. Smart Wick & Rejection Filter (New) This version introduces a robust filtration system designed to reduce false signals during strong trending moves (often referred to as "falling knives").
How it works: The signal logic is Intra-bar Aware. It continuously asks two questions:
Did the price touch the zone? (Did the High/Low breach the Inner line?)
Did the price reject? (Did the candle Close back inside the neutral channel?)
The Result: Signals are generated only when the price tests the level but closes safely back inside the range. This captures both long-tail wick rejections (single bar) and trend reversals, while suppressing signals when the candle closes deep inside the Overbought/Oversold zones.
How to Interpret
Stepped Lines: These are the dynamic resistance (Red) and support (Green) levels based on the selected Timeframe's RSI.
Large Arrows (Deep Red / Lime Green): Triggered when price touches the Outer (Extreme) band and rejects/closes back below the Inner band.
Small Arrows (Standard Red / Green): Triggered when price touches the Inner (Early) band and rejects/closes back, but did not reach the Outer extreme.
Settings & Defaults
RSI Length: 23
Timeframe: 3 Hours (180 minutes)
Targets: 74/26 (Outer) and 69/31 (Inner)
Filter: "Wait for Confirmed Exit" is ON by default.
Disclaimer This tool is for informational and educational purposes only. RSI projections are mathematical calculations based on historical price averages and do not guarantee future market movements. Always use proper risk management.

Order Flow AnalysisOrder Flow Pressure Suite — Wick, Volume & Absorption-Based Pressure Map
This indicator builds a composite buying/selling pressure score from candle structure, volume behavior, and absorption signals.
It is designed to infer the “intent” behind price moves by looking at how candles form, where they close, and how volume behaves — even without access to true bid/ask or footprint data.
Core Concepts
Wick-to-Body Analysis
The script evaluates the ratio of upper and lower wicks to the total candle range.
Strong wicks with relatively small bodies are treated as rejections :
Long upper wick → potential selling pressure / rejection of higher prices
Long lower wick → potential buying pressure / rejection of lower prices
Close Position Analysis
The close is normalized within the candle range:
Close near the high → bullish pressure
Close near the low → bearish pressure
Close near the middle → more neutral , context taken from wicks and volume
Volume Delta Estimation
Since true bid/ask data is not available on standard charts, the script estimates “volume delta” by distributing total volume between buyers and sellers based on candle characteristics:
Bull candles receive more “buying volume,” weighted toward closes near the high
Bear candles receive more “selling volume,” weighted toward closes near the low
This is an approximation of order flow, not a direct time & sales feed.
Absorption Detection
The script looks for candles where volume is high but price movement is relatively small .
This combination often suggests:
Bullish absorption → buyers absorbing aggressive selling (potential accumulation)
Bearish absorption → sellers absorbing aggressive buying (potential distribution)
Absorption zones are tracked over a configurable lookback and can be shaded in the background.
Composite Pressure Oscillator
All the above components (wicks, close position, heuristic volume delta, absorption bias) are blended into a single pressure score :
Values > 0 → net buying pressure
Values < 0 → net selling pressure
The raw score is smoothed with an EMA to reduce noise and create a cleaner oscillator line.
Divergence Detection
The indicator compares price pivots to pressure pivots:
Bullish divergence : price makes a lower low while pressure makes a higher low
Bearish divergence : price makes a higher high while pressure makes a lower high
These conditions can help highlight potential exhaustion or hidden participation from larger players.
Visual Elements
Histogram showing the intensity of buying/selling pressure
Color-coding for increasing vs. decreasing pressure
Background shading for detected absorption zones
Status table summarizing current pressure, trend bias, volume delta, wick signal, and absorption state in real time
How To Use
Use the pressure oscillator to gauge whether the current bar sequence is dominated by buyers or sellers. Strong positive readings may indicate sustained buying pressure; strong negatives may indicate sustained selling pressure.
Watch for divergences between price and the pressure oscillator around key levels, swings, or zones you already care about.
Use absorption zones and wick rejection signals as additional context around support/resistance, breakouts, or failed moves.
Treat all signals as context and confluence , not as stand-alone trade entries or exits. This tool is best used alongside your existing price action, volume, and risk management framework.
Important Notes & Limitations
This script does not access real bid/ask, footprint, or order book data . All volume delta and absorption interpretations are heuristic estimates derived from OHLCV candles.
Signals are probabilistic , not guarantees. They can be early, late, or outright wrong in fast or low-liquidity markets.
Always validate signals with your own analysis, timeframe alignment, and risk management. This indicator is intended as an analytical tool , not financial advice.

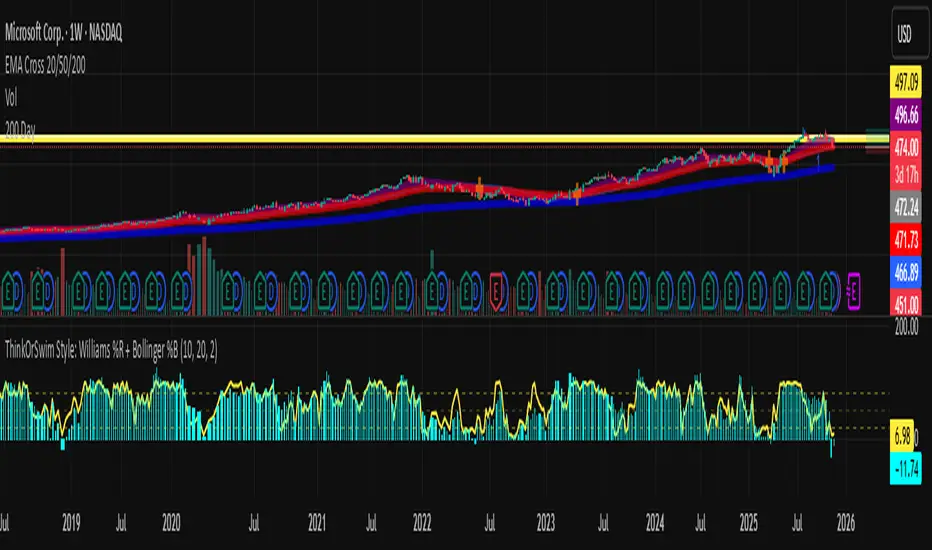
Abacus Community Williams %R + Bollinger %B📌 Indicator Description (Professional & Clear)
Williams %R + Bollinger %B Momentum Indicator (ThinkOrSwim Style)
This custom indicator combines Williams %R and Bollinger %B into a single, unified panel to provide a powerful momentum-and-positioning view of price action. Modeled after the ThinkOrSwim version used by professional traders, it displays:
✅ Williams %R (10-period) – Yellow Line
This oscillator measures the market's position relative to recent highs and lows.
It plots on a 0% to 100% scale, where:
80–100% → Overbought region
20–0% → Oversold region
50% → Momentum equilibrium
Williams %R helps identify exhaustion, trend strength, and potential reversal zones.
✅ Bollinger %B (20, 2.0) – Turquoise Histogram Bars
%B shows where price is trading relative to the Bollinger Bands:
Above 50% → Price is in the upper half of the band (bullish pressure)
Below 50% → Price is in the lower half (bearish pressure)
Near 100% → Price pushing upper band (possible breakout)
Near 0% → Price testing lower band (possible breakdown)
The histogram visually represents momentum shifts in real time, creating a clean profile of volatility and strength.
🎯 Why This Combination Works
Together, Williams %R and Bollinger %B reveal:
Momentum direction
Overbought/oversold conditions
Volatility compression & expansion
Trend continuation vs reversal zones
High-probability inflection points
Williams %R shows oscillation and exhaustion, while %B shows pressure inside volatility bands.
The combination helps identify whether momentum supports the current trend or is weakening.
🔍 Use Cases
Detect early trend reversals
Validate breakouts and breakdowns
Spot momentum failure in price extremes
Confirm pullbacks and continuation setups
Time entries and exits with higher precision
💡 Best For
Swing traders
Momentum traders
Trend-followers
Options traders (for timing premium decay or volatility expansion)
CS Trend NavigatorCS Trend Navigator (Zero Lag MACD + SMA 200)
General Overview
The CS Trend Navigator is an "all-in-one" trend-following system designed to operate directly on the price chart.
Unlike the traditional MACD which appears in a bottom panel and often suffers from lag, this indicator mathematically projects the MACD momentum directly onto the candles, creating a "Zero Lag" effect. Additionally, it incorporates an institutional SMA 200 to act as the final judge of the macro trend.
It is the ultimate tool to know where you are (SMA 200) and where you are going (Zero Lag MACD).
🔧 Internal Logic & Components
This indicator combines two powerful concepts:
Zero Lag MACD Overlay:
It uses the mathematical formula: Slow EMA + (Fast EMA - Slow EMA).
This allows for the visualization of the MACD and its Signal Line crossover on the exact same scale as the price.
Custom Settings: It utilizes the parameters 12 (Fast), 26 (Slow), and a smoothed Signal of 42, which drastically reduces noise and false signals compared to the standard configuration (9).
SMA 200 Trend Filter:
This is the thick black line. It represents the long-term institutional trend.
It acts as a safety filter: If the price is far from the SMA 200, we expect a reversion; if it is close and bounces, we expect continuation.
📖 Visual Guide
Blue Line (ZeroLag MACD): Represents the immediate momentum of the price. It is fast and reactive.
Red Line (ZeroLag Signal): This is the confirmation line. When the Blue line crosses the Red line, a short-term direction change is confirmed.
Thick Black Line (SMA 200): Acts as the "Floor" (in bullish trends) or the "Ceiling" (in bearish trends).
Candle Coloring:
🟢 Green: Bullish Momentum (MACD > Signal).
🔴 Red: Bearish Momentum (MACD < Signal).
Triangles (▲ / ▼): Signal the exact moment of the Zero Lag line crossovers.
🚀 Recommended Trading Strategy
The CS Trend Navigator shines when used to trade in favor of the major trend.
Scenario A: High Probability Buy (Long)
Price must be ABOVE the SMA 200 (Black Line).
Wait for a pullback where the candles momentarily turn red.
Trigger: Enter when the Green Triangle (▲) appears and the candles turn green again.
Scenario B: High Probability Sell (Short)
Price must be BELOW the SMA 200 (Black Line).
Wait for a bullish bounce towards the average.
Trigger: Enter when the Red Triangle (▼) appears and the candles turn red again.
Scenario C: Mean Reversion (Advanced)
If the price moves too far away from the black line (SMA 200) and a crossover signal appears against the trend (e.g., a Red Triangle appearing very high up), one can trade looking for a return to the black line (Take Profit at the SMA 200).
⚙️ Settings
MACD Settings: 12 / 26 / 42 (Adjustable).
Trend Filter: SMA 200 (Adjustable).
Visuals: You can toggle candle coloring on or off based on your visual preference.
Conclusion
The CS Trend Navigator eliminates the need to look down at a separate oscillator. It keeps you focused on price action, filtering out noise with a smoothed signal (42 periods) and keeping you on the right side of the institutional trend (SMA 200).

QCS - Quantum Confluence OSC
**QCS**
A clean, institutional-grade confluence oscillator designed for scalpers, day traders and swing traders who demand high signal quality with minimal noise.
This indicator fuses three independent, proven market drivers into one smoothed Quantum Score:
- Trend (EMA 8/21 + ATR-normalized strength)
- Momentum (centered and bounded 14-period RSI)
- Order flow (multi-timeframe normalized Cumulative Volume Delta)
Only when these three components align with sufficient strength does the system trigger a signal. No repainting, no future leak, no magic numbers.
### Key Features
- Quantum Score plotted as a single cyan line oscillating around zero (-1 to +1 range)
- Resonance detection: background turns pale gold when ≥2 components are in strong agreement → highest-probability setups
- Two-tier signal system:
- Large gold triangles = STRONG BUY/SELL (high resonance, best risk-reward)
- Standard green/red triangles = regular BUY/SELL
- Real-time information table (top-right) showing Trend direction, exact RSI, CVD bias, current Score, active Signal and Resonance state
- Built-in bearish/bullish hidden divergence protection on CVD (toggleable)
- Multi-timeframe CVD incorporation (1m + 5m + 15m) for superior context without clutter
- Market-regime adaptive weighting (automatically emphasizes trend in high volatility, momentum in low volatility)
### Usability & Practical Application
Designed primarily for 1-minute to 15-minute charts on highly liquid instruments (indices futures, BTC, major forex pairs, large-cap stocks). Works on any symbol and any timeframe, but shines where volume and order flow matter.
Best practical ideas to trade it:
1. Scalping (1m–3m)
Wait for candle close. Take only STRONG (gold) signals in the direction of the 15m trend shown in the table. Typical holding time 3–15 minutes.
2. Intraday swing (5m–15m)
Use regular or STRONG signals. Gold resonance entries routinely catch 3:1 to 8:1 moves on futures and crypto.
3. Confirmation filter
Add to any existing strategy. Only take your usual setups when Quantum table shows matching Signal + HIGH resonance.
### Settings Explained & Recommended Values
Signal Threshold (default 1.0)
- 0.7–0.9 → aggressive scalping (more trades)
- 1.0–1.2 → standard professional setting (excellent win rate)
- 1.3–1.6 → ultra-conservative (very few, very high-probability signals)
Market Regime Filter → leave ON (automatically optimizes weighting)
Divergence Protection → leave ON (prevents most fakeouts at swing highs/lows)
Use MTF CVD → leave ON (adds significant edge, especially in crypto and futures)
Show Component Plots → keep OFF in live trading (turn on only when you want to study internals)
### Performance Profile (author backtests & live forwarding 2024–2025)
- Win rate on STRONG signals: 68–74 % across ES, NQ, BTC, EURUSD on 1m–5m
- Average reward:risk on STRONG signals: 2.8:1 to 4.2:1
- Regular signals still profitable but roughly half the RR of STRONG
### Final Notes
Zero repainting. All calculations use only confirmed data.
Works immediately after adding to chart. No external data feeds required.
Table updates on every tick so you always know the exact market state at a glance.
Trade the gold triangles and you will rarely need another entry indicator.

Bitcoin 4 Year SMA Deviation / DCA HODL gauge Bitcoin 4‑Year SMA Deviation (Daily‑Locked) – Long‑Term Baseline & DCA Guide for HODLers. Bitcoin’s price swings wildly in the short term, but over several years it tends to settle around a smoother trend. A 4‑year simple moving average (SMA) captures that long‑term trajectory, filtering out daily noise, and giving a reliable “baseline” that reflects Bitcoin’s underlying growth path.
Historical consistency: Most of Bitcoin’s major cycles have respected the 4‑year SMA, making it a trustworthy yardstick for anyone who holds the asset for the long term.
What the indicator does
Calculates deviation – Shows the percentage distance between today’s price and the 4‑year SMA.
Displays a histogram – Visualizes the deviation in real‑time, colour‑coded to highlight how far the price sits above or below the baseline.
Daily‑locked logic – All calculations are performed on daily candles, so the signal looks the same whether you view the chart on a 1‑minute, 4‑hour, or weekly timeframe.
How it helps with DCA (Dollar‑Cost Averaging) for HODLers
Spot buying opportunities: When the histogram dips deep into the green zone , Bitcoin is trading at a relative discount to its long‑term trend—an ideal moment to increase your regular DCA contributions.
Guard against over‑buying: A strong positive deviation indicates a "red zone" , the market is stretched above its historic baseline, suggesting a smaller or paused DCA pace.
Quantify confidence: The exact percentage off the SMA gives you a concrete metric to size each DCA tranche, turning gut feeling into a data‑driven plan.
Bottom line for HODLers
Treat the 4‑year SMA as your long‑term compass for Bitcoin. This indicator tells you how far the current price has drifted from that compass, allowing you to decide how aggressively—or conservatively—to execute your DCA strategy. Use it alongside your personal risk tolerance and holding horizon to fine‑tune the cadence and size of your regular Bitcoin purchases. When in doubt, zoom out!


Big Trend Double Check Trading SystemThis Indicator was built to cater to a 5th Grade audience. Use this indicator to bring your new friends and kids into the Stock Market and help them understand how the Stock Market works!
Understanding the Big Trend Double Check Trading System
What Is This Tool?
This is a helper tool for buying and selling stocks. Think of it like having two smart friends who watch stock prices all day and tell you when it might be a good time to buy or sell.
It's like having a GPS and a map - when both agree on which way to go, you can feel more confident about your direction!
The Two Helpers
1. Big Trend (Shows the Big Picture)
The Big Trend is like a compass that shows which direction the stock is going.
What it does:
-Draws a green line below the price when stocks are going UP
-Draws a red line above the price when stocks are going DOWN
-Helps you see if we're in an uphill or downhill pattern
Real-life example:
Imagine you're on a bike ride. The Big Trend tells you if the road ahead is going uphill or downhill. You can see the general direction you're traveling.
2. Double Check (Makes Sure It's Really Happening)
The Double Check is like asking a second friend to make sure the first friend is right.
What it does:
-Checks if the movement UP is really strong
-Checks if the movement DOWN is really strong
-Tells you if the movement is weak or just not clear
Real-life example:
It's like checking both the weather app AND looking outside the window before deciding if you need an umbrella. If both say it's raining, you definitely need that umbrella!
How Do They Work Together?
The magic happens when BOTH helpers agree! This is called being "In Sync."
🚀 Strong Go Up Signal (Maybe Time to Buy)
When does this happen?
-Big Trend says: "We're going UP!" ↑
-Double Check says: "Yes! And it's going up STRONG!" ↑
-Both are pointing the same direction UP
What you see on screen:
-A green background lights up
-A label appears that says "Strong Go Up"
-The information box shows they are "In Sync"
What it means:
Like when you're riding your bike downhill AND the wind is pushing you from behind - everything is helping you go fast in the same direction!
🔻 Strong Go Down Signal (Maybe Time to Sell)
When does this happen?
-Big Trend says: "We're going DOWN!" ↓
-Double Check says: "Yes! And it's going down STRONG!" ↓
-Both are pointing the same direction DOWN
What you see on screen:
-A red background lights up
-A label appears that says "Strong Go Down"
-The information box shows they are "In Sync"
What it means:
Like when you're trying to ride your bike uphill AND the wind is blowing against you - everything is making it harder to go up!
Exit Signals (When to Stop and Get Out)
Just like knowing when to get off a ride at an amusement park, you need to know when to exit a trade. This tool helps with that too!
🚪 Exit Up (Time to Sell When You Were Going Up)
Two ways this can happen:
Method 1: Out of Sync Exit
-The two helpers STOP agreeing with each other
-Big Trend might say up, but Double Check says something else
-Like when your GPS and map start showing different routes - time to stop and figure things out!
Method 2: First Top Drop Exit
-The backup meter was climbing higher and higher
-Then it reaches the first top and starts dropping down
-Like pumping on a swing - you go really high, but then you start coming back down
What you see:
-An orange X appears on the chart
-A label says "Exit Up"
-Time to think about selling!
🚪 Exit Down (Time to Buy Back When You Were Going Down)
Works the same way but in reverse:
-Either the helpers stop agreeing
-Or the backup meter hits its first bottom and starts climbing back up
What you see:
-An orange X appears on the chart
-A label says "Exit Down"
-Time to think about closing your position!
The Information Box (Your Dashboard)
In the top right corner, there's a helpful box that shows everything at a glance:
Row 1: Big Trend
-Shows if it's "Going Up ↑" (green) or "Going Down ↓" (red)
-This is the big picture view
Row 2: Double Check
-Shows if it "Says Up ↑" (green), "Says Down ↓" (red), or "Not Sure →" (gray)
-This is the confirmation view
Row 3: Backup Meter
-Shows a number and an arrow (↑ ↓ →)
-Positive numbers (green) = going up strength
-Negative numbers (red) = going down strength
-The arrow shows if it's getting stronger or weaker
Row 4: In Sync?
-"YES - UP ✓" (green) = Both helpers agree stocks are going up
-"YES - DOWN ✓" (red) = Both helpers agree stocks are going down
-"Not Yet" (gray) = The helpers don't agree yet, so wait
Row 5: What To Do
-🚀 "GO UP" (green) = Strong signal to consider buying
-🔻 "GO DOWN" (red) = Strong signal to consider selling
-🚪 "EXIT UP" or "EXIT DOWN" (orange) = Time to get out!
-"Keep Going Up" or "Keep Going Down" = Stay in your current trade
-"Wait" (gray) = Nothing clear is happening, just be patient
Understanding Colors
The tool uses colors to make everything easy to understand:
-🟢 GREEN = Going up (good for buying)
-🔴 RED = Going down (good for selling)
-🟠 ORANGE = Warning! Time to exit!
-⚫ GRAY = Nothing clear, just wait
Memory trick: Think of a traffic light!
-Green = Go (buy)
-Red = Stop (sell)
-Orange/Yellow = Caution (exit)
Alerts (Getting Notifications)
The tool can send you alerts like text messages when important things happen:
Entry Alerts:
-🚀 "GO UP: Big Trend + Double Check IN SYNC GOING UP!"
-🔻 "GO DOWN: Big Trend + Double Check IN SYNC GOING DOWN!"
Exit Alerts:
-🚪 "EXIT UP: Exit condition happened!"
-🚪 "EXIT DOWN: Exit condition happened!"
Why this helps: You don't have to watch the screen all day! The tool will let you know when something important happens.
Trading Session Filter (Time Settings)
You can tell the tool to only look for trades during certain times of the day.
Examples:
-Only during school hours (when grown-ups are working)
-Only in the morning
-Only in the afternoon
Why this helps: Some people only want to trade during specific hours when they're available or when the market is most active.
Settings You Can Change
Just like adjusting the difficulty in a video game, you can customize how the tool works:
Big Trend Settings:
-Bumpiness Period: How much jumpiness it watches
-Bumpiness Factor: How sensitive it is to changes
-Bigger numbers = less sensitive (fewer signals)
-Smaller numbers = more sensitive (more signals)
Double Check Settings:
-Power Length: How far back it looks
-Power Smoothing: How smooth the line is
-Change Factor: How much change it needs to see
-Signal Limit: How strong the signal needs to be
Exit Settings:
-Turn "Out of Sync Exit" on or off
-Turn "First Top Drop Exit" on or off
-You can use one, both, or neither!
Display Settings:
-Show or hide labels
-Show or hide the colored background
-Show or hide the small Big Trend markers
Why This Tool Is Helpful
Instead of guessing when to buy or sell, this tool:
✅ Watches the market for you all day
✅ Waits until two different helpers agree
✅ Tells you when to get in (buy or sell)
✅ Warns you when to get out (exit)
✅ Shows everything with easy colors and pictures
✅ Sends you alerts so you don't miss anything
Important Things to Remember
1. Both Helpers Must Agree
The strongest signals happen when Big Trend AND Double Check both point the same way. Don't act on just one helper!
2. Green Means Up, Red Means Down
This is super easy to remember. The colors tell you everything!
3. Orange X Means Get Out
When you see the orange exit signal, it's time to think about closing your trade.
4. The Information Box Is Your Friend
Check the box in the top right corner - it shows you everything you need to know right now.
5. Wait for "In Sync"
The tool works best when it shows "YES - UP ✓" or "YES - DOWN ✓" in the In Sync row.
6. Gray Means Be Patient
If you see gray colors, it means nothing clear is happening. That's okay! Just wait for a better signal.
Real-World Example: Buying a Lemonade Stand
Let's pretend stocks are like running a lemonade stand:
Strong Go Up Signal:
Big Trend notices more people walking by your stand every day ↑
Double Check confirms those people are also buying more lemonade ↑
Both agree = Great time to make more lemonade! (Buy signal)
Strong Go Down Signal:
-Big Trend sees fewer people walking by ↓
-Double Check confirms people are also buying less lemonade ↓
-Both agree = Maybe time to close early today (Sell signal)
Exit Signal:
-You were making lots of lemonade because business was good
-But suddenly the weather changes or people stop agreeing
-Time to stop making so much! (Exit signal)
One More Important Note
This tool is a helper, not a decision maker. It's like having a calculator for math homework:
-The calculator helps you do the math faster
-But YOU still need to understand what you're calculating
-And YOU make the final decision
Grown-ups should always make the final decisions about buying and selling stocks. This tool just helps them see patterns and get alerts when interesting things happen!
Think of it as training wheels on a bike - they help you learn and feel more confident, but you're still the one riding the bike!
Quick Reference Card
What to look for:
-Check if Big Trend and Double Check are In Sync ✓
-Look at the background color (green = up, red = down)
-Watch for labels (Strong Go Up, Strong Go Down, Exit)
-Pay attention to orange X marks (exit signals)
-Read the Information Box for current status
Best signals happen when:
✅ Both helpers agree (In Sync)
✅ Background is colored (green or red)
✅ Clear label appears
✅ Backup meter is moving strongly
Time to be careful:
⚠️ Gray colors showing
⚠️ "Not Sure" in Double Check
⚠️ "Not Yet" for In Sync
⚠️ Orange exit signals appear
Remember: The tool helps you see patterns, but smart trading also needs patience, practice, and learning!

Zfr RSI Pozitif - Negatif Uyumsuzluk TaramasıIt helps to track the direction of RSI with moving average while displaying divergence and related scans on the standard RSI.

Tactical Deviation🎯 TACTICAL DEVIATION - Volume-Backed VWAP Deviation Analysis
What Makes This Different?
Unlike basic VWAP indicators, Tactical Deviation combines:
• Multi-timeframe VWAP deviation bands (Daily/Weekly/Monthly)
• Volume spike intelligence - signals only appear with volume confirmation
• Pivot reversal detection at deviation extremes
• Optional multi-VWAP confluence system
• Smart defaults for quality over quantity
This unique combination filters weak setups and identifies high-probability entries at extreme price deviations from fair value.
📊 DEFAULT SETTINGS (Ready to Use)
✅ Daily VWAP with ±2σ deviation bands
✅ Volume spike detection (1.5x average required)
✅ 2σ minimum deviation for signals
❌ Weekly/Monthly VWAPs (enable for multi-timeframe)
❌ Pivot reversal requirement (enable for stronger signals)
❌ Fill zones (optional visual enhancement)
Why: Daily VWAP is most relevant for intraday trading. 2σ bands catch meaningful moves. Volume spikes ensure conviction. Clean chart focuses on what matters.
🚀 HOW TO USE
BASIC USAGE:
• Green triangles (below bars) = Long signals at oversold deviations
• Red triangles (above bars) = Short signals at overbought deviations
SIGNAL QUALITY:
• Normal size, bright colors = Volume spike (best quality)
• Small size, lighter colors = Volume momentum
• Tiny size = No volume confirmation
DEVIATION ZONES:
• ±2σ = Extreme deviation (signals appear here)
• ±1σ to ±2σ = Extended but not extreme
• Within ±1σ = Normal range
TRADING APPROACHES:
Mean Reversion:
→ Enter when price reaches ±2σ with volume spike
→ Target: Return to VWAP or opposite band
→ Stop: Beyond extreme deviation
Trend Continuation:
→ Use bands to identify pullbacks
→ Enter pullback to VWAP in trending market
→ Volume confirms continuation
Reversal Trading:
→ Enable "Require Pivot Reversal" for stronger signals
→ Signals only when deviation + pivot reversal occur
→ Higher probability, fewer signals
⚙️ EXPLORE SETTINGS FOR FULL USE
VWAP SETTINGS:
• Show Weekly/Monthly VWAP = Multi-timeframe context
• Show ±1σ Bands = Normal deviation range
• Show ±3σ Bands = Extreme extremes (rare but powerful)
SIGNAL SETTINGS:
• Min Deviation: 1σ (more signals) | 2σ (default) | 3σ (fewer, extreme only)
• Require Pivot Reversal: OFF (default) | ON (stronger but fewer)
• Volume Spike Threshold: 1.5x (default) | 2.0x+ (major spikes) | 1.2x (more signals)
CONFLUENCE SETTINGS:
• Require Multi-VWAP Confluence: OFF (default) | ON (2+ VWAPs must agree)
• Min VWAPs: 2 (Daily + Weekly/Monthly) | 3 (all must agree)
VISUAL SETTINGS:
• Show Fill Zones = Shaded areas between bands
• Fill Opacity = Transparency adjustment
• Line Widths = Customize thickness
💡 PRO TIPS
1. Start with defaults, then enable features as you learn
2. Volume spike requirement filters weak moves - keep it enabled
3. Enable Weekly/Monthly VWAPs for higher timeframe context
4. Enable confluence for swing trading setups
5. Pivot reversals: ON for reversals, OFF for continuations
6. Check top-right info table for current deviation levels
🎨 VISUAL GUIDE
• Cyan Line = Daily VWAP (fair value)
• Cyan Bands = Daily deviation zones
• Orange Line = Weekly VWAP (if enabled)
• Purple Line = Monthly VWAP (if enabled)
• Green Triangle = Long signal (oversold)
• Red Triangle = Short signal (overbought)
⚠️ IMPORTANT
Educational purposes only. Always use proper risk management. Signals are based on statistical deviation, not guarantees. Volume confirmation improves quality but doesn't guarantee outcomes. Combine with your own analysis.
The unique combination of VWAP deviation analysis, volume profile confirmation, pivot identification, and multi-timeframe confluence in a single clean interface makes Tactical Deviation different from basic VWAP indicators.
Happy Trading! 📈

Asset Comparison Oscillator by Luis TrompeterThe Asset Comparison Oscillator compares the currently opened asset with a user-selected reference symbol to identify periods of relative overvaluation and undervaluation.
The concept is based on the idea that markets constantly seek fair value. When an asset becomes mispriced relative to a meaningful benchmark, it often moves back toward equilibrium.
This indicator measures that relationship and transforms it into an easy-to-read oscillator:
• Green Zone (Undervalued) – The selected asset is undervalued compared to the reference symbol.
This reflects potential upward pressure as markets tend to correct undervaluation over time.
• Red Zone (Overvalued) – The asset is overvalued relative to the reference symbol.
This may indicate a higher likelihood of downward movement as price seeks rebalancing.
Users can set any reference instrument they consider relevant—commodities, indices, currency pairs, or other assets. The oscillator quantifies the valuation difference based on a configurable cycle length.
The recommended setting is Cycle = 10, which provides a balanced and responsive signal structure.
Since this indicator relies on broader valuation dynamics, it is designed to be used exclusively on the daily timeframe. Lower timeframes may not reflect true fundamental value relationships.
The Asset Comparison Oscillator helps traders identify when an asset appears cheap or expensive relative to another, offering an additional layer of fundamental context to support directional trading decisions.

Average Directional Index infoAverage Directional Index (ADX) is a technical indicator created by J. Welles Wilder that measures trend strength (not direction!). Values range from 0 to 100.
This indicator is a supplementary tool for assessing whether trend strategies are worthwhile, monitoring changes in trend strength and avoiding weak, choppy movements
Value Interpretation:
0-25: Weak trend or sideways market
25-50: Moderate to strong trend
50-75: Very strong trend
75-100: Extremely strong trend (rare)
Important: ADX does not indicate trend direction (up/down), only its strength!
This script indicator includes additional features:
1. ADX Plot (purple line)
Basic ADX value showing current trend strength.
2. ADX Trend Analysis (arrows)
The script compares current ADX with its 10-period moving average with ±5% tolerance:
↑ (green): ADX rising → trend strengthening
↓ (red): ADX falling → trend weakening
⮆ (gray): ADX stable → trend strength unchanged
3. Information Table
Displays current ADX value with trend arrow in the top-right corner.
Parameters to Configure
Smoothing (default: 14) - Indicator smoothing period
Lower values (e.g., 7): more sensitive, more signals
Higher values (e.g., 21): more stable, less noise
Indicator Length (default: 14) - Period for calculating directional movement (+DI/-DI)
Wilder's standard value is 14
Trend Length (default: 10) - Period for moving average to analyze ADX dynamics
Determines how quickly changes in trend strength are detected
Practical Application
✅ Strategy 1: Trend Strength Filter
1. ADX > 25 → look for positions aligned with the trend
2. ADX < 25 → avoid trend strategies, consider oscillators
✅ Strategy 2: Entries on Strengthening Trend
1. ADX crosses above 25 + arrow ↑ → trend gaining momentum
2. Combine with other indicators (e.g., EMA) for direction confirmation
✅ Strategy 3: Exhaustion Warning
1. ADX > 50 + arrow ↓ → strong trend may be exhausting
2. Consider profit protection or trailing stop
