Ema Z-score | viResearchEma Z-score | viResearch
Conceptual Foundation and Innovation
The "Ema Z-score" indicator introduces a novel method of analyzing price deviations from the mean by combining the Exponential Moving Average (EMA) with a Z-score calculation. The Z-score is a statistical measure that quantifies how far a value deviates from the mean in terms of standard deviations. By applying the Z-score to an EMA, this indicator provides traders with insights into the strength and momentum of price movements relative to a smoothed average. This enables better detection of overbought and oversold conditions, as well as potential trend reversals.
The use of the Z-score helps filter out noise and provides more robust signals by highlighting extreme deviations from the mean, allowing traders to make more informed decisions in both trending and ranging markets.
Technical Composition and Calculation
The "Ema Z-score" script consists of two main components: the Exponential Moving Average (EMA) and the Z-score calculation. The EMA is calculated over a user-defined length, smoothing price movements to provide a clearer trend line. The Z-score is then derived by measuring the deviation of the current EMA value from the mean of the EMA over a lookback period, divided by the standard deviation of the EMA during that same period.
For the Z-score calculation, the script first computes the mean EMA over the lookback period using the ta.ema function. It then calculates the standard deviation of the EMA over the same period using the ta.stdev function. The Z-score is determined by subtracting the mean EMA from the current EMA value and dividing by the standard deviation, producing a normalized measure of deviation from the average.
Features and User Inputs
The "Ema Z-score" script offers several customizable inputs that allow traders to adjust the indicator according to their strategies. The EMA Length controls the smoothing period of the EMA, while the Lookback Period defines how far back the script looks when calculating the mean and standard deviation for the Z-score. Customizable thresholds allow traders to define when the Z-score signals potential uptrends or downtrends, based on their chosen levels of deviation.
Practical Applications
The "Ema Z-score" indicator is designed for traders who want to better understand price deviations from the mean and use those insights to identify potential trading opportunities. This tool is particularly effective for:
Identifying Overbought and Oversold Conditions: The Z-score provides a quantitative measure of how far the price has deviated from the mean, helping traders spot extreme conditions that could lead to reversals. Detecting Trend Reversals: By monitoring when the Z-score crosses certain thresholds, traders can identify potential trend reversals early and adjust their positions accordingly. Confirming Trend Strength: The Z-score can help confirm whether a price move is backed by momentum or is likely to revert to the mean, providing additional context for trade entries and exits.
Advantages and Strategic Value
The "Ema Z-score" script offers a significant advantage by combining the smoothing effect of the EMA with the precision of Z-score analysis. This approach reduces the impact of market noise while highlighting meaningful deviations from the norm. The ability to quantify deviations in terms of standard deviations gives traders a statistical edge in identifying overbought or oversold conditions and potential trend shifts. This makes the "Ema Z-score" an effective tool for both trend-following and contrarian strategies.
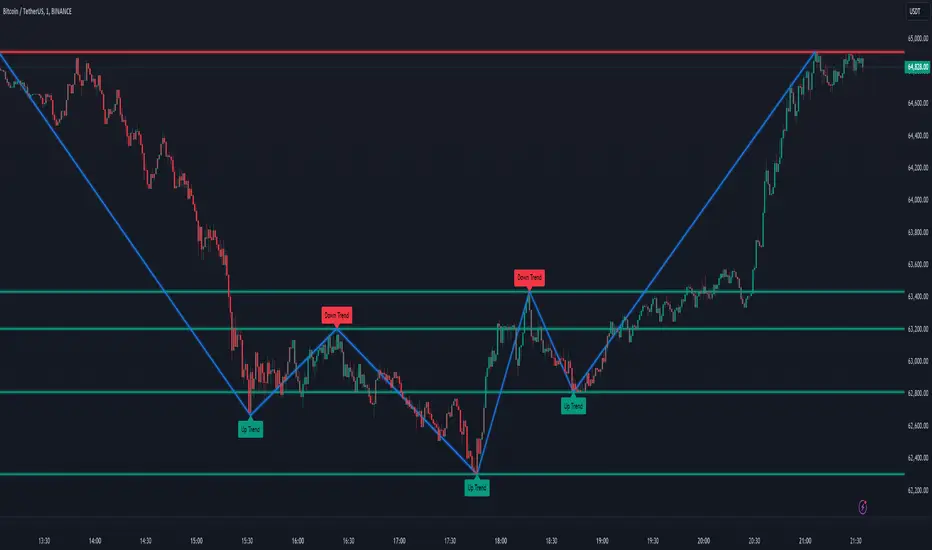
Alerts and Visual Cues
The script includes alert conditions to notify traders of key Z-score threshold crossings. The "Ema Z-score Long" alert is triggered when the Z-score exceeds the upper threshold, signaling a potential upward trend. Conversely, the "Ema Z-score Short" alert signals a possible downward trend when the Z-score falls below the lower threshold. Visual cues such as color changes in the bar chart and Z-score plot help traders easily identify these conditions on the chart.
Summary and Usage Tips
The "Ema Z-score | viResearch" indicator offers a unique combination of EMA smoothing and Z-score analysis, giving traders a statistical measure of price deviations and improving their ability to detect overbought or oversold conditions, trend reversals, and trend confirmations. By incorporating this script into your trading strategy, you can better quantify price extremes and make more informed decisions in both volatile and stable markets. Whether you're focused on spotting early reversals or confirming ongoing trends, the "Ema Z-score" provides a reliable and customizable solution.
Note: Backtests are based on past results and are not indicative of future performance.
Индикатор Pine Script®