Consolidating Trend MasterA complimentary Oscillator to the Hybrid ST/EMA Trend Table Indicator to help provide confident Confluence signals and when the market is consolidating/choppy/moving sideways.
This Oscillator may also help someone with scalping.
warning as always, no chart is 100% accurate.
Линии тренда

eBacktesting - Learning: Trend LineseBacktesting - Learning: Trend Lines helps you spot clean trend lines automatically, using real swing points (highs/lows) and confirming a line only after it’s “respected” multiple times.
What you’ll see on the chart
- Uptrend lines (support) when price is making higher lows
- Downtrend lines (resistance) when price is making lower highs
- A simple way to study structure, spot “respect” of a trend line, and understand when a trend may be weakening
- Trend line breaks are based on candle closes, not just quick wicks, so the signals are clearer
You can also keep a few older lines on the chart, making it easy to review past reactions and build pattern recognition.
These indicators are built to pair perfectly with the eBacktesting extension, where traders can practice these concepts step-by-step. Backtesting concepts visually like this is one of the fastest ways to learn, build confidence, and improve trading performance.
Educational use only. Not financial advice.

MA Types - Auto OptimizedThis indicator is a comprehensive Moving Average optimization engine designed to dynamically identify the most effective period for a selected Moving Average type (SMA, EMA, WMA, or RMA) based on historical price action. Unlike standard indicators that use a fixed length (e.g., a 50-period SMA) for the entire chart history, this script performs a "Walk-Forward" simulation on every bar to determine which period would have yielded the best risk-adjusted returns for a Long-Only strategy up to that specific moment.
The core concept is to adapt to changing market volatility and trends by mathematically scoring different lookback periods and projecting the "winner" onto the chart.
How It Works
The script runs an internal simulation loop for every candle, testing a range of periods (defined by the user, e.g., 2 to 50). For each period p in that range, it tracks a theoretical trading account that executes trades based on crossovers of that specific MA.
Simulation: It calculates the MA value for every period in the range using manual math implementations (to allow for dynamic length processing).
Trade Logic (Long Only):
Buy Signal: Simulates opening a Long position when the price crosses over the MA.
Sell Signal: Simulates closing the Long position when the price crosses under the MA.
Scoring: It calculates a "Score" for each period based on Net Profit, Drawdown, and Profit Factor.
Selection: The period with the highest score is selected as the "Best Period" for the current bar.
Visualization: The indicator plots the MA value of that winning period. This creates a composite "Optimized MA Line" that shifts its length as market conditions change.
Features & Settings
MA Types: Choose between Simple (SMA), Exponential (EMA), Weighted (WMA), and Relative (RMA) Moving Averages.
Optimization Range: Define the Min Period and Max Period to constrain the search space (e.g., searching for the best MA between 10 and 200).
Risk Management: Inputs for Initial Capital, Quantity %, and Commission % allow the simulation to account for trading costs and position sizing, ensuring the "Best Period" isn't selected based on unrealistic friction-less trading.
Dashboard: A table in the bottom right displays the performance metrics of the currently selected "Best Period," including Net Profit, Max Drawdown, Win Rate, and Profit Factor.
Pros and Cons
Pros:
Adaptability: The indicator adjusts to the market phase. It might select a fast MA during strong trends to capture moves early, and a slower MA during chop to avoid false signals.
Data-Driven: Signals are based on mathematical performance metrics rather than arbitrary fixed numbers.
Visual Clarity: Provides a single line and clear Buy/Sell labels, reducing chart clutter compared to plotting multiple MAs.
Cons:
Repainting/Lag: While the indicator DOES NOT repaint past signals (it is a walk-forward analysis), the "Best Period" can change from bar to bar. This means the MA line may appear "jagged" or shift character as the winner changes.
Curve Fitting: Because the script hunts for the best historical performance, there is an inherent risk of overfitting to past data. The "best" period of the past 100 bars is not guaranteed to be the best for the next 10.
Processing Heavy: Calculating dozens of moving averages and tracking their theoretical equity curves on every bar is computationally intensive.
Screenshots & Examples
1. Bitcoin (BTC/USDT) - SMA Optimization
This example shows the script optimizing a Simple Moving Average (SMA) on Bitcoin. The dashboard indicates a "Best Period" of 125, resulting in a high Profit Factor.
2. Gold (XAU/USD) - SMA Intraday
Here, the script is applied to Gold on a 1-hour chart. The optimization engine adapts to the intraday volatility, selecting a longer period (188) to filter out noise.
3. Bitcoin (BTC/USD) - WMA Optimization
Using a Weighted Moving Average (WMA), the script captures the aggressive trend of Bitcoin. The WMA places more weight on recent data, often reacting faster than the SMA.
4. Silver (XAG/USD) - RMA Optimization
This chart demonstrates the Relative Moving Average (RMA) on Silver. The RMA is smoother and often used in RSI calculations; here it provides a steady trend-following line with a high win rate.
Usage Note
This script is intended as a trend-following tool for spot trading or long-biased strategies. It works best in trending markets and may produce whipsaws in ranging sideways markets. Always use it in conjunction with other forms of analysis, such as support/resistance or volume, to confirm signals.
Disclaimer
Not Financial Advice: This script and its description are for educational and informational purposes only. Nothing here constitutes financial, investment, or trading advice.
Risk Warning: Trading financial markets involves a high level of risk and may not be suitable for all investors. You should never trade with money you cannot afford to lose.
Past Performance: This tool relies on historical optimization ("curve fitting"). Please be aware that past performance is not indicative of future results. A Moving Average period that performed perfectly in the last 100 bars may fail completely in the next 100 bars due to changing market volatility and conditions.
Liability: The author assumes no responsibility or liability for any errors, omissions, or for any trading losses incurred from the use of this script. Always perform your own due diligence and use this tool as part of a broader risk management strategy.

S9 ToolkitGENERAL OVERVIEW:
The S9 Toolkit is a multi-layered market structure and volume analysis indicator. It combines volumetric support and resistance, trendlines, engulfing candlesticks & zones, session volume profile, swing highs/lows, moving averages, and a checklist dashboard into one framework. Each component works independently while staying aligned with the others.
This indicator was developed by Flux Charts in collaboration with S9 Trades.
WHAT IS THE THEORY BEHIND THIS INDICATOR?:
The core idea is that price movement encodes behavior, not just direction. Candles show where price traded, but they don’t reveal how committed buyers or sellers were or whether a move was truly accepted or rejected. The S9 Toolkit exposes these behaviors by watching how price reacts at structurally important areas and by analyzing volume during those interactions.
Structure defines where the market is operating. Highs, lows, zones, and trends mark areas where the market has responded before. Volume adds context by showing the level of participation at those locations. Strong reactions, weak follow-through, repeated tests, and clean breaks each convey different information.
Market structure also changes over time. A zone that holds multiple tests may remain important, while one that breaks cleanly may lose relevance. The toolkit tracks these interactions so traders can see how structure evolves rather than treating levels as fixed. Sessions matter too. Markets behave differently across trading windows, and volume distribution shifts throughout the day. By incorporating session-based profiling and higher-timeframe alignment, the toolkit accounts for these differences.
The purpose of the S9 Toolkit is to clarify what the market is doing now and how that relates to earlier structure. It organizes price, volume, and structural change into a clear framework, helping traders make decisions with better context.
S9 TOOLKIT FEATURES:
The S9 Toolkit indicator includes 8 main features:
Volumetric Support & Resistance Zones
Trendlines Structure
Engulfing Candlesticks & Zones
Swing Highs/Lows
Session Volume Profile
EMAs & Directional Bias Dashboard
Checklist Dashboard
Alerts
Each component operates independently while sharing the same underlying market structure and confirmation logic. Detailed explanations for each component are provided in the sections that follow.
VOLUMETRIC SUPPORT AND RESISTANCE ZONES:
🔹 What is Support & Resistance?
Support and resistance are areas on the chart where price previously showed a meaningful reaction. Support is a price area where buying activity was sufficient to slow down or reverse a decline and is displayed in the lower portion of price movement, while resistance is a price area where selling activity was sufficient to slow down or reverse an advance, and is shown in the upper portion of price movement. These zones represent areas where bullish and bearish pressure accumulated and where price is more likely to react again when revisited.
The S9 Toolkit treats support and resistance as price zones. Price does not interact with one exact level but with a range where previous reactions occurred. These zones make it easier to observe whether price reacts, pauses, or moves through the same range when revisited.
(Screenshot: only Support Resistance Zones Enabled)
🔹 How the Indicator Identifies Support & Resistance
The S9 Toolkit identifies support and resistance using confirmed market structure.
◇ Step 1: Confirmed Swing Detection
The indicator first detects confirmed swing highs and swing lows using a user-defined pivot length. A swing is only confirmed after price has completed the required number of bars on both sides, ensuring that structure does not repaint.
Confirmed swing lows are used to identify support
Confirmed swing highs are used to identify resistance
(Screenshot: Pivot swing detection)
◇ Step 2: Zone Construction
Once a swing is confirmed, the indicator constructs a price zone.
The zone is created around the confirmed swing pivot
The zone boundaries are offset above and below the pivot using a fixed Daily Average True Range (ATR) value
The ATR value is used only to define the initial zone size and does not change after the zone is created
Each zone is plotted forward in time so future price interaction can be observed.
(Screenshot: Zones instead of Lines - based on ATR)
◇ Step 3: Overlap Filtering
To reduce clutter and redundant structure, newly detected zones are compared against existing zones of the same type. If a new zone overlaps too closely with an existing active zone, it is not created
(Screenshot: Ignoring overlapping zones)
🔹 Volumetric Information
Each zone displays the volume information accumulated during its formation. This includes total volume and the percentage breakdown between bullish and bearish activity. By embedding this information directly within the zone, the indicator allows traders to evaluate the character of the trading activity that created the structure.
◇ How volume is calculated
During zone formation, volume is accumulated using lower-timeframe data. Volume is classified as bullish when a bar closes at or above its open, and bearish when a bar closes below its open. This provides a consistent approximation of buying versus selling volume without requiring bid/ask data.
(Screenshot: Bullish Volume vs Bearish Volume)
◇ How volume is displayed
Each zone displays:
The total volume traded during zone formation
A percentage value indicating which side was dominant
For support zones, the percentage represents bullish volume
For resistance zones, the percentage represents bearish volume
◇ Imbalance Zones
In some cases, a zone may show volume dominance that does not align with its type. For example, a resistance zone may display a higher bullish volume percentage, or a support zone may display a higher bearish volume percentage. This indicates that price reversed despite greater activity from the opposing side during formation. These imbalanced zones are displayed the same way as other zones and provide additional information about how price reacted within that range.
(Screenshot: Imbalance Zones)
🔹 Breaks & Retests
After a zone is created, the S9 Toolkit tracks how price interacts with it over time.
◇ Retests
A retest occurs when price returns to a zone after moving away, trades into its price range, and reacts without breaking through the zone boundaries. The retest is only counted after the bar closes, ensuring that transient intrabar touches are not treated as valid retests.
(Screenshot: Retests)
◇ Breaks
A break occurs when price moves beyond a zone’s boundary according to the selected invalidation method.
(Screenshot: Zone breaks)
Breaks are evaluated only on confirmed bars. Intrabar price movement does not trigger break conditions, ensuring that only completed price action updates the zone state.
Once a break is confirmed, the zone is marked as broken and its internal state is updated. The zone no longer qualifies as active support or resistance and can optionally remain on the chart in a visually muted form.
🔹Settings
◇ Volumetric Info
Enables or disables the display of volumetric information inside support and resistance zones. When enabled, each zone shows the total volume traded during its formation along with the bullish and bearish volume distribution. When disabled, zones are displayed without any volume data.
◇ Pivot Length
The Pivot Length setting controls how many bars on each side of a price point are required to confirm a swing high or swing low, used to create support and resistance zones. A zone is only formed after the swing is fully confirmed. Higher Pivot Length values require more confirmation bars, resulting in fewer support and resistance zones based on larger, more established price moves. Lower values confirm swings more quickly, creating more frequent zones that reflect finer structural detail. Pivot Length only affects how support and resistance zones are identified and does not change the zone size or behavior after creation.
(Pivot Length: 5 Detects more zones)
(Pivot Length: 20 Detects fewer zones)
◇ Strength
The strength value represents the number of confirmed retests a support or resistance zone has received. Strength increases only when a valid retest occurs and is capped at a maximum of three. Zones are displayed only when their strength meets or exceeds the user-defined Strength setting. This value does not change after a zone is broken.
(Screenshot: Strength 1, 2 ,3 zones displayed)
◇ Higher-Timeframe Zones
The S9 Toolkit allows support and resistance zones to be calculated on a higher timeframe and projected onto the active chart. When a higher timeframe is selected, zone creation, retests, and breaks are all evaluated using that timeframe's data, while the zones themselves are displayed on lower timeframes without recalculation. This allows traders to observe how lower-timeframe price interacts with zones that were formed using higher-timeframe price action and a wider price range.
(Screenshot: Higher Timeframe Zones)
◇ Invalidation method
The S9 Toolkit allows users to control how a break is confirmed by selecting an invalidation method.
Close-based Invalidation: A break is confirmed only when price closes beyond the zone boundary. Wick penetration alone is ignored. This method requires price to fully accept beyond the zone before it is marked as broken.
Wick-based Invalidation: A break is confirmed when price wicks beyond the zone boundary, even if the candle closes back inside the zone. This method is more sensitive and captures early or aggressive break attempts.
(Screenshot: Zone Breaks with Close)
(Screenshot: Zone Breaks with Wick)
◇ Display Nearest
The Display Nearest setting controls how many of the closest support and resistance zones are shown on the chart relative to the current price. Only the nearest active zones above and below price are displayed, while older or more distant zones are hidden. This helps reduce visual clutter and keeps the focus on the most immediately relevant support and resistance areas without removing or recalculating any underlying zones.
(Screenshot: Display nearest 2 zones)
◇ Breaks & Retests
These settings control the visibility and appearance of break and retest markers on support and resistance zones. Users can independently enable or disable break markers and retest markers. Color settings allow customization of how bullish and bearish retests and zone breaks are displayed on the chart, making it easier to distinguish different types of interactions. Turning these options off hides the markers without affecting how zones are calculated.
◇ Show invalidation Zones
The Show Invalidated Zones setting controls whether support and resistance zones remain visible after they are broken. When enabled, zones that have been invalidated are kept on the chart in a visually muted form. This allows users to see where zones were previously active without treating them as current support or resistance. When disabled, invalidated zones are removed from the chart once a break is confirmed, keeping the display focused only on active zones.
(Screenshot: Historical Zones are muted)
TRENDLINES:
🔹 What is a Trendline
A bullish trendline is a line drawn by connecting higher swing lows, showing that price is making progressively higher lows over time. As long as price continues to respect this line, upward movement remains intact. A bullish trendline is typically tested from above, and a break occurs when price closes below the line.
(Screenshot: Bullish Trendline)
A bearish trendline is a line drawn by connecting lower swing highs, showing that price is making progressively lower highs over time. As long as price respects this line, the downward movement remains intact. A bearish trendline is typically tested from below, and a break occurs when price closes above the line.
(Screenshot: Bearish Trendline)
🔹How it works
In the S9 Toolkit, trendlines are constructed using confirmed swing points. Each trendline is created only after a valid sequence of pivots is identified, ensuring that lines are based on completed price movement rather than interim fluctuations. Once drawn, a trendline extends forward and is continuously evaluated as new price data forms. Trendlines and volumetric zones work together in the S9 Toolkit. Zones highlight areas where price interacts and trades, while trendlines show the overall directional structure. When viewed together, they help traders see whether price is moving in line with the current structure or beginning to move away from it.
🔹How the indicator detects trendlines
◇ Step 1: Detect confirmed swing pivots
The S9 Toolkit identifies confirmed swing highs and swing lows using the selected Swing Length setting. A pivot is only confirmed after the required number of bars have formed on both sides, ensuring completed structure and non-repainting behavior.
(Screenshot: Confirmed swing pivots)
◇ Step 2: Form and validate a candidate trendline
When a new pivot is confirmed, the indicator attempts to connect it with the previous pivot of the same type. For bearish trendlines, the new swing high must be lower than the previous swing high. For bullish trendlines, the new swing low must be higher than the previous swing low.
(Screenshot: New Lower High)
◇ Step 3: Apply strength filtering
Each valid candidate trendline is evaluated using a slope-based strength calculation derived from the relative size of the swing legs between the pivots, rather than a simple angle measurement. If the calculated strength does not meet the user-defined Strength threshold, the trendline is filtered out and not displayed.
(Screenshot: Strength Calculation)
◇ Step 4: Extend the trendline and draw the zone
Validated trendlines are extended forward by the number of bars defined in the Extend By setting. A shaded zone is drawn around the line using ATR-based padding so price interaction is observed as an area rather than a single line.
(Screenshot: S9 Toolkit’s Trendlines)
🔹 Swing Length
The Swing Length setting controls how swing points are identified for trendline construction. A swing point is confirmed only after the specified number of bars has formed on both sides of the pivot. A higher swing length requires more bars to confirm each pivot, resulting in fewer swing points and trendlines that reflect longer-term price movement. A lower swing length confirms pivots more frequently, producing more swing points and shorter-term trendlines that react more quickly to price changes.
(Screenshot: Trendlines with Smaller Swing Length)
(Screenshot: Trendlines with Higher Swing Length)
🔹Strength filtering
The strength setting controls how selective the trendline detection is. Higher strength values require more pronounced directional moves between swing points, filtering out flatter or weaker trendlines. Lower values allow more trendlines to appear, including those with gentler slopes. This allows traders to adjust sensitivity based on their preferred level of structural detail.
(Screenshot: Low strength zones, Flatter Slope)
(Screenshot, High Strength Zones, Weaker Filtered out)
🔹Trendline extension and lifecycle
Once established, trendlines extend forward by a user-inputted number of bars and remain active until invalidated by confirmed price behavior. A trendline does not disappear simply because the price moves away from it. Its relevance is reassessed only when the price decisively breaks through it.
(Screenshot: Trendlines Keep Extending Until Invalidation)
🔹Extend By
The Extend By setting controls how far a trendline is extended forward after its last confirmed pivot or break. The value defines the number of bars the trendline continues beyond that point for ongoing reference.
(Screenshot: Extend by Example)
🔹Show Last
The Show Last setting limits the number of most recent trendlines displayed on the chart. Older trendlines beyond this limit are hidden to reduce visual clutter.
(Screenshot: Show Last Settings)
🔹 Regular Breaks
A regular break occurs when price closes beyond the trendline on a confirmed bar. Intrabar movement is ignored, ensuring that only completed candles can invalidate a trendline. Regular breaks are evaluated using the same confirmed-bar logic as support and resistance zones.
(Screenshot: Regular Breaks)
🔹 Engulfing Breaks
An engulfing break occurs when a valid engulfing candle forms at the trendline. Instead of requiring a close beyond the line, the engulfing pattern itself is used as the break condition. Engulfing breaks are also evaluated only on confirmed bars and can be enabled independently of regular breaks.
(Screenshot: Engulfing Breaks)
The engulfing candlesticks used for trendline break detection follow the same criteria described later in this write-up in the Engulfing Candlesticks section below, where the pattern is explained in detail.
After a break, the trendline stops extending and is marked with a break label.
🔹Hide Invalidated Trendlines
When enabled, trendlines are removed from the chart after a confirmed break to reduce chart clutter and keep the focus on active directional structure. When disabled, broken trendlines remain visible for reference, allowing users to see where previous directional boundaries existed without treating them as valid trendlines.
(Screenshot: Only Valid Trendlines displayed)
🔹How to interpret trendline breaks and continuation
Trendlines should be viewed for directional reference, not as buy or sell signals. When price respects a trendline, it suggests the market is continuing in the same direction, and structure remains aligned. When reactions become weaker or price starts overlapping the line, it may indicate that directional strength is fading.
Clear breaks, especially when they occur near zones or alongside volume changes, often show that the market is re-evaluating its direction. When trendlines align with volumetric zones, price reactions tend to be more meaningful. When they do not align, the mismatch itself becomes useful information.
The S9 Toolkit highlights these relationships so traders can observe whether direction and structure remain aligned or begin to separate.
ENGULFING CANDLE BEHAVIOR AND ZONES:
🔹What is an engulfing candlestick
An engulfing candlestick occurs when a candle completely overtakes the body of the previous candle in the opposite direction. The current candle closes beyond the prior candle’s range, showing that price moved decisively during that bar rather than continuing the previous movement. This type of candlestick highlights a clear shift in short-term price direction compared to the preceding candle and marks areas where price momentum changes abruptly.
A bullish engulfing candlestick forms when a bearish candle is followed by a larger bullish candle that fully engulfs the previous candle’s body and closes above its high.
(Screenshot: Bullish Engulfing)
A bearish engulfing candlestick forms when a bullish candle is followed by a larger bearish candle that fully engulfs the previous candle’s body and closes below its low.
(Screenshot: Bearish Engulfing)
🔹 How the indicator detects engulfing candlesticks
◇ Step 1: Compare candle direction
The indicator first checks whether the previous candle and the current candle are in opposite directions. A bullish engulfing requires the previous candle to be bearish and the current candle to be bullish. A bearish engulfing requires the previous candle to be bullish and the current candle to be bearish.
(Screenshot: Bullish Candle/ Bearish Candle)
◇ Step 2: Apply body-size requirement
The indicator then checks that the current candle’s body is significantly larger than the previous candle’s body. This requirement filters out weak or marginal engulfing candles and focuses only on more decisive price movement.
(Screenshot: Weak Body vs Strong Body)
◇ Step 3: Confirm range takeover with a close beyond the prior bar
After the size condition is met, the indicator requires the current candle to close beyond the previous candle’s range:
Bullish engulfing candles must close above the previous candle’s high.
Bearish engulfing candles must close below the previous candle’s low.
(Screenshot: Closing above previous high)
◇ Step 4: Highlight the engulfing candle on the chart
When an engulfing candlestick is detected, the indicator highlights the candle using direction-specific colors. Bullish engulfing candles and bearish engulfing candles are colored separately based on the user’s Engulfing Candlesticks color settings, allowing quick visual identification on the chart.
(Screenshot: Highlighting the Engulfing Candle)
🔹Engulfing Zones
When a valid engulfing candlestick is detected, the toolkit constructs an engulfing zone based on the price range of the engulfing candlestick. For bullish engulfing, the zone spans from the current bar's high down to its open. For bearish engulfing, the zone spans from the current bar's open down to its low. These zones persist forward in time and can be revisited, tested, or invalidated like other structural elements. The toolkit tracks whether price later returns to mitigate (trade through) these zones.
(Screenshot: Engulfing Zones)
🔹Show Last
This setting limits the number of engulfing zones displayed on the chart. When set to a value such as 5, only the five most recent engulfing zones that have not yet been mitigated are shown, while all others are hidden to reduce chart clutter.
(Screenshot: Last 2 Engulfing Zones)
🔹How to interpret engulfing behavior
Engulfing behavior should be read as a sign of decisive price movement. A bullish engulfing event shows that buying pressure was strong enough to overcome the prior bar's range and close higher. A bearish engulfing event shows the same for selling pressure.
The most important information comes from what happens next. Continued movement in the same direction suggests follow-through, while overlap or hesitation suggests the move may be temporary.
Engulfing behavior becomes more contextually significant when it aligns with other toolkit components. An engulfing event that forms near a volumetric support zone, along a trendline, or close to a session POC may carry more weight than one that appears in open space. The toolkit presents these events as points of interest, allowing traders to evaluate context without treating them as automatic trade signals.
🔹Zone mitigation logic
When price revisits an engulfing zone after its creation, the toolkit tracks whether the zone is mitigated. A zone is marked as mitigated when price trades through it (closes beyond its boundary). Mitigated zones stop displaying, keeping the chart focused on active, unmitigated structure.
By highlighting engulfing behavior and optionally tracking the resulting zones, the S9 Toolkit turns candle patterns into observable reference points. Traders can see where decisive price moves occurred and whether those areas continue to influence later price behavior.
HIGHS AND LOWS STRUCTURAL MARKERS:
🔹How it works
The toolkit marks swing highs and lows as horizontal reference lines on the chart. These represent confirmed pivot points where price changed direction. When price later breaks through a prior swing level, it's marked with a "B" label.
🔹Swing detection
Swing sensitivity is configurable. Lower values detect more swings with finer detail. Higher values detect fewer, more significant pivots. Swings are only marked after confirmation, so they don't repaint.
🔹How to interpret
Swing highs and lows show where price previously reversed. Breaks show where price has moved beyond prior structure. Sequences of higher highs/lows or lower highs/lows help assess directional context.
SESSION VOLUME PROFILE:
🔹How it works
The Session Volume Profile component of the S9 Toolkit organizes traded volume across price for a defined trading session. Volume is arranged vertically across price levels, showing where activity concentrated and where trading interest was limited during that session. This helps identify the price areas where the market spent time trading and building activity. Sessions can be defined explicitly to reflect distinct trading environments, such as regional market opens or custom intraday windows. Each session profile resets independently, allowing traders to observe how value develops and shifts from one session to the next without cumulative distortion.
🔹How volume is distributed across price
Volume is aggregated across all bars within the active session and mapped to price levels using a configurable number of rows. The toolkit divides the session's price range into equal segments and distributes each bar's volume across the rows that the bar's range touches. Volume distribution uses a proportional calculation method where each bar's volume is allocated based on how much of the bar's range falls within each price row. This creates a distribution that highlights high-activity price levels and low-activity gaps. Volume is classified as up or down based on candle direction, providing a consistent way to separate buying and selling activity across the profile.
🔹Point of Control (POC)
The Point of Control represents the price level where the highest amount of volume was traded during the session. It marks the area of greatest trading activity and often acts as a gravitational reference point for price. The POC highlights where the market showed the strongest willingness to transact during that session.
Repeated interaction with a session POC suggests continued interest around that price level, while clean movement away from it can indicate that trading activity is shifting elsewhere.
🔹Value Area High and Low (VAH / VAL)
The Value Area defines the range of prices where the majority of session volume was exchanged. VAH marks the upper boundary of this range, while VAL marks the lower boundary. Together, they frame the area where the market considered prices fair during that session.
Price behavior around VAH and VAL often provides context. Continued trading within the value area reflects concentrated activity, while sustained trade outside of it often coincides with expansion or transition in price behavior.
🔹How to interpret session-based volume structure
Session Volume Profile should be interpreted in conjunction with structure and direction. A session that develops value above prior structure may indicate continuation, while value developing below may suggest reassessment. Sessions with narrow value and low activity often precede expansion, while sessions with wide, overlapping value often reflect consolidation.
By resetting profiles each session, the S9 Toolkit helps traders observe how value shifts over time and how activity changes across different trading environments. Session Volume Profile highlights where trading activity is concentrated and where it is limited, providing a clear context for how price movement develops afterward.
EMA BIAS:
🔹How it works
The toolkit allows users to display up to three exponential moving averages, each with a user-defined length. These EMA lengths can be configured independently, allowing short-, medium-, and longer-term averages to be viewed together on the chart. Each EMA updates continuously as new bars form.
🔹 Price Above the EMAs
When price trades consistently above one or more EMAs, bias relative to those EMAs is considered positive. This indicates that price is accepting higher levels and that upward movement is being maintained. When multiple EMAs are stacked below price and begin to spread apart, it often reflects bullish price discovery, where price is moving higher with momentum.
(Screenshot: Price above ema, Emas spread apart)
🔹Price Below the EMAs
When price trades consistently below one or more EMAs, bias relative to those EMAs is considered negative. This indicates that lower prices are being accepted and downward movement is being maintained. When multiple EMAs are stacked above price and spread apart, it often reflects bearish price discovery, where price is moving lower with strong directional pressure.
(Screenshot: Bearish EMA Direction)
🔹Frequent EMA Crossings and Compression
When price crosses back and forth through the EMAs and the EMAs remain close together, directional bias is unclear. This behavior typically indicates consolidation or range-bound conditions, where price lacks sustained directional movement and reactions at support or resistance are more likely to be rotational rather than trending.
(Screenshot: Frequent Crossing, Range-Bound)
CHECKLIST DASHBOARD:
🔹How it works
The Checklist Dashboard is a context reference tool designed to present selected market conditions in a compact, easy-to-read format. It brings together key observations from the S9 Toolkit and displays them in one place, allowing traders to review structure, direction, and interaction without scanning the entire chart.
Most checklist items are manually assessed and toggled by the trader based on their own reading of the chart. This allows the checklist to function as a disciplined review framework rather than an automated signal generator. The EMA-related item is the only condition that updates automatically based on live price behavior.
🔹How checklist conditions are handled
Each checklist item represents a specific consideration, such as structural alignment, directional bias, or interaction with key zones. Except for EMA, checklist states are user-controlled and reflect the trader's interpretation of current conditions using the toolkit's visual components.
Conditions are presented in a simple binary format to reduce cognitive load. The checklist does not rank, weight, or score conditions. Its purpose is to organize thought, not to make decisions.
🔹How to use the checklist
The Checklist Dashboard is best used as a discipline and a confluence aid. A checklist showing broad alignment can indicate a cleaner market environment, while mixed states can highlight uncertainty, compression, or transition.
Because the checklist is configurable and largely manual, traders can adapt it to different workflows, higher-timeframe analysis, intraday execution, or post-analysis review. Used properly, it helps maintain consistency and situational awareness without introducing mechanical bias or automated decision-making.
INPUTS:
🔹Volumetric Support & Resistance
◇ Enable
Turns volumetric support and resistance zones on or off entirely.
◇ Pivot Length
Defines how many bars on each side are required to confirm a swing pivot.
Higher values produce fewer, more stable zones based on higher-level structure. Lower values produce more frequent zones with finer structural detail.
◇ Strength
Sets the minimum number of valid retests required for a zone to remain active. Strength increases only when price revisits the zone without breaking it. The maximum strength is capped at three.
◇ Timeframe
Allows zones to be sourced from a higher timeframe and projected onto the active chart. When set, all zone logic (creation, retests, breaks) is evaluated on the selected timeframe while remaining historically aligned.
◇ Invalidation Method
Controls how zone invalidation is confirmed:
Close: A zone is invalidated only when the price closes beyond its boundary.
Wick: A zone is invalidated when the price wicks beyond its boundary.
Close-based invalidation is more conservative; wick-based invalidation is more sensitive.
◇ Display Nearest
Limits how many of the closest active zones are displayed.
◇ Volumetric Info
Displays internal volume information inside each zone, including total volume and bullish/bearish percentage split based on candle direction during zone formation.
◇ Retests
Displays retest markers when price revisits a zone and reacts without invalidation.
◇ Breaks
Displays visual markers when a zone is invalidated according to the selected invalidation method.
◇ Show Invalidated Zones
Keeps invalidated zones on the chart in a visually muted state. This preserves historical structure and allows observation of how price behaves around former areas of interest.
🔹Trendlines
Trendline inputs control directional structure derived from confirmed swings.
◇ Enable
Enables or disables all trendline calculations and rendering.
◇ Swing Length
Defines how many bars are required to confirm swing highs and lows used for trendline construction. Higher values emphasize broader directional structure; lower values increase sensitivity.
◇ Strength
Sets the minimum slope strength required for a trendline to be considered valid. Higher values filter out flatter or weaker trendlines.
◇ Extend By
Controls how many bars a trendline extends forward beyond its last confirmed point or break.
◇ Show Last
Limits the number of most recent trendlines displayed to reduce clutter.
◇ Regular Breaks
Marks a trendline break when price closes beyond the trendline.
◇ Engulfing Breaks
Marks a trendline break when a valid engulfing candle occurs at the trendline.
◇ Hide Invalidated Trendlines
Removes broken trendlines from the chart after confirmation.
🔹Engulfing Candlesticks
◇ Bullish Engulfing / Bearish Engulfing
Enables detection of bullish or bearish engulfing candles based on body size and directional criteria.
◇ Engulfing Zones
Creates zones from engulfing candles that can be revisited, tested, or invalidated like other structural elements.
◇ Show Last
Limits how many recent engulfing events or zones remain visible.
🔹Session Volume Profile
◇ Session Volume Profile
Enables session-based volume profiling.
◇ Session
Defines the active session window used to build each profile. Profiles reset automatically at session boundaries.
◇ Volume Mode
Controls how volume is displayed:
Up / Down: Separates volume based on candle direction.
Total: Displays total volume per price row.
Delta: Displays directional imbalance.
◇ Value Area Volume (%)
Defines the percentage of total session volume used to calculate the Value Area.
◇ Row Size
Defines how the session’s price range is divided when constructing the volume profile. Each row represents a discrete price band where volume is aggregated.
◇ Profile Placement
Anchors the volume profile to the left or right of the session range.
◇ Point of Control (POC)
Displays the price level with the highest traded volume for the session.
◇ Value Area High / Low (VAH / VAL)
Displays the upper and lower boundaries of the value area.
◇ Only Show Current Session
Hides historical session profiles and displays only the active session.
🔹Highs & Lows
◇ Highs/Lows
Enables swing high and swing low detection.
◇ Swing Length
Defines how many bars are required to confirm a swing pivot.
◇ Display Nearest
Limits how many recent swing levels are displayed.
◇ Show Breaks
Marks when price breaks beyond a prior swing high or low using confirmed bars.
🔹EMAs
◇ EMA Visibility and Lengths
Controls which EMAs are displayed and their respective lengths.
🔹Checklist Dashboard
◇ Enabled
Shows or hides the checklist dashboard.
◇ Checklist Items (1–5)
Each checklist item consists of:
A manual true/false toggle
A custom label
These reflect the trader’s interpretation of current conditions using the toolkit’s visual components.
◇ EMA Checklist
Automatically displays EMA alignment status. This is the only dynamic checklist item.
◇ Position
Controls where the checklist appears on the chart.
◇ Size
Controls dashboard text and spacing.
ALERTS:
🔹How alerts are triggered
Alerts in the S9 Toolkit notify traders when important structural or behavioral events occur. Each alert is linked to confirmed conditions, so notifications reflect completed market behavior. Alerts trigger only after the condition is confirmed on a closed bar.
Alert logic mirrors the same confirmation rules used throughout the toolkit. If a zone is invalidated, a trendline is broken, or a structural condition changes, the alert fires only once the event is confirmed. This prevents duplicate or misleading alerts caused by intrabar fluctuations or temporary probes.
🔹Available alert types
The S9 Toolkit supports alerts for the following events:
◇ Trendlines:
Bullish Trendline Detection
Bearish Trendline Detection
Bullish Trendline Break
Bearish Trendline Break
◇ Support/Resistance Zones:
Support Zone Detected
Resistance Zone Detected
Support Zone Retest
Resistance Zone Retest
Support Zone Break
Resistance Zone Break
◇ Engulfing Patterns:
Bullish Engulfing Candlestick
Bearish Engulfing Candlestick
◇ Swing Structure:
Swing High Break
Swing Low Break
◇ Moving Averages:
EMA Direction Change (price crosses above or below EMA)
Each alert type can be individually enabled or disabled in the indicator settings.
🔹How to set up alerts
To create alerts, add the S9 Toolkit indicator to your chart and configure which alert types you want to receive in the indicator settings. Then create a TradingView alert on the chart, select the S9 Toolkit indicator, and choose "Any alert() function call" as the condition. This will trigger an alert whenever any of your enabled alert types fires.
PERFORMANCE AND DESIGN CONSIDERATIONS:
🔹Lower-timeframe data handling
Some components of the S9 Toolkit rely on lower-timeframe data to provide more granular volume and structural insight. These requests are handled explicitly and conservatively to avoid excessive data usage or performance degradation. Lower-timeframe logic is applied only where it meaningfully enhances analysis, and safeguards are in place to prevent unnecessary recalculation.
🔹Object limits and performance safeguards
The toolkit actively manages drawing objects such as zones, lines, and profiles to remain within TradingView’s object limits. Older or less relevant objects can be pruned, merged, or visually downgraded to preserve chart performance. This ensures stability even when multiple components are enabled simultaneously.
🔹Non-repainting and confirmation logic
All calculations in the S9 Toolkit are based on confirmed historical data. No component relies on future bars or retroactive adjustment. Structural elements update only when confirmation conditions are met, ensuring that historical analysis remains consistent with real-time behavior. This design principle allows traders to trust that what they see on the chart reflects what was available at the time.
UNIQUENESS:
The S9 Toolkit focuses on contextual analysis by organizing price, volume, and structure into layered components that operate together rather than as isolated signals. It combines volumetric support and resistance zones with internal volume breakdowns, trendline structure, engulfing candlestick detection, session-based volume profiling, and swing structure tracking in a single visual layout. Unlike indicators that focus on one technique at a time, each component in the S9 Toolkit is designed to coexist without overriding the others, allowing traders to observe alignment, disagreement, and transitions in market conditions within the same chart view.

Trendline and SR System [BullByte]TRENDLINE AND SR SYSTEM
From Manual Drawing to Intelligent Automation
═════════════════════════════════════════════════════════════
OVERVIEW
This indicator automates years of manual chart work: detecting trendlines, forming support/resistance zones, tracking zone lifecycles, and scoring touches by quality. Instead of counting touches equally, the system weights them by precision, reaction type and volume so a high-volume wick rejection gets more influence than a low-volume consolidation.
The core philosophy is simple: not all touches are equal. A wick rejection at high volume carries more weight than a body consolidation at low volume. A zone that held three times deserves more attention than one that just formed. This indicator captures that nuanced approach through a quality-weighted touch scoring system.
═════════════════════════════════════════════════════════════
THE PROBLEM THIS SOLVES
Manual technical analysis presents several challenges:
1. Time Consumption - Drawing and updating trendlines across multiple assets and timeframes is labor-intensive
2. Subjectivity - Two traders often draw different lines on the same chart
3. Inconsistency - Fatigue leads to missed levels or inconsistent criteria
4. Delayed Updates - Manually tracking when zones break, get retested, or flip takes constant attention
This system addresses each challenge by applying consistent mathematical criteria to every potential level, updating in real-time, and tracking zone lifecycle automatically.
═════════════════════════════════════════════════════════════
HOW IT WORKS
--- TRENDLINE DETECTION ---
The system identifies trendlines through a multi-step process:
Step 1: Pivot Detection
The indicator scans for significant swing highs and swing lows using a sensitivity parameter that automatically scales based on your chart timeframe. Shorter timeframes use faster detection, while daily charts use slower, more significant pivots.
Step 2: Line Validation
For each pair of pivots, the system calculates:
- Slope direction (upward for bullish, downward for bearish)
- Current relevance (is the projected line near current price?)
- Minimum touch requirements
Step 3: Touch Quality Scoring
This is where the system differs from simple trendline indicators. Each touch is scored based on:
Precision: How close did price get to the line? A touch at the exact line scores 1.0, while a touch at the edge of tolerance scores lower.
Reaction Type: The system classifies touches into categories:
* Wick Rejection (1.0) - Wick touched but body stayed outside
* Body Rejection (0.8) - Body touched but closed with reaction
* False Break (1.2) - Price broke through then recovered (strongest signal)
* Consolidation (0.5) - Price lingered without clear rejection
Volume Weight: When volume integration is enabled, high-volume touches receive a boost (up to 1.5x), while low-volume touches are discounted (down to 0.5x).
Step 4: Display Filtering
Only trendlines meeting minimum touch count AND minimum average precision are displayed. This eliminates weak, coincidental alignments.
--- SUPPORT AND RESISTANCE ZONES ---
Zones are detected from pivot points and horizontal level clustering:
Pivot-Based Zones:
When a significant pivot forms, a zone is created around that price level. Zone height is calculated as an ATR multiple, automatically scaling with volatility.
Cluster-Based Zones:
The system scans historical bars to find where multiple highs or lows align within tolerance. These horizontal rejection clusters often mark institutional interest levels.
Zone Merging:
When two zones are within a configurable distance, they merge into one stronger zone rather than cluttering the chart.
--- ZONE LIFECYCLE MANAGEMENT ---
This is the core innovation. Zones progress through states:
ACTIVE: Newly formed zone, not yet validated
TESTED: Zone has received 3+ quality touches, proving its relevance
BROKEN: Price closed through the zone
RETESTED: Price returned to test the broken zone
FLIPPED: Former support now acts as resistance (or vice versa)
Each state is visually distinct:
- Active zones show in standard support/resistance colors
- Tested zones show in blue with thicker borders
- Broken zones fade to gray
- Retested zones show in orange
- Flipped zones show in purple
Zone Decay:
Zones that price ignores gradually lose strength. The decay rate is configurable (default 0.997 per bar). This means a zone loses roughly half its strength after 230 bars of no interaction. This prevents old, irrelevant levels from cluttering your chart.
Zone Reactivation:
If price returns to a decayed zone, it receives a strength boost, recognizing that the level remains relevant.
═════════════════════════════════════════════════════════════
READING THE VISUAL ELEMENTS
--- TRENDLINES ---
Label Format:
Examples :
- B3 = Bullish trendline with 3 touches (active)
- B5x = Bullish trendline with 5 touches (broken)
- R4 = Bearish/Resistance trendline with 4 touches (active)
Line Thickness:
- Thin lines = 2-3 touches
- Thick lines = 4+ touches (higher significance)
Line Style:
- Solid = Active trendline
- Dotted = Broken trendline
--- ZONES ---
Label Format :
Examples :
- S2 = Support zone with 2 touches (active)
- S4+ = Support zone with 4 touches (tested/validated)
- R3x = Resistance zone with 3 touches (broken)
- S5r = Support zone retested after break
- R4f = Resistance zone that flipped to support
Border Thickness:
- Thin border = Standard zone
- Thick border = Validated zone (3+ touches or high volume)
Zone Colors by State:
- Teal/Green shades = Support zones
- Red shades = Resistance zones
- Blue = Tested/validated zones
- Gray = Broken zones
- Orange = Retested zones
- Purple = Flipped zones
--- DAILY AND WEEKLY LEVELS ---
PDH = Previous Day High
PDL = Previous Day Low
PWH = Previous Week High
PWL = Previous Week Low
HTF R = Higher Timeframe Resistance
HTF S = Higher Timeframe Support
These levels use dashed lines by default and extend from the period open.
--- BREAKOUT MARKERS ---
When a trendline breaks, the system places a "BRK" label at the breakout point.
Marker Size (when volume integration enabled):
- Tiny = Normal volume breakout
- Small = Above-average volume breakout
- Normal = High volume breakout (1.5x+ average)
Recent breakouts show full labels; older breakouts show as dots.
═════════════════════════════════════════════════════════════
THE DASHBOARD EXPLAINED
The information panel displays real-time metrics organized in sections:
--- TRENDLINES SECTION ---
Bull TL: Count of active bullish trendlines
Bear TL: Count of active bearish trendlines
Near B: Price level of nearest bullish trendline
Near R: Price level of nearest bearish trendline
--- S/R ZONES SECTION ---
Support: Nearest support zone price
Resist: Nearest resistance zone price
Dist: Percentage distance to each zone
Touches: Touch count of nearest zones
Quality: Quality score of nearest zones (higher = stronger)
--- DAILY LEVELS SECTION ---
PDH/PDL: Previous day high and low prices
Dist : Percentage distance from current price
Green percentage = price is above the level
Red percentage = price is below the level
--- WEEKLY LEVELS SECTION ---
PWH/PWL: Previous week high and low prices
Dist: Percentage distance from current price
--- ANALYSIS SECTION ---
R:R: Risk-to-Reward ratio based on distance to nearest support (risk) and resistance (reward). Ratios of 2:1 or higher show in green.
Bias: Market direction assessment based on:
- Trendline count comparison
- Distance to support vs resistance
- Zone quality comparison
- Price position relative to 50 SMA
Sup Zones / Res Zones: Count of active zones
Flipped / Retested: Count of zones in these states
Trend: Trend strength based on moving average alignment (Strong Bull to Strong Bear)
Volatility: Current ATR relative to 50-period average (High/Normal/Low)
Vol Ratio: Current volume relative to 20-period average
Vol Wgt: Volume weighting status (ON/OFF)
═════════════════════════════════════════════════════════════
TIMEFRAME ADAPTATION
The indicator automatically adjusts its parameters based on your chart timeframe:
SCALP MODE (Under 15 minutes)
- Faster pivot detection
- Tighter zone heights
- More responsive to recent price action
- Dashboard shows tag
INTRADAY MODE (15 minutes to 1 hour)
- Standard parameters
- Balanced sensitivity
- Dashboard shows tag
SWING MODE (1 hour to 4 hours)
- Slower pivot detection
- Wider zone heights
- Focus on more significant levels
- Dashboard shows tag
POSITION MODE (Daily and above)
- Slowest detection for major levels only
- Widest zones for higher timeframe context
- Dashboard shows tag
This means you can use the same settings across all timeframes, and the indicator adapts appropriately.
═════════════════════════════════════════════════════════════
SETTINGS GUIDE
--- TRENDLINE SETTINGS ---
Show Trendlines: Master toggle for all trendline visibility
Base Pivot Sensitivity: Controls how many bars the system looks back to identify pivots. Lower values find more pivots; higher values find only significant ones. Default 10 works well for most cases.
Minimum Touches: How many touches a trendline needs before displaying. Default 3 filters out weak lines.
Minimum Precision Score: Average touch quality required. Range 0.3 to 0.95. Default 0.6 provides good balance. Higher values show only the most precise trendlines.
Max Bullish/Bearish Trendlines: Limits how many lines display to prevent clutter.
Touch Tolerance ATR Mult: How close price must get to count as a touch, measured in ATR. Default 0.5 ATR works for most markets.
Extend Lines Right: Whether trendlines project into the future.
--- SUPPORT RESISTANCE SETTINGS ---
Show SR Zones: Master toggle for zone visibility
Base Zone Detection Length: Pivot lookback for zone creation. Similar to trendline sensitivity.
Base Zone Height ATR Mult: How tall zones are, as ATR multiple. Default 0.5 ATR. Increase for volatile markets.
Max Support/Resistance Zones: Limits displayed zones.
Zone Merge Distance ATR: Zones within this distance combine. Prevents duplicate zones at similar prices.
Zone Decay Rate: How quickly ignored zones fade. Default 0.997 means ~50% strength after 230 bars. Lower values mean faster decay.
Reactivation Boost: Strength multiplier when price returns to a zone. Default 1.3 (30% boost).
Detect Rejection Levels: Enables horizontal cluster detection.
Min Rejections for Level: How many aligned highs/lows needed to form a horizontal level.
Rejection Lookback Bars: How far back to scan for clusters. Lower values improve performance.
--- VOLUME INTEGRATION ---
Enable Volume Weighting: When on, volume affects touch quality and breakout significance.
High Volume Threshold: Volume ratio above this is considered significant. Default 1.5 (50% above average).
Low Volume Threshold: Volume ratio below this is considered weak. Default 0.7 (30% below average).
Volume Average Lookback: Bars used for average volume calculation.
--- DAILY LEVELS ---
Show PDH/PDL: Toggle previous day levels
Show Weekly H/L: Toggle previous week levels
Line Style: Solid, Dashed, or Dotted
--- MULTI-TIMEFRAME ---
Show HTF Levels: Toggle higher timeframe reference levels
Higher Timeframe: Select the reference timeframe
HTF Lookback Period: How many HTF bars to scan for high/low
--- LABEL SETTINGS ---
Label Mode:
- Compact: Shows type, touch count, and status (S3+)
- Minimal: Shows type only (S)
- None: Hides all labels
Hide Labels Beyond ATR Threshold: Reduces label clutter for distant levels
Max Labels to Display: Limits total labels to prevent overcrowding
--- DASHBOARD ---
Show Dashboard: Toggle the information panel
Position: Choose corner or center placement
Size: Tiny, Small, Normal, or Large text
--- THEME ---
Color Theme: Choose from Dark, Light, Neon, Classic, or Ocean presets. Each theme adjusts all colors for consistency.
--- VISUAL SETTINGS ---
Major/Minor Line Width: Thickness for significant vs standard lines
Show Breakout Markers: Toggle breakout event labels
═════════════════════════════════════════════════════════════
PRACTICAL USAGE
--- FOR TREND FOLLOWING ---
Watch for price respecting bullish trendlines in uptrends. Multiple touches with clean rejections indicate strong trend structure. A break below a well-tested trendline (4+ touches, high precision) often signals trend weakness.
--- FOR REVERSAL TRADING ---
Look for flipped zones (purple). A former resistance that now acts as support represents a genuine shift in market structure. Retested zones (orange) offer potential entry points as price confirms the level.
--- FOR BREAKOUT TRADING ---
Monitor tested zones (blue, 3+ touches). These validated levels, when broken with high volume (large BRK marker), often lead to significant moves. The R:R ratio in the dashboard helps assess if the breakout offers favorable risk-reward.
--- FOR MULTI-TIMEFRAME ANALYSIS ---
The HTF levels provide context. When an intraday support zone aligns with a daily support level (HTF S), that confluence adds significance. The dashboard shows distances to help identify these alignments.
--- FOR RISK MANAGEMENT ---
Use zone levels for stop placement. The dashboard R:R calculation shows reward-to-risk based on distance to nearest zones. Zones with higher quality scores have historically held better.
═════════════════════════════════════════════════════════════
WHAT MAKES THIS ORIGINAL
This is not a simple combination of existing indicators. The originality lies in:
1. Quality-Weighted Touch Scoring
Most trendline indicators count touches equally. This system scores each touch based on precision, reaction type, and volume, then filters by average quality. This eliminates many false positives that plague simple touch-counting approaches.
2. Zone Lifecycle State Machine
Rather than static boxes, zones evolve through states (active, tested, broken, retested, flipped) with distinct visual treatment and strength adjustments. This mirrors how experienced traders mentally track levels.
3. Decay and Reactivation System
Zones that price ignores fade naturally, while zones that price returns to strengthen. This creates a self-cleaning chart where only relevant levels remain prominent.
4. Timeframe-Adaptive Parameters
Instead of requiring different settings for each timeframe, the system automatically scales its detection parameters. The same configuration works from 1-minute to monthly charts.
5. Volume-Integrated Significance
When enabled, volume affects every calculation: touch quality, zone strength, and breakout marker prominence. High-volume events receive appropriate emphasis.
6. Synergistic Component Integration
Trendlines, zones, daily levels, and HTF reference work together. The dashboard synthesizes all components into actionable metrics like R:R ratio and market bias.
═════════════════════════════════════════════════════════════
ALERTS AVAILABLE
- Bullish Trendline Break: Triggers when price breaks below a bullish trendline
- Bearish Trendline Break: Triggers when price breaks above a bearish trendline
- Approaching Support: Triggers when price nears a support zone
- Approaching Resistance: Triggers when price nears a resistance zone
- PDH Test: Triggers when price tests previous day high
- PDL Test: Triggers when price tests previous day low
- Zone Retest: Triggers when price returns to a broken zone
- Zone Flip: Triggers when a broken zone confirms as flipped
═════════════════════════════════════════════════════════════
BACKGROUND COLOR INDICATOR
The chart background subtly changes color when price approaches key levels:
- Green tint: Price near support zone
- Red tint: Price near resistance zone
- Yellow tint: Price near both support and resistance (compression)
- No color: Price in open space between levels
This provides at-a-glance awareness without requiring constant dashboard monitoring.
═════════════════════════════════════════════════════════════
PERFORMANCE NOTES
The indicator is optimized for performance through:
- Calculation throttling for intensive operations
- Capped loop iterations to prevent script timeout
- Efficient array management
- Sampling techniques for historical scanning
If you experience slow loading on very long charts, consider reducing:
- Rejection Lookback Bars
- Max Zones settings
- Disabling Detect Rejection Levels temporarily
═════════════════════════════════════════════════════════════
NON-REPAINTING CONFIRMATION
This indicator uses confirmed bar data:
- Pivots are detected using historical lookback (not current bar)
- Zone states change only on bar close
- Trendline breaks are confirmed on bar close
- Alerts trigger only after bar confirmation
The only real-time updates occur on the current forming bar for visual purposes. All historical drawings remain fixed once their bar closes.
═════════════════════════════════════════════════════════════
DISCLAIMER
This indicator is for educational and informational purposes only. It does not constitute financial advice, investment recommendations, or trading signals.
Trading involves substantial risk of loss. Past performance of any trading system or methodology is not necessarily indicative of future results. You should not trade with money you cannot afford to lose.
The author makes no guarantees regarding the accuracy or completeness of any information provided. All trading decisions are your own responsibility.
Always conduct your own research and consider consulting with a qualified financial advisor before making any investment decisions.
═════════════════════════════════════════════════════════════
CREDITS AND ACKNOWLEDGMENTS
This indicator was developed to solve the manual charting experience, observing how price interacts with technical levels, and translating those observations into systematic rules.
Thank you to the TradingView community for the platform and Pine Script language that makes this automation possible.
═════════════════════════════════════════════════════════════
VERSION HISTORY
v1.0.0 - Initial Release
- Automatic trendline detection with quality-weighted touches
- Dynamic support/resistance zones with lifecycle management
- Volume integration for touch and breakout significance
- Multi-timeframe daily/weekly/HTF levels
- Comprehensive dashboard with real-time metrics
- Timeframe-adaptive parameter scaling
- Multiple theme options
- Complete alert system
═════════════════════════════════════════════════════════════

Draw Trendline with Breakout by Pooja🌟 Draw Trendline with Breakout by Pooja
Draw Trendline with Breakout by Pooja
✨ A smart & clean auto–trendline tool that detects swings, plots dynamic trendlines, and highlights real-time breakouts — designed for intraday, swing & positional traders.
Indicator intelligently reads market structure using objective statistical calculations (ATR / Stdev / LinReg) and gives you clarity on trend direction, structural shifts, and breakout opportunities.
Works on Stocks • Indian Stock Market • Crypto • Forex • Commodities
Suitable for Scalping • Day Trading • Swing Trading
🔥 Key Features
🔹 Auto Trendline Detection
Auto-detects swing highs/lows
Draws adaptive upper & lower trendlines
No manual drawing required
🔹 Dynamic Slope Engine
Choose from 3 professional slope methods:
📏 ATR Mode – volatility-adaptive
📊 Stdev Mode – statistical noise filtering
📐 Linear Regression Mode – structural slope mapping
🔹 Real-Time Breakout Signals
⚡ Instant breakout markers (Up/Down)
🔔 Alert support for both breakout types
Helps catch trend continuation & reversals early
🔹 Extended Projection Lines
➡️ Projects trendlines forward
🎯 Helps identify possible future reaction zones
🔹 Backpaint Control
🧩 Optional historical offset display
Great for forward testing & clean charts
🔹 Flexible Customization
Swing length
Colors
Slope sensitivity
Extended line visibility
📈 How to Use
Apply indicator
Set swing length based on volatility
Choose slope mode (ATR/Stdev/LinReg)
Observe auto trendlines
Watch for breakout markers
Set alerts for faster entries
Best used together with:
📌 Support & Resistance
📉 Price Action
🧭 Market Structure
🔊 Volume
💡 Why Traders Like It
Clean & lag-free structure mapping
Zero manual drawing
Breakouts are visually clear
Works on all assets & timeframes
⚠️ Disclaimer
This indicator is a technical analysis tool meant for charting assistance.
It does not guarantee profits or predict markets with certainty.
Always combine with your own analysis and proper risk management.
Past performance ≠ future results.

Trend lines & Pressure Zone Overview
This indicator intelligently identifies and plots dynamic support and resistance zones based on swing pivots and price action validation. It combines trend analysis with pressure zone detection to highlight key areas where price is likely to react.
Key Features
1.Smart Zone Detection
Automatically identifies the strongest resistance and support levels
Requires multiple price touches for validation (configurable)
Plots only the 2 most relevant trendlines to keep charts clean
Dynamic channel zones show the area of influence around each trendline
2.Dual Analysis Method
Uses swing pivot detection to find turning points
Validates zones through touch counting with price margin tolerance
Combines aspects of trendline analysis and pressure zone theory
Adapts to different timeframes and instruments
3.Contact Detection & Alerts
Visual circle markers when price contacts zones
Arrow indicators for zone interactions
Alert conditions for zone creation, breaks, and contacts
Customizable visual feedback
4.Flexible Configuration
Adjustable swing length for pivot detection
Configurable price margin tolerance
Minimum touch requirements prevent false signals
Optional line extension with custom length
Peak reset interval to refresh zones periodically
How It Works
Resistance Zones:
Identifies swing high pivots
Tracks the highest peak within the reset interval
When price drops below the peak, draws a downward trendline
Validates the zone by counting touches within the price margin
Only displays the zone after minimum touches are confirmed
Support Zones:
Identifies swing low pivots
Tracks the lowest trough within the reset interval
When price rises above the trough, draws an upward trendline
Validates the zone by counting touches within the price margin
Only displays the zone after minimum touches are confirmed
Zone Channels:
Each trendline includes a parallel channel showing the pressure zone width, making it easier to identify when price is interacting with the zone.
Pivot Detection:
Swing Length (default: 5) - Bars on each side to confirm pivot points
Peak Reset Interval (default: 100) - Bars before resetting tracked peak/trough
Zone Settings:
Price Margin % (default: 0.1%) - Tolerance for touch validation
Minimum Touches (default: 3) - Required touches before drawing zone
Channel Width % (default: 0.5%) - Visual width of pressure zone
Extension:
Extend Lines (default: off) - Project lines into the future
Extension Length (default: 50) - Bars to extend when enabled
Visual Styling:
Separate color/width controls for resistance and support
Customizable fill transparency for channels, Toggle contact arrows and circles
Trading Applications
Entry Signals:
Buy when price contacts support zone with confirmation
Sell when price contacts resistance zone with confirmation, Look for zone breaks as momentum signals
Stop Loss Placement:
Place stops beyond the opposite zone, Use channel width to gauge volatility
Target Setting:
Opposite zone acts as first profit target, Zone breaks signal potential trend continuation
Confluence:
Works well with volume analysis,Combine with RSI/MACD for confirmation,
Use multiple timeframes for stronger signals
Best Practices
✅ DO:
Adjust swing length based on timeframe (lower for intraday, higher for daily+)
Reduce minimum touches (2-3) for volatile markets
Increase price margin for choppy conditions
Wait for candle close confirmation on zone breaks
❌ DON'T:
Trade zones in isolation without other confirmation
Use overly tight parameters that generate false signals
Ignore the broader trend context
Chase price after zone breaks without pullback
Tips for Optimization
Scalping (1-5 min): Swing Length: 3-5, Min Touches: 2
Day Trading (15-60 min): Swing Length: 5-10, Min Touches: 3
Swing Trading (4H-Daily): Swing Length: 10-20, Min Touches: 3-4
Position Trading (Daily-Weekly): Swing Length: 15-25, Min Touches: 4-5
Alert Conditions
Zone Contact: Price touches resistance or support zone
Set up notifications for real-time trading opportunities
Disclaimer: This indicator is for educational and informational purposes only. It should not be considered financial advice. Always perform your own analysis and risk management before trading.

Auto Trendline using Liquidity Sweeps By Vachaspati JhaThis auto trendline systime uses Liquidity sweep points to draw, making them extremely reliable- price action respects these trendlines.
You can choose different pivot numbers for Green and Red lines to suit market condition. For instance in uptrend green line pivot number can be 2 or higher and Red line pivot number can be 1 for pullback opportunities.

QuantRX Trendlines v1QuantRX Trendlines v1 is a visual market structure indicator designed to automatically draw trendlines and channels based on recent swing highs and lows.
The tool focuses on clean chart structure by dynamically updating trendlines as price evolves, helping users visualize support, resistance, and directional bias across any market or timeframe.
Key characteristics:
Automatic detection of swing-based trendlines
Optional channel mode with adjustable thickness
Wick or body anchoring for different structure interpretations
Visual differentiation between active and broken lines
Designed to reduce chart clutter and improve readability
This indicator is intended as a visual analysis aid only.
It does not generate trade signals, predictions, or risk management instructions.
Users are encouraged to combine it with their own analysis and decision-making process.
⚠️ Disclaimer
This script is provided for educational and visual charting purposes only and does not constitute financial, investment, or trading advice.

Power Hour Trendlines [LuxAlgo]The Power Hour Trendlines indicator is based on Power Hours detection, and includes up to three displayed trendlines derived from the closing prices of all the bars within the last user-selected Power Hours.
Users can edit the time of Power Hours, choose how many sessions to take into account, enable or disable any trendlines, and change their colors.
🔶 USAGE
The Power Hour is defined as the last hour of the trading session and is set by default from 3:00 p.m. to 4:00 p.m. New York time. During this period, volume and volatility enter the market. Traders using higher timeframes may use this period to enter or exit positions by placing MOC (Market on Close) orders.
This tool works under the hypothesis that prices made during power hours (periods with high trading activity) are more relevant when used for the construction of trendlines.
An initial trendline is fit using linear regression; prices from power hours located above this initial fit are used for the upper trendline, while the ones below the fit are used for the lower one.
As with any trendline, traders can analyze the slope to determine the market's direction:
Positive slope: The market is trending up.
Negative slope: The market is trending down.
No slope: The market is trending sideways.
As we can see in the image, Nasdaq and Bitcoin are clearly in downtrends, gold is clearly in an uptrend, and the euro/U.S. dollar is in a sideways market over the last visible sessions.
As you can see, the trend lines may or may not be parallel to each other. The wider the area, the more volatile the data. The narrower the area, the less volatile the data. Let's look at an example.
In the image, the Dow30 and the euro/U.S. dollar have opposite behaviors. The volatility above the middle trendline is growing in the first case but shrinking in the second. In both cases, the volatility in the bottom area seems steady, so there are no big surprises there.
Traders can adjust the number of sessions for calculations, making the tool ideal for analyzing price behavior over different time frames.
As the image shows, we can clearly see how the market behaves over different time periods. XLY has been moving down over the last 10, 20, and 40 sessions, with a steeper decline over shorter periods. However, it has been moving sideways over the last 70 sessions.
One of the main uses of trendlines is to provide key support and resistance. In the image, SPY is shown with trendlines over the last 20 sessions. These lines provide excellent reference points for trading and observing price behavior in those areas, such as whether prices are accepted or rejected, which may trigger a response from other traders.
🔹 Not Allowed Timeframes
For obvious reasons, timeframes larger than 1H are not allowed. The Power Hour is defined as the last hour of the trading session. The tool will display a warning message if the timeframe is longer than 60 minutes.
🔶 SETTINGS
Power Hour (NY Time): Choose a custom Power Hour in New York time
Sessions Memory: Select how many Power Hours to take into account for calculations.
🔹 Style
Top: Enable or disable the top line and choose the line and background colors.
Middle: Enable or disable the middle line and choose the line color.
Bottom: Enable or disable the bottom line and choose the line and background colors.
Background: Enable or disable the background color for top and bottom lines.

JC_Trendlineauto trend line
this will automatically draws 3 sets of trend lines on any time frame charts

QMF- Market Structure & Signal Suite [BullByte]QUANTUM MOMENTUM FUSION - Market Structure and Signal Suite
OVERVIEW
Quantum Momentum Fusion is a comprehensive market analysis framework built around a multi-dimensional momentum oscillator. This indicator was designed to give traders a complete analytical workspace in a single tool, combining momentum measurement, market structure identification, trendline analysis, divergence detection, and multi-timeframe context into one unified system.
The core philosophy behind QMF is that successful trading decisions come from understanding multiple aspects of market behavior simultaneously, not from relying on any single indicator or signal. The oscillator serves as the analytical foundation, and every other component builds upon it to create a complete picture of current market conditions.
This description will walk through each component of the indicator, explaining what it measures, why that information matters, and how to interpret what you see on the chart. Whether you are an experienced trader familiar with oscillator analysis or newer to technical indicators, each section aims to make the concepts accessible and practical.
THE QUANTUM ENGINE: UNDERSTANDING THE CORE OSCILLATOR (why its original and not a mashup)
At the heart of this indicator is the Quantum Momentum Fusion oscillator, displayed in its own pane below the price chart. Unlike traditional oscillators that measure a single aspect of price behavior, the QMF oscillator synthesizes four distinct market dimensions into one unified reading.
WHAT IS AN OSCILLATOR
For those less familiar with the term, an oscillator is a technical indicator that fluctuates between defined boundaries, typically showing whether an asset is experiencing strong buying pressure, strong selling pressure, or neutral conditions. The QMF oscillator moves between 0 and 100, with 50 representing the neutral midpoint.
When the oscillator is high (above 70), it suggests the market has experienced significant upward momentum and may be approaching exhaustion. When low (below 30), it suggests the market has experienced significant downward momentum and may be due for a bounce. The space between these extremes represents normal market fluctuation.
THE FOUR DIMENSIONS
What makes the QMF oscillator different from standard momentum indicators is that it combines four separate measurements into its calculation. Each dimension captures a different aspect of market behavior:
VELOCITY DIMENSION
This measures how quickly momentum itself is changing. Think of it like acceleration in a car. Knowing the car is moving forward (direction) is useful, but knowing whether the driver is pressing the accelerator or the brake (acceleration) tells you what is likely to happen next. The velocity dimension calculates the rate of change of the rate of change, providing early warning when momentum is about to shift direction. In practical terms, this can show momentum weakening before price actually reverses.
Why it matters: Price can continue in one direction for a while even after the underlying momentum starts to fade. By measuring acceleration, you can identify potential turning points earlier than with simple momentum indicators.
How it appears: This dimension is calculated internally and combined with the others. You do not see it separately, but its effect shows in the oscillator responding earlier to momentum shifts.
VOLUME DIMENSION
This measures price movement weighted by trading volume. A price move accompanied by high volume has different significance than the same price move on low volume. High volume suggests conviction and participation from larger traders. Low volume suggests the move may lack follow-through.
The volume dimension multiplies price change by a volume ratio (current volume compared to average volume), giving greater weight to moves that have volume confirmation behind them.
Why it matters: Volume often precedes price. Strong volume on a move suggests institutional participation and increases the probability that the move will continue. Weak volume on a move suggests it may be easily reversed.
How it appears: Moves with strong volume conviction will push the oscillator more definitively, while low-volume moves will have muted effect on the reading.
VOLATILITY DIMENSION
This normalizes price movement against the current volatility environment. Markets go through periods of high volatility (large price swings) and low volatility (small price swings). A 1% move during a low volatility period is more significant than a 1% move during a high volatility period.
The volatility dimension divides price change by Average True Range (ATR), which measures typical price range. This tells you whether current movement is significant relative to what is normal for this market right now.
Why it matters: Without volatility normalization, the oscillator would react the same way to all price moves regardless of context. By adjusting for volatility, the oscillator identifies moves that are genuinely significant versus normal noise within the current regime.
How it appears: During quiet markets, smaller price moves can still register as significant if they exceed normal volatility. During volatile markets, the oscillator will not overreact to moves that are within expected range.
SESSION DIMENSION
This tracks where price is positioned relative to the session Volume Weighted Average Price (VWAP). VWAP represents the average price at which trading has occurred during the session, weighted by volume. Institutional traders often use VWAP as a benchmark for fair value.
When price is consistently above VWAP, it suggests buyers are willing to pay above average prices, indicating accumulation. When price is consistently below VWAP, it suggests sellers are accepting below average prices, indicating distribution.
Why it matters: VWAP positioning provides insight into whether institutional traders are likely accumulating or distributing. Price repeatedly returning to and bouncing from VWAP can indicate support, while price repeatedly failing at VWAP can indicate resistance.
How it appears: The session dimension contributes bullish readings when price maintains above VWAP and bearish readings when price maintains below VWAP.
ADAPTIVE WEIGHTING
The four dimensions are combined using configurable weights, and the system can operate in Adaptive Mode. When Adaptive Mode is enabled, the indicator automatically adjusts its sensitivity based on the current volatility regime. During high volatility periods, sensitivity increases to capture larger moves. During low volatility periods, sensitivity decreases to filter out noise.
This means the oscillator adapts to changing market conditions without requiring manual adjustment.
READING THE OSCILLATOR: DISPLAY MODES AND ZONES
The QMF oscillator can be displayed in four different visual formats. Each shows the same underlying data but presents it differently based on trader preference.
ENERGY CANDLES
This mode displays the oscillator as candlestick-style candles. Just as price candles show open, high, low, and close for price, energy candles show these values for the QMF oscillator.
Green candles indicate the oscillator closed higher than it opened (bullish momentum). Red candles indicate the oscillator closed lower than it opened (bearish momentum). The body size shows how much the oscillator moved during the period. Larger bodies indicate stronger momentum conviction.
This format is useful for traders who are comfortable reading candlestick patterns and want to apply similar visual analysis to the oscillator.
QMF LINE
This mode displays the oscillator as a traditional line chart with a signal line overlay. The main QMF line shows current momentum. The signal line is a smoothed average of the QMF that helps identify direction changes.
When the QMF line is above the signal line, momentum is bullish. When below, momentum is bearish. Crossovers between the two lines can indicate momentum shifts.
This format is familiar to traders who use indicators like MACD and prefer clean line-based visualization.
IMPULSE BARS
This mode displays the oscillator as a histogram centered on the 50 midline. Bars above 50 indicate bullish momentum, bars below 50 indicate bearish momentum. Bar height shows momentum strength.
The color intensity changes based on momentum direction. Bars that are increasing in the bullish direction show brighter color. Bars that are decreasing show muted color. This makes it easy to see momentum acceleration and deceleration at a glance.
HEIKIN FLOW
This mode applies Heikin-Ashi smoothing to the energy candles. Heikin-Ashi is a Japanese technique that averages price data to create smoother trends with fewer reversals.
The result is cleaner visual trends that are easier to follow, though with slightly more lag than standard energy candles. This format is useful for identifying sustained momentum moves without getting distracted by minor fluctuations.
OSCILLATOR ZONES
Regardless of display mode, the oscillator pane includes horizontal reference lines that define important zones:
Midline at 50: The neutral point. When the oscillator is above 50, overall momentum is bullish. When below 50, overall momentum is bearish.
Overbought level at 70: When the oscillator crosses above this level, the market is showing strong bullish momentum. However, this also means prices have risen significantly and bearish reversal probability increases the longer the oscillator stays elevated.
Oversold level at 30: When the oscillator crosses below this level, the market is showing strong bearish momentum. However, this also means prices have fallen significantly and bullish reversal probability increases.
Extreme overbought at 85: Maximum bullish exhaustion. At this level, almost all short-term buying pressure has been expended. Reversal probability is high.
Extreme oversold at 15: Maximum bearish exhaustion. At this level, almost all short-term selling pressure has been expended. Reversal probability is high.
Understanding these zones helps you assess the current market condition before looking at any other indicator components.
MARKET STRUCTURE: DYNAMIC SUPPORT AND RESISTANCE
The second major component of the indicator is market structure analysis through dynamic support and resistance levels. Unlike price-based support and resistance, these levels are calculated directly on the oscillator.
WHAT ARE OSCILLATOR-BASED S/R LEVELS
When the QMF oscillator reaches a high point and then reverses lower, that high point becomes a resistance level on the oscillator. When the oscillator reaches a low point and then reverses higher, that low point becomes a support level.
These levels represent momentum thresholds that the market has previously found difficult to exceed. They answer the question: At what momentum reading has the oscillator historically reversed?
WHY THIS MATTERS
Oscillator support and resistance provides different information than price support and resistance. Price S/R tells you where buyers and sellers have previously entered the market. Oscillator S/R tells you what level of momentum the market has been able to sustain.
If the oscillator approaches its resistance level, it suggests momentum is reaching the upper bounds of what has been achievable recently. Either momentum will break through (indicating unusually strong conditions) or it will reverse (indicating normal mean reversion).
Similarly, if the oscillator approaches support, it suggests momentum is reaching exhaustion levels that have previously triggered bounces.
HOW IT APPEARS ON THE CHART
Resistance is displayed as a horizontal red line with a RES label on the oscillator pane. Support is displayed as a horizontal cyan line with a SUP label. These lines update dynamically as new pivots form.
When the oscillator breaks through these levels, markers appear:
R with up arrow: Resistance level broken, indicating unusually strong bullish momentum
S with down arrow: Support level broken, indicating unusually strong bearish momentum
R with checkmark: Resistance held, price rejected at this level
S with checkmark: Support held, price bounced from this level
The dashboard also shows current S/R status: whether the oscillator recently broke resistance, broke support, is currently at resistance, is currently at support, or is in clear space between levels.
AUTOMATED TRENDLINES: MOMENTUM TREND STRUCTURE
The third major component is automated trendline detection on the oscillator. This identifies trending behavior in momentum itself, separate from price trends.
WHAT ARE OSCILLATOR TRENDLINES
Just as you can draw trendlines on a price chart connecting swing lows (uptrend) or swing highs (downtrend), the indicator draws trendlines on the oscillator connecting pivot points.
Support trendlines connect oscillator pivot lows and project forward with a flat or rising slope. These show upward trending momentum where each pullback finds support at a higher level.
Resistance trendlines connect oscillator pivot highs and project forward with a flat or falling slope. These show downward trending momentum where each rally faces resistance at a lower level.
WHY THIS MATTERS
Price trends and momentum trends do not always align. Price can continue making higher highs while momentum makes lower highs, a condition called bearish divergence. Momentum trendlines help visualize this behavior.
When momentum is making higher lows (rising support trendline), it suggests underlying strength even if price is consolidating. When momentum is making lower highs (falling resistance trendline), it suggests underlying weakness even if price is holding.
Breaks of these trendlines often precede price moves. If a falling momentum resistance trendline breaks upward, it suggests bearish pressure is releasing and bullish momentum may follow. If a rising momentum support trendline breaks downward, it suggests bullish pressure is failing and bearish momentum may follow.
HOW IT APPEARS ON THE CHART
Support trendlines appear in blue/cyan, resistance trendlines appear in pink/magenta. Lines extend forward from the most recent pivot point to show projected levels.
Small circle markers can optionally appear at each pivot point used to construct the trendlines, helping you verify the anchor points.
When the oscillator breaks through a trendline, markers appear:
TL with up arrow: Resistance trendline broken upward (bullish breakout)
TL with down arrow: Support trendline broken downward (bearish breakdown)
Trendline strength is calculated based on three factors: how many pivot points validate the line, how recently it formed, and the angle of the slope. Stronger trendlines have more touches, formed recently, and have moderate slopes. You can filter trendlines by strength to show only the most significant ones.
Optional trendline zones can display a shaded area around each trendline rather than just a single line, showing a zone of influence rather than a precise level.
DIVERGENCE: WHEN PRICE AND MOMENTUM DISAGREE
The fourth major component is divergence detection, which identifies discrepancies between price action and oscillator behavior.
WHAT IS DIVERGENCE
Divergence occurs when price makes a new high or low, but the oscillator fails to confirm it. This disagreement between price and momentum often precedes reversals.
There are four types of divergence:
REGULAR BULLISH DIVERGENCE
Price makes a lower low (new low point below the previous low), but the oscillator makes a higher low (its low point is above its previous low). This suggests that despite price going lower, selling momentum is actually weakening. The implication is that sellers are losing conviction and a bounce or reversal may be approaching.
Visual example: Imagine price drops from 100 to 95, bounces to 97, then drops again to 93. At the same time, the oscillator drops to 25, bounces to 35, then drops only to 30. Price made a lower low (93 vs 95) but the oscillator made a higher low (30 vs 25). This is regular bullish divergence.
REGULAR BEARISH DIVERGENCE
Price makes a higher high (new high point above the previous high), but the oscillator makes a lower high (its high point is below its previous high). This suggests that despite price going higher, buying momentum is actually weakening. The implication is that buyers are losing conviction and a pullback or reversal may be approaching.
HIDDEN BULLISH DIVERGENCE
Price makes a higher low (its low point is above its previous low), but the oscillator makes a lower low (new low below its previous low). This occurs during uptrends and suggests the trend will continue. Price is holding higher but momentum briefly dipped further, indicating a temporary pullback within a larger uptrend.
HIDDEN BEARISH DIVERGENCE
Price makes a lower high (its high point is below its previous high), but the oscillator makes a higher high (new high above its previous high). This occurs during downtrends and suggests the trend will continue. Price is staying lower but momentum briefly spiked higher, indicating a temporary bounce within a larger downtrend.
Regular divergence suggests reversal. Hidden divergence suggests continuation.
HOW IT APPEARS ON THE CHART
When divergence is confirmed, labels appear on the oscillator:
BULL DIV: Regular bullish divergence confirmed
BEAR DIV: Regular bearish divergence confirmed
H-BULL: Hidden bullish divergence confirmed
H-BEAR: Hidden bearish divergence confirmed
Dotted lines connect the pivot points on the oscillator to show the divergence pattern. Regular divergence uses solid colored lines, hidden divergence uses dashed lines.
The dashboard shows divergence status in real-time:
CHECKING BULL: A potential bullish divergence pattern is forming but not yet confirmed
CHECKING BEAR: A potential bearish divergence pattern is forming but not yet confirmed
BULL CONFIRMED: Bullish divergence has been validated
BEAR CONFIRMED: Bearish divergence has been validated
NONE: No divergence currently active
Divergence strength is calculated from the magnitude of the oscillator discrepancy. Only divergences meeting the minimum strength threshold are displayed to filter out minor, less significant patterns.
FLOW RIBBONS: VISUALIZING MOMENTUM ALIGNMENT
The fifth major component is the Flow Ribbon system, which displays multiple moving averages of the QMF oscillator to visualize momentum trend and alignment.
WHAT ARE FLOW RIBBONS
Flow ribbons consist of three Exponential Moving Averages (EMAs) applied to the QMF oscillator values. Think of them as smoothed versions of the oscillator at different speeds:
Fast Ribbon : Responds quickly to momentum changes, showing recent momentum direction
Medium Ribbon: Balances responsiveness with smoothness, showing intermediate momentum
Slow Ribbon: Moves slowly and shows longer-term momentum context
When these three lines are plotted together with filled area between them, they create a visual ribbon that expands and contracts based on momentum conditions.
WHY RIBBON ALIGNMENT MATTERS
The relationship between these three averages tells you about momentum structure:
BULLISH ALIGNMENT (Fast above Medium above Slow)
When the ribbons are stacked with fast on top, medium in middle, and slow on bottom, momentum is aligned bullishly across multiple timeframes. Short-term momentum leads, with medium and long-term momentum confirming. This is the strongest bullish configuration.
BEARISH ALIGNMENT (Fast below Medium below Slow)
When the ribbons are inverted with fast on bottom, medium in middle, and slow on top, momentum is aligned bearishly across multiple timeframes. Short-term momentum leads downward, with medium and long-term momentum confirming. This is the strongest bearish configuration.
MIXED/TRANSITIONING
When the ribbons are not properly stacked, momentum is in transition. This often occurs during consolidation, trend changes, or choppy conditions. Trading during mixed ribbon states carries higher uncertainty.
RIBBON EXPANSION AND CONTRACTION
Beyond alignment, the distance between the fast and slow ribbon provides additional information:
EXPANDING RIBBON
When the gap between fast and slow ribbon is increasing, momentum is accelerating. In a bullish alignment with expansion, upward momentum is strengthening. In a bearish alignment with expansion, downward momentum is strengthening. Expansion confirms trend conviction.
CONTRACTING RIBBON
When the gap between fast and slow ribbon is decreasing, momentum is decelerating. The current trend may be losing steam. Contraction often precedes consolidation or reversal. It serves as an early warning that the current move may be exhausting.
HOW IT APPEARS ON THE CHART
The fast ribbon appears as a thicker line, the slow ribbon as a thinner line. The area between them fills with color:
Green fill: Bullish ribbon alignment
Red fill: Bearish ribbon alignment
Gray fill: Neutral or transitioning state
The dashboard shows ribbon state as BULL, BEAR, or NEUT, and indicates whether ribbons are expanding (EXP) or contracting (CON).
Ribbon crossovers occur when the fast ribbon crosses the slow ribbon, signaling potential momentum shifts. These crossovers are confirmed only after the bar closes to prevent false signals from intrabar movement.
REVERSAL CLOUDS: PROBABILITY ZONES
The sixth major component is the Reversal Cloud system, which visualizes zones where momentum reversals have elevated probability.
WHAT ARE REVERSAL CLOUDS
Reversal clouds are shaded areas around the QMF oscillator that indicate probability zones for mean reversion. They answer the question: How far from average has momentum extended, and what is the probability it will revert?
When the oscillator moves far from its normal range, it creates stretched conditions. Like a rubber band pulled to its limit, the probability increases that it will snap back toward center. Reversal clouds visualize these stretched conditions.
CLOUD CALCULATION METHODS
Five different calculation methods are available, each with different characteristics:
DYNAMIC BOLLINGER
Uses statistical standard deviation to create bands that adapt to oscillator volatility. When the oscillator is volatile, bands widen. When the oscillator is calm, bands narrow. This method identifies moves that are statistically significant relative to recent oscillator behavior.
GOLDEN RATIO
Applies Fibonacci proportions (0.214 and 0.786) to the oscillator range. These ratios appear throughout nature and markets. Some traders believe these proportions have psychological significance in market behavior.
ADAPTIVE HALO
Scales cloud width based on price ATR rather than oscillator volatility. This connects cloud width to actual price volatility, making the clouds wider during volatile price action and narrower during calm periods.
VOLATILITY SQUEEZE
Uses short-term standard deviation to create bands that contract during low volatility and expand during high volatility. This method is particularly useful for identifying potential breakout conditions when volatility is compressed.
ICHIMOKU RSI
Applies concepts from Ichimoku Kinko Hyo equilibrium theory to create balanced zones. Uses multiple lookback periods to establish equilibrium levels where the oscillator tends to find balance.
HOW TO READ THE CLOUDS
The oscillator moves through the cloud area as momentum fluctuates:
When QMF enters the upper cloud region, it indicates extended bullish momentum. The higher into the cloud, the greater the probability of bearish reversal through mean reversion.
When QMF enters the lower cloud region, it indicates extended bearish momentum. The deeper into the cloud, the greater the probability of bullish reversal through mean reversion.
Cloud opacity adjusts based on reversal probability. More opaque coloring indicates higher reversal probability. Subtle coloring indicates lower reversal probability.
IMPORTANT UNDERSTANDING
Clouds show probability zones, not certainty. Price can remain in extreme zones longer than expected, particularly during strong trends. Clouds are most useful when combined with other components like divergence, S/R breaks, and ribbon alignment rather than used in isolation.
MULTI-TIMEFRAME ANALYSIS: SEEING THE BIGGER PICTURE
The seventh major component is Multi-Timeframe (MTF) analysis, which calculates QMF values across multiple timeframes to assess momentum alignment at different time perspectives.
WHY MULTIPLE TIMEFRAMES MATTER
The timeframe you trade on shows only one perspective of market momentum. A bullish signal on a 15-minute chart may occur within a larger bearish trend on the 4-hour chart. Understanding momentum context from higher timeframes helps you assess whether you are trading with or against the larger flow.
When multiple timeframes align in the same direction, the probability of a successful trade increases. When timeframes conflict, the situation is more uncertain and requires additional caution.
HOW MTF ANALYSIS WORKS
The indicator calculates the full QMF oscillator independently on four configurable timeframes. By default, these are set to 5-minute, 15-minute, 60-minute (1 hour), and 240-minute (4 hour), but you can configure them to any timeframes that suit your trading style.
For each timeframe, the system determines the current momentum bias:
OB - Overbought: QMF above 70, indicating extended bullish momentum that may reverse
B+ - Strong Bullish: QMF above 55 and above its signal line, indicating solid bullish momentum
B - Bullish: QMF above its signal line, indicating mild bullish momentum
N - Neutral: QMF near 50 with no clear direction
S - Bearish: QMF below its signal line, indicating mild bearish momentum
S+ - Strong Bearish: QMF below 45 and below its signal line, indicating solid bearish momentum
OS - Oversold: QMF below 30, indicating extended bearish momentum that may reverse
ALIGNMENT SCORING
The dashboard displays an alignment score showing how many of the four timeframes agree with each directional bias. This appears as a fraction like 3/4 or 2/4.
4/4 Bullish: All four timeframes show bullish readings - maximum bullish alignment
3/4 Bullish: Three timeframes bullish, one diverging - strong bullish alignment
2/4: Split between bullish and bearish - no clear alignment, use caution
3/4 Bearish: Three timeframes bearish, one diverging - strong bearish alignment
4/4 Bearish: All four timeframes show bearish readings - maximum bearish alignment
Higher alignment scores indicate more reliable momentum context. Trading with 3/4 or 4/4 alignment in your favor provides better odds than trading against alignment or during mixed conditions.
NON-REPAINTING MTF DATA
The multi-timeframe data uses proper request.security settings with lookahead disabled and gaps handled correctly. This ensures the MTF readings you see in backtesting match what you would see in real-time trading, with no future data leakage that could create misleading results.
LIVE MOMENTUM SCORING: REAL-TIME MARKET ASSESSMENT
The eighth major component is the Live Momentum Scoring system, which provides continuous real-time feedback on current market conditions.
WHAT IS LIVE MOMENTUM SCORING
Unlike signals which only appear when specific patterns complete, live momentum scores update every bar to show the current balance between bullish and bearish factors. This answers the question: Right now, how do the bullish factors compare to the bearish factors?
The system evaluates six categories for each direction and adds up points:
ZONE POSITION (0-25 points)
Rewards positioning in favorable oscillator zones. Deep oversold positioning adds points to the bullish score. Deep overbought positioning adds points to the bearish score. Extreme zones receive maximum points, moderate zones receive partial points, neutral zones receive zero.
DIVERGENCE (0-20 points)
Rewards active or forming divergence patterns. Confirmed divergence receives full points. Forming (checking) divergence receives partial credit. No divergence receives zero points.
TREND ALIGNMENT (0-20 points)
Rewards proper EMA stacking and trend MA positioning. Full bullish EMA stack (fast above medium above slow above trend MA) receives maximum bullish points. Partial alignment receives partial points.
MOMENTUM DIRECTION (0-15 points)
Rewards current momentum direction and acceleration. Accelerating momentum in the favorable direction receives maximum points. Simple directional momentum receives moderate points. Histogram turning (early reversal signs) receives partial points.
RIBBON STATE (0-10 points)
Rewards proper ribbon alignment and expansion. Aligned and expanding ribbons receive maximum points. Aligned but contracting ribbons receive moderate points. Mixed ribbons receive zero points.
MULTI-TIMEFRAME (0-10 points)
Rewards higher timeframe alignment. 4/4 alignment receives maximum points, scaling down as alignment decreases.
READING THE LIVE SCORES
The dashboard displays current scores for both directions:
BULL: Shows bullish score as percentage (0-100) and letter grade (A through D)
BEAR: Shows bearish score as percentage (0-100) and letter grade (A through D)
BIAS: Shows which direction currently dominates (BULL, BEAR, or NEUTRAL if close)
Grade thresholds:
A Grade: 70% or higher - Strong momentum factors aligned
B Grade: 50-69% - Moderate momentum factors present
C Grade: 30-49% - Some momentum factors but incomplete
D Grade: Below 30% - Weak or missing momentum factors
The dominant bias shows which direction currently has stronger factors. When one side leads by more than 10 points, it shows that direction. Otherwise, it shows NEUTRAL indicating balanced or mixed conditions.
WHY LIVE SCORING MATTERS
Live scores help you understand current market conditions even when no signal has fired. You can see momentum building or fading in real-time. A rising bullish score suggests conditions are improving for potential long opportunities. A rising bearish score suggests conditions are deteriorating.
This continuous feedback helps with:
- Anticipating potential signals before they fire
- Assessing whether to act on signals that do fire
- Understanding why a signal did or did not appear
- Monitoring open positions for changing conditions
THE DASHBOARD: YOUR ANALYSIS CONTROL CENTER
The dashboard provides a comprehensive real-time summary of all indicator components in one organized table. It displays on the price chart using force overlay so it remains visible regardless of which pane you are focused on.
DASHBOARD LAYOUT
The dashboard can be configured in three detail levels:
COMPACT MODE
Shows only essential information: QMF value, zone status, S/R status, and volume. Uses minimal screen space for traders who want the indicator to remain unobtrusive.
STANDARD MODE
Shows balanced detail including QMF values, zone status, last signal information, grade statistics, divergence status, S/R and volume status, live momentum scores, and MTF panel. Suitable for most traders.
FULL MODE
Shows maximum detail including everything in Standard mode plus EMA structure, ribbon state, volatility regime, signal statistics breakdown, and trendline counts. For traders who want complete information access.
DASHBOARD ROWS EXPLAINED
Row 1 - HEADER
Shows indicator name for identification.
Row 2 - QMF VALUES
Displays three values:
- QMF with directional arrow showing current oscillator value and whether it is rising, falling, or unchanged
- SIG showing the signal line value
- Histogram value with plus or minus sign showing the difference between QMF and signal line
Row 3 - PROGRESS BAR
Visual representation of oscillator position from 0 to 100 using text characters. Provides quick visual reference without needing to look at the oscillator pane.
Row 4 - ZONE STATUS
Text classification of current zone with color coding:
- EXTREME OB (red): Oscillator at or above extreme overbought level
- OVERBOUGHT (light red): Oscillator in overbought zone
- BULLISH (light green): Oscillator above 55 but below overbought
- NEUTRAL (gray): Oscillator between 45 and 55
- BEARISH (light red): Oscillator below 45 but above oversold
- OVERSOLD (light blue): Oscillator in oversold zone
- EXTREME OS (blue): Oscillator at or below extreme oversold level
Row 5 - LAST SIGNAL (Standard and Full mode)
Shows information about the most recent signal:
- Direction and grade (LONG A, SHORT B, etc.)
- Bars ago since signal fired
- Entry price when signal fired
- Current profit/loss from that price level
This helps track performance of recent signals and manage any open positions based on them.
Row 6 - GRADE STATISTICS (Standard and Full mode)
Running count of signals generated:
- A: Count of Grade A signals
- B: Count of Grade B signals
- C: Count of Grade C signals
- T: Total signal count
This provides perspective on signal frequency and grade distribution over the visible chart period.
Row 7 - DIVERGENCE STATUS (Standard and Full mode)
Current state of divergence detection:
- CHECKING BULL: Bullish divergence pattern forming, not yet confirmed
- CHECKING BEAR: Bearish divergence pattern forming, not yet confirmed
- BULL CONFIRMED: Bullish divergence validated
- BEAR CONFIRMED: Bearish divergence validated
- NONE: No divergence currently active
Row 8 - S/R AND VOLUME
Two pieces of information:
- S/R status: Shows R BROKEN (resistance broken upward), S BROKEN (support broken downward), AT RES (testing resistance), AT SUP (testing support), or CLEAR (between levels)
- Volume status: Shows HIGH (volume 1.5x or more above average), MID (volume near average), or LOW (volume below average)
Row 9 - LIVE MOMENTUM (Standard and Full mode)
Real-time momentum scoring:
- BULL: Bullish percentage and letter grade
- BEAR: Bearish percentage and letter grade
- Dominant bias indicator
Row 10-11 - MTF PANEL (when enabled, Standard and Full mode)
Multi-timeframe status:
- Top row shows the four timeframe labels
- Bottom row shows the status code for each timeframe (OB, B+, B, N, S, S+, OS)
- Final cell shows alignment score as X/4
FULL MODE ADDITIONAL ROWS
Structure row: Shows EMA stack status (BULL STACK, BEAR STACK, or relationship between fast and slow) and trend MA position (ABOVE MA or BELOW MA)
Stats row: Shows count of long signals, short signals, and active trendlines
Ribbon row: Shows ribbon state (BULL, BEAR, NEUT), expansion status (EXP or CON), and volatility regime (H-VOL for high volatility, L-VOL for low volatility, N-VOL for normal)
DASHBOARD POSITIONING AND SIZING
Position options: Top Left, Top Center, Top Right, Middle Left, Middle Right, Bottom Left, Bottom Center, Bottom Right
Size options: Tiny (minimal space), Small (balanced), Normal (maximum readability)
Choose a position that does not obscure important price action on your chart and a size that balances readability with space efficiency.
HOW SIGNALS EMERGE FROM CONFLUENCE
After understanding all the individual components, it becomes clear how signals are generated. Signals in QMF are not arbitrary triggers based on single conditions. They emerge when multiple independent factors align to create confluence.
THE PATTERN-BASED APPROACH
The signal system uses a hierarchical pattern-based approach. Rather than calculating a score from random factors and labeling it, the system actively hunts for specific predefined pattern combinations.
The system first checks for Grade A patterns. If none are found, it checks for Grade B patterns. If none are found, it checks for Grade C patterns. Each grade represents specific combinations of factors that must be present together.
GRADE A REQUIREMENTS
Grade A patterns require multiple strong factors aligned. Examples of Grade A pattern combinations:
Pattern A1 - Perfect Storm Reversal:
- Extreme zone positioning (deeply oversold or overbought)
- Confirmed regular divergence
- Structural break (resistance broken or support broken or trendline broken)
- Strong volume conviction (1.3x or higher)
- High MTF alignment (3 or more timeframes agreeing)
Pattern A2 - Breakout Conviction:
- Resistance or support broken
- Accelerating momentum in the breakout direction
- Full EMA stack aligned
- Ribbon aligned and expanding
- Strong volume conviction (1.4x or higher)
- Good MTF alignment (2 or more timeframes)
Pattern A3 - Zone Reversal Multi-Confirmation:
- Extreme or standard zone positioning
- Regular or hidden divergence confirmed
- Active bounce from zone
- EMA crossover or MA break in reversal direction
- Good MTF alignment (2 or more timeframes)
- Volume conviction present (1.2x or higher)
All factors in the pattern must be present simultaneously. Missing any single factor disqualifies the Grade A pattern.
GRADE B REQUIREMENTS
Grade B patterns require fewer but still meaningful confirmations. These patterns fire only when no Grade A pattern is detected:
Pattern B1 - Zone with Confirmation:
- Oversold or overbought zone positioning
- Momentum in reversal direction
- Hidden divergence, EMA crossover, or trendline break present
- Minimum MTF alignment met
Pattern B2 - Divergence with Structure:
- Regular or hidden divergence confirmed
- Structural break (S/R or trendline or MA)
- Momentum confirming direction
- Volume at least average
Pattern B3 - Clean Trend Continuation:
- Above or below trend MA
- Ribbon aligned in direction
- Oscillator crossed signal line
- EMA stack complete
GRADE C REQUIREMENTS
Grade C patterns require basic confirmations. These patterns fire only when no Grade A or Grade B pattern is detected:
Pattern C1 - Early Zone Entry:
- Zone positioning or approaching zone
- Momentum in expected direction
- Oscillator or EMA crossover present
Pattern C2 - Momentum Shift:
- Histogram turning in expected direction
- Oscillator crossover confirmed
- Oscillator on expected side of midline
SIGNAL QUALITY CONTROLS
Beyond pattern detection, several quality controls must be satisfied:
COOLDOWN
A minimum number of bars must pass between any two signals. This prevents signal clustering during volatile conditions and ensures each signal represents a distinct opportunity.
DIRECTION ALTERNATION
When enabled, signals must alternate between LONG and SHORT. After a LONG signal, only SHORT signals can fire until direction changes. This prevents multiple consecutive signals in the same direction.
PULLBACK REQUIREMENT
After a signal fires, the oscillator must retrace a minimum percentage before another same-direction signal can fire. This ensures re-entry signals occur after meaningful pullbacks rather than immediately after the first signal.
VOLUME CONFIRMATION (Optional)
When enabled, volume must meet minimum threshold relative to average. This filters out signals during low-volume periods when moves may lack follow-through.
BAR CONFIRMATION
All signals require barstate.isconfirmed, meaning they only fire after the bar closes. This prevents signals from appearing and disappearing during live bar formation, ensuring backtest results match live behavior.
A comprehensive example that combines signal generation logic, grading system, with all elements clearly annotated for easy understanding.
SETTINGS REFERENCE
This section provides a reference for the main configurable settings organized by category.
QUANTUM ENGINE SETTINGS
Sensitivity (5-50): Primary lookback period for momentum calculations. Lower values respond faster but may include more noise. Higher values smooth the oscillator but increase lag. Default 14 balances responsiveness with stability.
Smoothing (1-10): Exponential smoothing applied to final QMF value. Higher values reduce noise, lower values preserve detail. Default 3 provides good noise reduction.
Adaptive Mode: When enabled, automatically adjusts sensitivity based on volatility regime. Increases sensitivity during high volatility, decreases during low volatility.
Dimension Toggles: Enable or disable each of the four dimensions (Velocity, Volume, Volatility, Session) individually. Useful for customizing the oscillator for specific instruments or conditions.
Dimension Weights: Adjust relative contribution of each dimension. Weights are normalized so they do not need to sum to 1.0. Higher weight means that dimension has more influence on the final value.
Signal Length: EMA period for the signal line. Lower values make signal line more responsive, higher values make it smoother.
DISPLAY SETTINGS
Display Mode: Choose between Energy Candles, QMF Line, Impulse Bars, or Heikin Flow visualization.
Candle Glow: Adds luminous glow effect around energy candles based on momentum strength. Visually striking but can impact performance on slower systems.
Glow Layers: Number of glow layers when candle glow is enabled. More layers create smoother gradient but use more resources.
VISUAL SETTINGS
Theme: Choose between Tokyo Night (dark blue with vibrant accents), Dracula (purple-grey with high contrast), or Nord (muted arctic tones). Each theme is designed for extended trading sessions.
Glow Intensity: Controls transparency of glow effects. Lower values create more visible glows, higher values more subtle.
Enable Glow Effects: Master toggle for all glow effects around candles and levels.
REVERSAL CLOUD SETTINGS
Enable Reversal Clouds: Toggle cloud display on or off.
Cloud Style: Choose calculation method (Dynamic Bollinger, Golden Ratio, Adaptive Halo, Volatility Squeeze, Ichimoku RSI).
Cloud Transparency: Higher values make clouds more transparent, lower values more visible.
Cloud Width: Multiplier for cloud width. Higher values create wider reversal zones.
FLOW RIBBON SETTINGS
Enable Ribbons: Toggle ribbon display.
Fast/Medium/Slow Ribbon: Period for each ribbon EMA. Faster periods respond quicker, slower periods show longer-term trend.
DIVERGENCE SETTINGS
Enable Divergence: Toggle divergence detection.
Pivot Sensitivity: Bars required on each side to confirm pivot point. Higher values detect more significant pivots but may miss shorter-term divergences.
Confirmation Bars: Bars to wait after pivot detection before confirming divergence.
Min Strength Pct: Minimum divergence strength percentage to display. Higher values filter out weaker divergences.
Show Lines: Draw connecting lines between divergence pivots.
Min/Max Distance: Range of bars between pivots for valid divergence.
SIGNAL SYSTEM SETTINGS
Enable Signals: Toggle signal generation.
Show Signals: Filter by grade (A Only, A and B, All Grades).
Cooldown Bars: Minimum bars between signals.
Pullback Required Pct: Percentage pullback needed before same-direction signal.
Require Direction Alternation: Force signals to alternate LONG and SHORT.
Fast/Slow EMA: Periods for EMA crossover analysis.
Trend MA: Period for trend-defining moving average.
Min MTF Alignment: Minimum timeframes that must align for higher grades.
Require Volume Confirmation: Make volume threshold mandatory for signals.
Min Volume Ratio: Minimum volume relative to average when required.
TRENDLINE SETTINGS
Enable Trendlines: Toggle automated trendline detection.
Pivot Left/Right: Bars for pivot detection.
Extension Bars: How far to extend lines into future.
Min Touch Points: Minimum pivots to validate line.
Enable Strength Filter: Filter by calculated strength.
Minimum Strength: Threshold for strength filter.
Show Trendline Zones: Display shaded zones around lines.
Zone Width StdDev: Standard deviation multiplier for zone width.
Line Style: Solid, Dashed, or Dotted.
Line Width: Thickness in pixels.
Show Touch Points: Display circle markers at pivots.
Show Strength Labels: Display strength percentage at line end.
SUPPORT RESISTANCE SETTINGS
Enable S/R: Toggle dynamic S/R display.
Pivot Lookback: Period for detecting S/R pivots.
DASHBOARD SETTINGS
Enable Dashboard: Toggle dashboard display.
Position: Screen position (8 options).
Size: Tiny, Small, or Normal.
Style: Compact, Standard, or Full detail level.
MTF Panel: Include or exclude multi-timeframe panel.
MTF 1-4: Timeframe selections for MTF analysis.
LEVEL SETTINGS
Overbought/Oversold: Standard zone thresholds.
Extreme OB/OS: Extreme zone thresholds.
PRACTICAL EXAMPLE: READING THE COMPLETE PICTURE
This example walks through analyzing a chart using all the indicator components together.
SCENARIO: You are analyzing a 15-minute chart looking for trading opportunities.
STEP 1: ASSESS OSCILLATOR ZONE
You look at the QMF oscillator and see it reading 24, which is in the oversold zone. The dashboard confirms this showing OVERSOLD in the zone status. The progress bar shows the oscillator is in the lower portion of its range.
Initial assessment: The market has experienced significant selling pressure and is in territory where bullish reversals have elevated probability.
STEP 2: CHECK STRUCTURE
You look at the dynamic S/R levels. The oscillator recently touched its support level at 22 and bounced. You see an S with checkmark marker indicating support held. The dashboard shows AT SUP status.
Assessment update: The oscillator found support at a level that has held before. This adds to the bullish case.
STEP 3: EXAMINE TRENDLINES
You notice a resistance trendline connecting recent oscillator highs that has been declining. The oscillator is currently approaching this trendline from below. No break has occurred yet.
Assessment update: There is overhead resistance that will need to be cleared. A break above would be significant.
STEP 4: CHECK DIVERGENCE
The dashboard shows BULL CONFIRMED in the divergence status. Looking at the oscillator, you see a BULL DIV label with a dotted line connecting two pivot lows. The oscillator made a higher low while price made a lower low.
Assessment update: Confirmed bullish divergence suggests selling momentum is weakening despite price continuing lower. This is a meaningful signal of potential reversal.
STEP 5: EVALUATE RIBBONS
The ribbons are currently mixed with fast below medium but both above slow. Ribbon fill is gray indicating transitioning state. However, you notice the fast ribbon is turning upward and approaching the medium ribbon from below.
Assessment update: Ribbons are not yet aligned bullish, but appear to be transitioning. A bullish crossover may be approaching.
STEP 6: CHECK MTF ALIGNMENT
The dashboard MTF panel shows: 5m is B+, 15m is B, 1H is N, 4H is S. The alignment shows 2/4 bullish.
Assessment update: Lower timeframes support bullish bias, but higher timeframes are neutral or bearish. This is mixed alignment, suggesting caution. Any bullish move may face resistance from higher timeframe sellers.
STEP 7: REVIEW LIVE MOMENTUM SCORES
Dashboard shows BULL at 52% Grade B, BEAR at 28% Grade D. Dominant bias shows BULL.
Assessment update: Bullish factors currently outweigh bearish factors. The score suggests moderate bullish conditions, not yet strong.
STEP 8: SYNTHESIS
Putting it together:
- Oversold zone positioning (bullish factor)
- Support held (bullish factor)
- Bullish divergence confirmed (strong bullish factor)
- Ribbons transitioning but not yet aligned (neutral)
- MTF alignment mixed at 2/4 (caution factor)
- Live score favors bullish moderately (supporting factor)
- Resistance trendline overhead (risk factor)
Conclusion: Conditions favor a bullish reversal but with caution warranted due to mixed MTF alignment and overhead resistance. This would not qualify for a Grade A signal due to insufficient MTF alignment. If a signal fires, it would likely be Grade B.
STEP 9: SIGNAL FIRES
Several bars later, the oscillator crosses above its signal line while still in oversold territory. The EMA fast crosses above EMA slow. A LONG B signal appears at 85% confluence.
The signal represents: Oversold positioning plus confirmed divergence plus momentum crossover, meeting Grade B pattern requirements.
STEP 10: MONITORING
After entry, you monitor the dashboard for changing conditions. Live momentum scores continue rising. The resistance trendline breaks (TL up arrow marker appears). Ribbons align bullish. MTF alignment improves to 3/4 as the 1H turns bullish.
The improving conditions confirm the trade thesis. You hold the position as conditions strengthen.
ALERTS AVAILABLE
28 alert conditions are available covering all major events. To set up alerts, click the alert icon in TradingView, select this indicator, and choose the desired condition.
SIGNAL ALERTS
- A-Grade LONG Signal: Highest probability bullish entry
- A-Grade SHORT Signal : Highest probability bearish entry
- B-Grade LONG Signal: Solid bullish entry
- B-Grade SHORT Signal: Solid bearish entry
- Any LONG Signal: Any bullish signal regardless of grade
- Any SHORT Signal: Any bearish signal regardless of grade
DIVERGENCE ALERTS
- Regular Bullish Divergence: Classic bullish reversal pattern
- Regular Bearish Divergence: Classic bearish reversal pattern
- Hidden Bullish Divergence: Bullish continuation pattern
- Hidden Bearish Divergence: Bearish continuation pattern
- Any Bullish Divergence: Either regular or hidden bullish
- Any Bearish Divergence: Either regular or hidden bearish
STRUCTURE ALERTS
- Trendline Break Up : Resistance trendline broken
- Trendline Break Down: Support trendline broken
- Resistance Broken: S/R resistance level broken
- Support Broken: S/R support level broken
CROSSOVER ALERTS
- EMA Cross Up : Fast EMA crossed above slow EMA
- EMA Cross Down : Fast EMA crossed below slow EMA
- Trend MA Break Up: Oscillator crossed above trend MA
- Trend MA Break Down: Oscillator crossed below trend MA
ZONE ALERTS
- Entered Overbought Zone: Oscillator entered overbought
- Entered Oversold Zone: Oscillator entered oversold
- Entered Extreme Overbought: Oscillator reached extreme overbought
- Entered Extreme Oversold: Oscillator reached extreme oversold
RIBBON ALERTS
- Ribbon Cross Up: Fast ribbon crossed above slow ribbon
- Ribbon Cross Down: Fast ribbon crossed below slow ribbon
BOUNCE ALERTS
- Bounce From Oversold: Active reversal from oversold zone
- Bounce From Overbought : Active reversal from overbought zone
NON-REPAINTING Structure
All visual elements and signals in this indicator are non-repainting:
- Signals use barstate.isconfirmed to fire only after bar close
- Divergence confirmation waits for pivot validation
- Trendline breaks confirm after bar close
- S/R breaks confirm after bar close
- MTF data uses lookahead off setting
- No future data is used in any calculation
What you see in backtesting accurately represents what would have appeared in real-time trading.
RISK DISCLAIMER
This indicator is provided for educational and informational purposes only. It does not constitute financial advice, investment advice, or trading advice.
Trading financial instruments involves substantial risk of loss and is not suitable for all investors. Past performance is not indicative of future results. The analysis provided by this indicator should not be relied upon as the sole basis for any trading decision.
Before trading:
- Understand you may lose some or all of your investment
- Never trade with money you cannot afford to lose
- Conduct your own research and due diligence
- Consider consulting with a qualified financial advisor
- Practice with paper trading before risking real capital
- Implement proper risk management with recommended maximum 1-2% risk per trade
By using this indicator, you acknowledge that you have read and understood this disclaimer and accept full responsibility for your trading decisions.

Trend Break Targets [MarkitTick]Trend Break Targets
Trend Break Targets is a technical analysis tool designed to assist traders in identifying trendline breakouts and projecting potential price targets based on market geometry. Unlike fully automated indicators that guess trendlines, this tool provides you with precise control by allowing you to manually Pivot Point the trendline to specific points in time, while automating the complex math of target projection and structure mapping.
Theoretical Basis & Concepts
This indicator is grounded in classic technical analysis principles found in foundational trading literature. It automates the following methodology:
Drawing a trend line between two key points to represent dynamic support or resistance.
Identifying a breakout when the price closes above or below this line, potentially signaling a change in trend.
Calculating a price target by measuring the vertical distance between the breakout line and the last high/low (pivot), then projecting that same distance in the direction of the breakout.
This concept is based on methods and "Measured Move" theories explained in classic books such as "Technical Analysis of Stock Trends" by Edwards & Magee, "Technical Analysis of the Financial Markets" by John Murphy, and in Thomas Bulkowski's Price Pattern Studies.
How It Works
Pivot Pointed Trendline Construction The script draws a trendline between two user-defined points in time (Start Date and End Date). It calculates the slope between these points and extends the line infinitely to the right, allowing you to define the exact structure (e.g., a resistance trendline on a wedge).
Breakout Detection The script monitors the "Price Source" (High, Low, or Close) relative to the extended trendline.
A Bullish Breakout (BC) occurs when the Close crosses above a bearish trendline.
A Bearish Breakout (BC) occurs when the Close crosses below a bullish trendline.
Dynamic Target Projection (The Math) Upon a confirmed breakout, the script automatically calculates three distinct targets by identifying the most significant "Swing Point" (Pivot) prior to the breakout.
Distance (D): The vertical distance between the Trendline and the Pivot Price at the specific bar where the pivot occurred.
Target 1 (T1): The Breakout Price +/- (Distance × 1.0). This represents a classic 1:1 measured move.
Target 2 (T2): The Breakout Price +/- (Distance × 1.618). Based on the Golden Ratio extension.
Target 3 (T3): The Breakout Price +/- (Distance × 2.618).
Market Structure (CHOCH) The script includes an optional Change of Character (CHOCH) module. This runs independently of the trendline logic, identifying local Swing Highs and Swing Lows based on the "Swing Detection Length." It plots dashed lines and labels to visualize immediate shifts in market structure.
How to Use This Tool
This is an interactive tool that requires user input to define the setup.
Identify a Setup: Locate a clear trend, wedge, or flag pattern on your chart.
Set Pivot Points: Go to the Indicator Settings. Input the exact Start Date and End Date corresponding to the two main touches of your trendline.
Monitor for Breakout: The script will extend the line. Wait for a "BC" label to appear.
Trade Management: Once "BC" prints, the T1, T2, and T3 lines will instantly render. These can be used as potential take-profit zones or areas to tighten stop-losses.
Settings & Configuration
Indicator Settings
Start/End Date: The timestamp Pivot Points for your trendline.
Price Source: Determines what price (High or Low) Pivot Points the line and triggers the breakout.
Pivot Left/Right: Adjusts the sensitivity for finding the "Pivot Before Break" used for target calculations.
Extend Target Line: How far forward the target lines are drawn.
Visual Style
Colors: Fully customizable colors for the Trendline, Breakout Labels, and each Target level (T1, T2, T3).
Gold Bullish Reversal
This analysis dissects a confirmed bullish reversal on Gold using a custom Trend Break system. The setup identifies a transition from a bearish corrective phase to bullish momentum, validated by a structural break and a geometric target projection.
Trend Identification (The Pivot Points) The descending white trendline serves as the primary dynamic resistance, defining the bearish correction.
Pivot Points: The line is drawn connecting two significant swing highs, marked by Label 1 and Label 2.
Logic: These points represent the "lower highs" characteristic of the previous downtrend. As long as price remained below this trajectory, the bearish bias was intact.
The Trigger: Breakout & Confirmation The transition occurs at the candle marked BC (Breakout Candle).
Breakout Criteria: The indicator logic dictates that a signal is only valid when the bar closes above the trendline. This filters out intraday wicks and ensures genuine buyer commitment.
CHOCH Confluence: Immediately following the breakout, a CHOCH (Change of Character) label appears. This signals a shift in market structure, indicating that the internal lower-high/lower-low sequence has been violated, adding probability to the reversal.
Target Projection: The Measured Move The vertical green lines (T1, T2) represent profit objectives derived from the depth of the prior move. The logic calculates the distance between the breakout line and the lowest pivot prior to the break.
T1 (Standard Target): This is a 1:1 projection of the pre-breakout volatility. We see price action initially stalling near this level, confirming it as a zone of interest.
T2 (Golden Ratio Extension): The second target is calculated as the initial distance multiplied by 1.618 (Fibonacci Golden Ratio). The chart shows the price rallying aggressively through T1 to tap the T2 zone, often considered an exhaustion or major take-profit level in harmonic extensions.
Conclusion Gold has successfully invalidated the 4-hour bearish trendline. The confluence of a confirmed close above resistance (BC) and a structural shift (CHOCH) provided a high-probability long setup. The price has now fulfilled the T2 (1.618) extension, suggesting traders should watch for consolidation or a reaction at this key Fibonacci resistance level.
Bearish Trendline Breakdown
The image displays a Bearish Trendline Breakdown on the Gold (XAUUSD) 4-hour chart. The indicator is actually functioning in "Low" mode here (connecting swing lows to form support), which triggers the bearish logic found in the code. Here is the step-by-step breakdown:
The Setup: Pivot Points & Trendline
Visual: The Blue Labels "1" and "2" connected by a white diagonal line.
Code Logic: These are the user-defined start and end points.
Pivot Point 1 (startDate): The starting pivot of the trendline.
Pivot Point 2 (endDate): The ending pivot.
Trendline: The code draws a line between these two points and extends it to the right (extend.right). In this specific image, the line acts as a Support Trendline.
The Trigger: Break Candle (BC)
Visual: The Red Label "BC" appearing just below the white trendline.
Code Logic: This is the execution signal. The code detects a "Down Break" (dnBreak) because the Price Source was likely set to "Low" and the candle's Close was lower than the Trendline Price at that specific bar (close < currLinePrice). This confirms the support level has been breached.
The Projection: Targets (T1 & T2)
Visual: The Green Labels "T1" and "T2" with dotted horizontal lines projected downward.
Code Logic: These are profit targets based on a "Measured Move."
Pivot Calculation: The script looks back for a recent "Pivot High" (the peak before the crash) to calculate the volatility/distance (dist) between that peak and the trendline.
T1 (Conservative): The price is projected downward by 1x that distance (currLinePrice - dist).
T2 (Extended): The price is projected downward by 1.618x that distance (Golden Ratio extension).
Market Context: CHOCH
Visual: The small Red/Orange "CHOCH" labels appearing above the price action.
Code Logic: This is a secondary confirmation system running independently of the trendline. It detects a Change of Character (structural shift). The red labels indicate a "Bearish CHOCH," meaning the price broke below a significant prior swing low (last_swing_low). This supports the bearish bias of the trendline break.
Disclaimer This tool is for educational and technical analysis purposes only. Breakouts can fail (fake-outs), and past geometric patterns do not guarantee future price action. Always manage risk and use this tool in conjunction with other forms of analysis.

Trend detection zero lag Trend Detection Zero-Lag (v6)
Trend Detection Zero-Lag is a high-performance trend identification indicator designed for intraday traders, scalpers, and swing traders who require fast trend recognition with minimal lag. It combines a zero-lag Hull Moving Average, slope analysis, swing structure logic, and adaptive volatility sensitivity to deliver early yet stable trend signals.
This indicator is optimized for real-time decision-making, particularly in fast markets where traditional moving averages react too slowly.
Core Features
🔹 Zero-Lag Trend Engine
Uses a Zero-Lag Hull Moving Average (HMA) to reduce lag by approximately 40–60% versus standard moving averages.
Provides earlier trend shifts while maintaining smoothness.
🔹 Multi-Factor Trend Detection
Trend direction is determined using a hybrid engine:
HMA slope (momentum direction)
Rising / falling confirmation
Swing structure detection (HH/HL vs LH/LL)
ATR-adjusted dynamic sensitivity
This approach allows fast flips when conditions change, without excessive noise.
Adaptive Volatility Sensitivity
Sensitivity dynamically adjusts based on ATR relative to price
In high volatility: faster reaction
In low volatility: smoother, more stable trend state
This ensures the indicator adapts across:
Trend days
Range days
Volatility expansion or contraction
Trend Duration Intelligence
The indicator tracks historical trend durations and maintains a rolling memory of recent bullish and bearish phases.
From this, it calculates:
Current trend duration
Average historical duration for the active trend direction
This helps traders gauge:
Whether a trend is early, mature, or extended
Probability of continuation vs exhaustion
Strength Scoring
A normalized Trend Strength Score (0–100) is calculated using:
Zero-lag slope magnitude
ATR normalization
This provides a quick read on:
Weak / choppy trends
Healthy trend continuation
Overextended momentum
Visual Design
Color-coded Zero-Lag HMA
Bullish trend → user-defined bullish color
Bearish trend → user-defined bearish color
Designed for dark mode / neon-style charts
Clean overlay with no clutter
Trend Detection Zero-Lag is built for traders who need:
Faster trend recognition
Adaptive behavior across market regimes
Structural confirmation beyond simple moving averages
Clear, actionable visual signals

VCAI Volume & Liquidity Map LiteVCAI Volume & Liquidity Map Lite visualises recent market participation using a horizontal liquidity/volume histogram plotted beside current price.
It shows where trading activity has clustered, where the chart is thin, and how much of that activity came from buying vs selling pressure.
This Lite edition keeps the tool simple and fast:
Yellow = buy-side volume (aggressive buyers / upward pressure)
Purple = sell-side volume (aggressive sellers / downward pressure)
Thicker sections = higher traded volume at that price
POC line (purple) marks the price with the highest volume concentration
Value Area lines (yellow dashed) mark where ~70% of volume has traded
Bars extend outward to the right of price for a clean, unobstructed chart
Lookback setting controls how many candles the map is built from
Use it to quickly identify:
high-interest price zones
low-liquidity areas where price can move fast
likely reaction levels
where momentum may slow, reverse, or break through
Designed as a lightweight, open-source tool for anyone wanting a clean liquidity/volume map without complex settings.
Part of the VCAI Lite Series.

TrendlinesDowntrend lines are one of the most important tools in technical analysis. A downtrend line is created by connecting a series of lower highs which forms a clear visual line where price repeatedly finds resistance. Traders use these lines to understand trend direction, time entries, plan exits, and quickly recognize when momentum is shifting.
This indicator automatically finds and maintains the strongest downtrend lines on any timeframe. It removes the guesswork and inconsistency that comes with manually drawing trendlines.
Unlike most other trendline indicators that just draw lines from swing highs to the current high, this indicator actively scans for new pivot highs, tests each potential line against live price action and only promotes a line to valid status once it has proven itself as a true trendline by price touching or respecting the line a user defined number of times, with the default set to three. This filters out noise and leaves only the most meaningful and reliable trendlines on your chart.
When price eventually breaks a respected downtrend line the indicator highlights the breakout immediately. Traders often use these moments for entries confirmation signals or to prepare for a potential shift in market behavior. The breakout alert is built directly into the indicator so you never miss an important move.
This indicator also works with the Pine Screener to find tickers with current valid trendlines.
How are trendlines determined?
The indicator begins by anchoring to the most recent pivot high. From there it draws a temporary line to the current bar and evaluates every bar between the two points.
Each time a high comes within a user selected buffer zone around that line it is counted as a touch. Once the required number of touches is confirmed and price has never exceeded the buffer to the upside the trendline becomes valid and is displayed on the chart as an active downtrend line.
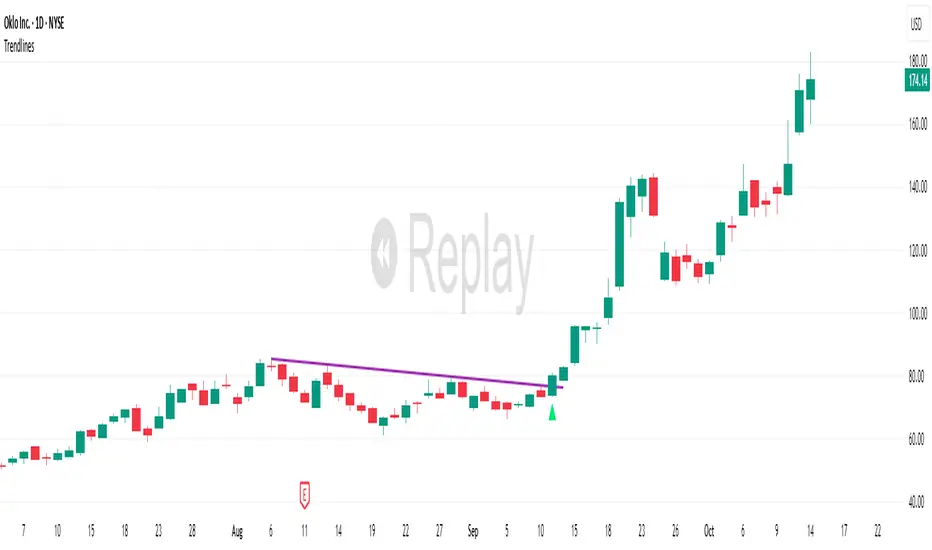
Trading Session IL7 Session-Based Intraday Momentum IndicatorOverview
This indicator is designed to support discretionary traders by highlighting intraday momentum phases based on price behavior and trading session context.
It is intended as a confirmation tool and not as a standalone trading system or automated strategy.
Core Concept
The script combines multiple market observations, including:
- Directional price behavior within the current timeframe
- Structural consistency in recent price movement
- Session-based filtering to focus on periods with higher activity and liquidity
Signals are only displayed when internal conditions align, helping traders avoid low-quality setups during sideways or low-momentum market phases.
How to Use
This indicator should be used to confirm existing trade ideas rather than generate trades on its own.
It can help traders:
- Identify periods where momentum is more likely to continue
- Filter out trades during unfavorable market conditions
- Align intraday execution with higher-timeframe bias
Best results are achieved when used alongside key price levels, higher-timeframe structure and proper risk management.
Limitations
This indicator does not predict future price movements.
Signals may change during active candles.
Market conditions may reduce effectiveness during extremely low volatility periods.
Language Notice
The indicator’s user interface labels are displayed in German.
This English description is provided first to comply with TradingView community script publishing rules.

Vdubus MacD Divergence Trend Break Signal Generator Vdubus Divergence Wave Theory v1
System Type: Momentum Trendline Breakout & Continuation Model Platform:
1. Executive Summary
The Vdubus Divergence Wave Theory v1 is a sophisticated trend-following and reversal strategy developed over a 10-year period. Unlike standard indicators that rely on simple crossovers, this system applies Price Action geometry (Trendlines) directly to Momentum (MACD).
PREVIOUS DIVERGENCE PROJECTS FUTURE TREND BREAKS/ REVERSALS !
The core philosophy is that momentum breaks trendlines before price does. By identifying compression in the MACD oscillator and trading the breakout of that compression, the system identifies high-probability entries for both Reversals and Trend Continuations.
2. Core Logic & Methodology
The indicator operates on three specific layers of logic:
A. The Engine (Modified MACD)
It utilizes a custom-tuned MACD (Moving Average Convergence Divergence) to smooth out noise while retaining responsiveness.
Fast Length: 12
Slow Length: 34 (Smoother than the standard 26)
Signal Smoothing: 5
B. Dynamic Trendline Projection (The "Divergence" Aspect)
The script uses a Pivot-based algorithm to mathematically identify peaks and troughs in momentum.
Resistance Projection: It identifies lower highs in the MACD (momentum is fading) and projects a red resistance line forward.
Support Projection: It identifies higher lows in the MACD (momentum is building) and projects a blue support line forward.
The Trigger: A signal is generated only when the MACD line physically crosses these invisible projected barriers.
C. The Wave Theory (Signal Classification)
The system distinguishes between "Reversals" and "Continuations" based on the Zero Line.
Below Zero: Considered "Bearish Territory." A break upward here is a Reversal.
Above Zero: Considered "Bullish Territory." A break upward here is Momentum Continuation (Overbought).
3. Signal Types & Visual Guide
The indicator outputs four distinct signals, color-coded for instant decision-making.
🟢 1. LONG (Standard Reversal)
Condition: MACD breaks a Resistance Trendline while Below Zero.
Meaning: Momentum has finished causing the price to drop and is reversing upward. This is often a "Buy the Bottom" signal.
Visuals: Green Box, Green "LONG" Label.
🔵 2. OB-CONT (Overbought Continuation)
Condition: MACD breaks a Resistance Trendline while Above Zero.
Meaning: The trend is already bullish, but momentum consolidated briefly before exploding higher. This indicates a "Second Wave" or trend continuation.
Visuals: Blue Box (Thick Border), Bright Blue "OB-CONT" Label.
🔴 3. SHORT (Standard Reversal)
Condition: MACD breaks a Support Trendline while Above Zero.
Meaning: Momentum has exhausted to the upside and is rolling over. This is often a "Sell the Top" signal.
Visuals: Red Box, Red "SHORT" Label.
🟠 4. OS-CONT (Oversold Continuation)
Condition: MACD breaks a Support Trendline while Below Zero.
Meaning: The trend is already bearish, but price paused briefly before dropping further. This indicates a "Waterfall" or trend continuation downward.
Visuals: Orange Box (Thick Border), Bright Orange "OS-CONT" Label.
4. Technical Settings (Inputs)
Users can adjust the sensitivity of the "Wave" detection:
Pivot Lookback Left (Default: 20): How many bars to the left the script checks to confirm a major peak/valley. Higher numbers = fewer, more significant signals. Lower numbers = more signals, potentially more noise.
Pivot Lookback Right (Default: 20): The confirmation period. A value of 20 ensures that the pivot used for the trendline is a significant structural point, not just a small blip.
5. Best Practices for Trading
The Box Break: The coloured box drawn around the signal represents the "Breakout Candle." A strong close outside this box often confirms the move.
Zero Line Authority: Pay attention to where the cross happens.
Crosses occurring near the Zero Line are often the most explosive, as they represent a full momentum shift.
Deep Continuation Signals (e.g., an OB-CONT very high up) should be treated with caution as the move might be exhausted.
Divergence Context: This tool is designed to visualize the breaking of divergence. When you see a Price making higher highs but the MACD making lower highs (Divergence), wait for the Red Line Break (Short Signal) to confirm the trade.

APEX TREND: Macro & Hard Stop SystemAPEX TREND: Macro & Hard Stop System
The APEX TREND System is a composite trend-following strategy engineered to solve the "Whipsaw" problem inherent in standard breakout systems. It orchestrates four distinct technical theories—Macro Trend Filtering, Volatility Squeeze, Momentum, and Volatility Stop-Loss—into a single, hierarchical decision-making engine.
This script is not merely a collection of indicators; it is a rules-based trading system designed for Swing Traders (Day/Week timeframes) who aim to capture major trend extensions while strictly managing downside risk through a "Hard Stop" mechanism.
🧠 Underlying Concepts & Originality
Many trend indicators fail because they treat all price movements equally. The APEX TREND differentiates itself by applying an "Institutional Filter" logic derived from classic Dow Theory and Modern Volatility Analysis.
1. The Macro Hard Stop (The 200 EMA Logic)
Origin: Based on the institutional mandate that “Nothing good happens below the 200-day moving average.”
Function: Unlike standard super trends that flip constantly in sideways markets, this system integrates a 200-period Exponential Moving Average (EMA) as a non-negotiable "Hard Stop."
Synergy: This acts as the primary gatekeeper. Even if the volatility engine signals a "Buy," the system suppresses the signal if the price is below the Macro Baseline, effectively filtering out counter-trend traps.
2. The Volatility Engine (Squeeze Theory)
Origin: Derived from John Carter’s TTM Squeeze concept.
Function: The script identifies periods where Bollinger Bands (Standard Deviation) contract inside Keltner Channels (ATR). This indicates a period of potential energy build-up.
Synergy: The system only triggers an entry when this energy is released (Breakout) AND coincides with Linear Regression Momentum, ensuring the breakout is genuine.
3. Anti-Chop Filter (ADX Integration)
Origin: J. Welles Wilder’s Directional Movement Theory.
Function: A common failure point for trend systems is low-volatility chop. This script utilizes the Average Directional Index (ADX).
Synergy: If the ADX is below the threshold (Default: 20), the market is deemed "Choppy." The script visually represents this by painting candles GRAY, signaling a "No-Trade Zone" regardless of price action.
4. The "Run Trend" Stop Loss (Factor 4.0 ATR)
Origin: Adapted from the Turtle Trading rules regarding volatility-based stops.
Function: Standard Trailing Stops (usually Factor 3.0) are too tight for crypto or volatile equities on daily timeframes.
Optimization: This system employs a wider ATR Multiplier of 4.0. This allows the asset to fluctuate naturally within a trend without triggering a premature exit, maximizing the "Run Trend" potential.
🛠 How It Works (The Algorithm)
The script processes data in a specific order to generate a signal:
Check Macro Trend: Is Price > EMA 200? (If No, Longs are disabled).
Check Volatility: Is ADX > 20? (If No, all signals are disabled).
Check Volume: Is Current Volume > 1.2x Average Volume? (Confirmation of institutional participation).
Trigger: Has a Volatility Breakout occurred in the direction of the Macro Trend?
Execution: If ALL above are true -> Generate Signal.
🎯 Strategy Guide
1. Long Setup (Bullish)
Signal: Look for the Green "APEX LONG" Label.
Condition: The price must be ABOVE the White Line (EMA 200).
Execution: Enter at the close of the signal candle.
Stop Loss: Initial stop at the Green Trailing Line.
2. Short Setup (Bearish)
Signal: Look for the Red "APEX SHORT" Label.
Condition: The price must be BELOW the White Line (EMA 200).
Execution: Enter at the close of the signal candle.
Stop Loss: Initial stop at the Red Trailing Line.
3. Exit Rules (Crucial)
This system employs a Dual-Exit Mechanism:
Soft Exit (Profit Taking): Close the position if the price crosses the Trailing Stop Line (Green/Red line). This locks in profits during a trend reversal.
Hard Exit (Emergency): Close the position IMMEDIATELY if the price crosses the White EMA 200 Line against your trade. This prevents holding a position during a major market regime change.
⚙️ Settings
Momentum Engine: Adjust Bollinger Band/Keltner Channel lengths to tune breakout sensitivity.
Apex Filters: Toggle the EMA 200 or ADX filters on/off to adapt to different asset classes.
Risk Management: The ATR Multiplier (Default 4.0) controls the width of the trailing stop. Lower values = Tighter stops (Scalping); Higher values = Looser stops (Swing).
Disclaimer: This script is designed for trend-following on higher timeframes (4H, 1D, 1W). Please backtest on your specific asset before live trading.

Dynamic Support and Resistance with Trend LinesMain Purpose
The indicator identifies and visualizes dynamic support and resistance levels using multiple strategies, plus it includes trend analysis and trading signals.
Key Components:
1. Two Support/Resistance Strategies:
Strategy A: Matrix Climax
Identifies the top 10 (configurable) most significant support and resistance levels
Uses a "matrix" calculation method to find price levels where the market has historically reacted
Shows these as horizontal lines or zones on the chart
Strategy B: Volume Extremes
Finds support/resistance levels based on volume analysis
Looks for areas where extreme volume occurred, which often become key price levels
2. Two Trend Line Systems:
Trend Line 1: Pivot Span
Draws trend lines connecting pivot high and pivot low points
Uses configurable pivot parameters (left: 5, right: 5 bars)
Creates a channel showing the trend direction
Styled in pink/purple with dashed lines
Trend Line 2: 5-Point Channel
Creates a channel based on 5 pivot points
Provides another perspective on trend direction
Solid lines in pink/purple
3. Trading Signals:
Buy Signal: Triggers when Fast EMA (9-period) crosses above Slow EMA (21-period)
Sell Signal: Triggers when Fast EMA crosses below Slow EMA
Displays visual shapes (labels) on the chart
Includes alert conditions you can set up in TradingView
4. Visual Features:
Dashboard: Shows key information in a table (top-right by default)
Visual Matrix Map: Displays a heat map of support/resistance zones
Color themes: Dark Mode or Light Mode
Timezone adjustment: For accurate time display
5. Customization Options:
Universal lookback length (100 bars default)
Projection bars (26 bars forward)
Adjustable transparency for different elements
Multiple calculation methods available
Fully customizable colors and line styles
What Traders Use This For:
Entry/Exit Points: The EMA crossovers provide clear buy/sell signals
Risk Management: Support/resistance levels help set stop-losses and take-profit targets
Trend Confirmation: Multiple trend lines confirm trend direction
Key Price Levels: Identifies where price is likely to react (bounce or break through)
The indicator is quite feature-rich and combines technical analysis elements (pivots, EMAs, volume, support/resistance) into one comprehensive tool for trading decisions.

QuantMotions - TPR Sentinel LineTPR Sentinel Line is an advanced adaptive Support/Resistance system that combines multi-layered trend analysis with a directional Time-Price Ratio (TPR) engine. The indicator dynamically builds a stabilized support or resistance line that adjusts to market volatility, trend strength, ATR expansion and contraction, and real-time slope changes.
This creates a high-precision, self-adjusting trend barrier that acts as support in uptrends, resistance in downtrends, and a neutral anchor during sideways phases.
Key Features
✔ Adaptive Trend Base
- A composite trend model blending:
- Kijun-style midpoint
- Donchian midline
- SMA & EMA smoothing
This creates a stable baseline that reacts smoothly but reliably to structural trend shifts.
✔ Directional TPR Calculation
The indicator measures slope across short, medium, and long trend windows, normalizes it with ATR, and determines:
- Trend direction
- Trend strength
- Momentum quality
✔ Dynamic Support/Resistance Line
Depending on trend direction:
- In uptrends → the line becomes adaptive support
- In downtrends → the line becomes adaptive resistance
- In neutral phases → the line centers around the smoothed trend base
A built-in lag factor prevents unrealistic jumps and keeps the level stable.
✔ Automatic Support/Resistance Zones
The indicator expands the main line into upper and lower zones based on ATR and trend strength, creating a dynamic volatility envelope around the trend structure.
✔ Signals & Alerts
- Support bounce
- Resistance rejection
- Breakouts above/below the dynamic line
These events help identify high-probability continuation or reversal moments.
✔ Information Panel
A real-time status table displays:
- Trend direction
- Trend strength
- Current S/R level
🎯 Ideal For
- Precision entries on pullbacks
- Detecting trend shifts earlier
- Identifying strong or weak trend phases
- Adaptive take-profit and stop-loss zones
- Filtering false breakouts
💡 Summary
TPR Sentinel Line gives you a living, breathing support/resistance structure that evolves with the market.
Instead of relying on static levels, you get a continuously adapting trend barrier that reflects real strength, real volatility, and real momentum.
A powerful tool for traders who want structure, clarity, and trend confidence.

Trend Line Methods (TLM)Trend Line Methods (TLM)
Overview
Trend Line Methods (TLM) is a visual study designed to help traders explore trend structure using two complementary, auto-drawn trend channels. The script focuses on how price interacts with rising or falling boundaries over time. It does not generate trade signals or manage risk; its purpose is to support discretionary chart analysis.
Method 1 – Pivot Span Trendline
The Pivot Span Trendline method builds a dynamic channel from major swing points detected by pivot highs and pivot lows.
• The script tracks a configurable number of recent pivot highs and lows.
• From the oldest and most recent stored pivot highs, it draws an upper trend line.
• From the oldest and most recent stored pivot lows, it draws a lower trend line.
• An optional filled area can be drawn between the two lines to highlight the active trend span.
As new pivots form, the lines are recalculated so that the channel evolves with market structure. This method is useful for visualising how price respects a trend corridor defined directly by swing points.
Method 2 – 5-Point Straight Channel
The 5-Point Straight Channel method approximates a straight trend channel using five key points extracted from a fixed lookback window.
Within the selected window:
• The window is divided into five segments of similar length.
• In each segment, the highest high is used as a representative high point.
• In each segment, the lowest low is used as a representative low point.
• A straight regression-style line is fitted through the five high points to form the upper boundary.
• A second straight line is fitted through the five low points to form the lower boundary.
The result is a pair of straight lines that describe the overall directional channel of price over the chosen window. Compared to Method 1, this approach is less focused on the very latest swings and more on the broader slope of the market.
Inputs & Menus
Pivot Span Trendline group (Method 1)
• Enable Pivot Span Trendline – Turns Method 1 on or off.
• High trend line color / Low trend line color – Colors of the upper and lower trend lines.
• Fill color between trend lines – Base color used to shade the area between the two lines. Transparency is controlled internally.
• Trend line thickness – Line width for both high and low trend lines.
• Trend line style – Line style (solid, dashed, or dotted).
• Pivot Left / Pivot Right – Number of bars to the left and right used to confirm pivot highs and lows. Larger values produce fewer but more significant swing points.
• Pivot Count – How many historical pivot points are kept for constructing the trend lines.
• Lookback Length – Number of bars used to keep pivots in range and to extend the trend lines across the chart.
5-Point Straight Channel group (Method 2)
• Enable 5-Point Straight Channel – Turns Method 2 on or off.
• High channel line color / Low channel line color – Colors of the upper and lower channel lines.
• Channel line thickness – Line width for both channel lines.
• Channel line style – Line style (solid, dashed, or dotted).
• Channel Length (bars) – Lookback window used to divide price into five segments and build the straight high/low channel.
Using Both Methods Together
Both methods are designed to visualise the same underlying idea: price tends to move inside rising or falling channels. Method 1 emphasises the most recent swing structure via pivot points, while Method 2 summarises the broader channel over a fixed window.
When the Pivot Span Trendline corridor and the 5-Point Straight Channel boundaries align or intersect, they can highlight zones where multiple ways of drawing trend lines point to similar support or resistance areas. Traders can use these confluence zones as a visual reference when planning their own entries, exits, or risk levels, according to their personal trading plan.
Notes
• This script is meant as an educational and analytical tool for studying trend lines and channels.
• It does not generate trading signals and does not replace independent analysis or risk management.
• The behaviour of both methods is timeframe- and symbol-agnostic; they will adapt to whichever chart you apply them to.

Slope Rank ReversalThis tool is designed to solve the fundamental problem of "buying low and selling high" by providing objective entry/exit signals based on momentum extremes and inflection points.
The System employs three core components:
Trend Detection (PSAR): The Parabolic SAR is used as a filter to confirm that a trend reversal or transition is currently underway, isolating actionable trade setups.
Dynamic Momentum Ranking: The indicator continuously measures the slope of the price action. This slope is then ranked against historical data to objectively identify when an asset is in an extreme state (overbought or oversold).
Signal Generation (Inflection Points):
Oversold/Buy: A 🟢 Green X is generated only when the slope ranking indicates the market is steeply negative (oversold), and the slope value begins to tick upwards (the inflection point), signaling potential mean reversion.
Overbought/Sell: A 🔴 Red X is generated only when the slope ranking indicates the market is steeply positive (overbought), and the slope value begins to tick downwards, signaling momentum exhaustion.
The core philosophy is simple: Enter only when the market is exhausted and has started to turn.